W03 Assignment: Rafting Site – About Us Page
Overview
The assignment this week introduces a multi-page website project about a white water rafting company that you will work on for the next few weeks in this course. You will begin by building one of the pages on the site, "About Us". This page provides an overview of the purpose of the website, history, and other promotions for the company.
Instructions
Introduction – The Rafting Site
The rafting site assignment is a multi-week project. You will start developing the site by building one of the pages, the About Us page. This website represents a fictional, white water rafting company.
- Read the rafting site description to get an overview of the project and to see examples of real companies that do this type of business.
Folder and File Setup
- In VS Code, be sure you have your wdd130 directory open and add a sub-folder named "wwr" (wwr stands for "white water rafting"). This folder will contain all the pages and assets required for the website.
-
Add two subfolders within the wwr folder named "images" and
"styles".
Do not be confused that you already have root level (wdd130) folders named images and styles. These new folders are specifically for your rafting website project and are contained within the wwr project sub folder.
- Add a file named "about.html" in the wwr directory.
Develop the Page Structure: HTML
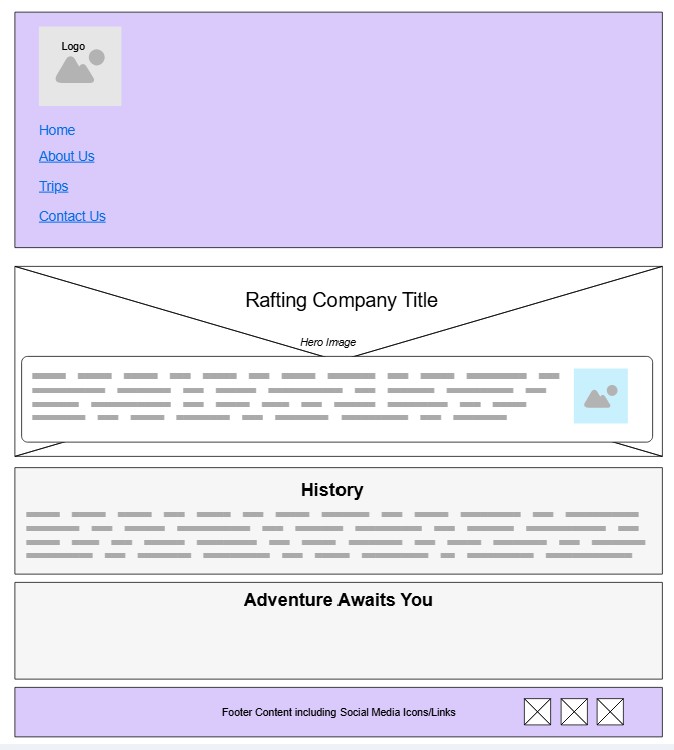
Use the following wireframe/sketch design as a guide to develop your page structure, layout, and style for this about.html page.
- In your about.html document, begin writing the necessary HTML structure by starting with
the
headwith its standard, requiredmetaandtitlecontent. - Add a
metadescriptionto theheadwith concise content that is an enticing summary of what the web page is about. - Add a
metaauthorelement with the content being your full name. - In the
bodyparent tag, add the following elements:header,main, andfooter. - The
headercontains two (2) items:- A rafting site logo that you have created or that you have downloaded from the
choices provided at WWR Sample Logos
Check Your Understanding
Remember that your logo image and all images used on the site need to be located in a images directory within the wwr directory. In addition, all images must be optimized (<= 125kB) and have an appropriate alt attribute. - A
navelement with four (4) child<a>tags with associated text content. Thehrefattribute values, the page references, can be set now even though the pages do not all exist yet.- index.html (the future home page of wwr, not to be confused with the course home page.)
- about.html
- trips.html
- contact.html
Check Your Understanding
or using a list is considered to be better practice, semantically.<nav> <a href="index.html">Home</a> <a href="about.html">About Us</a> <a href="trips.html">Trips</a> <a href="contact.html">Contact Us</a> </nav><nav> <ul> <li><a href="index.html">Home</a></li> <li><a href="about.html">About Us</a></li> <li><a href="trips.html">Trips</a></li> <li><a href="contact.html">Contact Us</a></li> </ul> </nav>
- A rafting site logo that you have created or that you have downloaded from the
choices provided at WWR Sample Logos
- The
mainelement should contain the following three (3) elements:- A
divwith a class ofherothat contains these items:- A hero image
imgthat will be in the entire background of thedivbackground.Be sure to pick an image that is large enough in dimensions to cover the entire
divbackground.Help: Image Resources- Course Rafting Image Repository
- Web Frontend Resources – see Images and Graphics section.
All images used on your site must be optimized which means not pixelated and less than or equal to 125kB in size.
- A
h1element that has the title of the rafting company as the text content. - An
articleelement that contains:- A smaller
imgelement that portrays a happy client or happy, working employee. - A
pelement with the company purpose, mission, creed, motto, etc. It is OK to use non-sense, placeholder language for now.
- A smaller
- A hero image
- A
sectionelement with the following contents:- A
h2element with a section titled "History". - A
pelement with a brief history of the company. It is OK to use nonsense language.
- A
- A
sectionelement with the following contents.- A
h2element with a section titled "Adventure Awaits You!".In the next assignment, you will add images to this section. For now, this section content is empty.
- A
Check Your Understanding
<main> <div class="hero"> <img src="images/..." alt="..."> <h1>Rafting Company Name</h1> <article> <img src="images/..." alt="..."> <p>Lorem ipsum dolor sit amet consectetur ...</p> </article> </div> <section> <h2>History</h2> <p>Lorem ipsum dolor sit amet consectetur adipisicing ...</p> </section> <section> <h2>Adventure Awaits You!</h2> </section> </main> - A
- A
footerelement that contains:- A
pparagraph element containing a copyright symbol, the year, the rafting company name, and your name. - A
navelement with a class assignment ofsocialmediathat contains three (3)imgelements that are encased byaanchor elements pointing to three different social media outlets. The links can be generic.Example
<nav class="socialmedia">
  <a href="https://facebook.com">
    <img src="images/facebook.svg" alt="Facebook Icon">
  </a>
  <a href="https://linkedin.com">
    <img src="images/linkedin.svg" alt="LinkedIn Icon">
  </a>
  <a href="https://instagram.com">
    <img src="images/instagram.svg" alt="Instagram Icon">
  </a>
</nav>
- A
Example
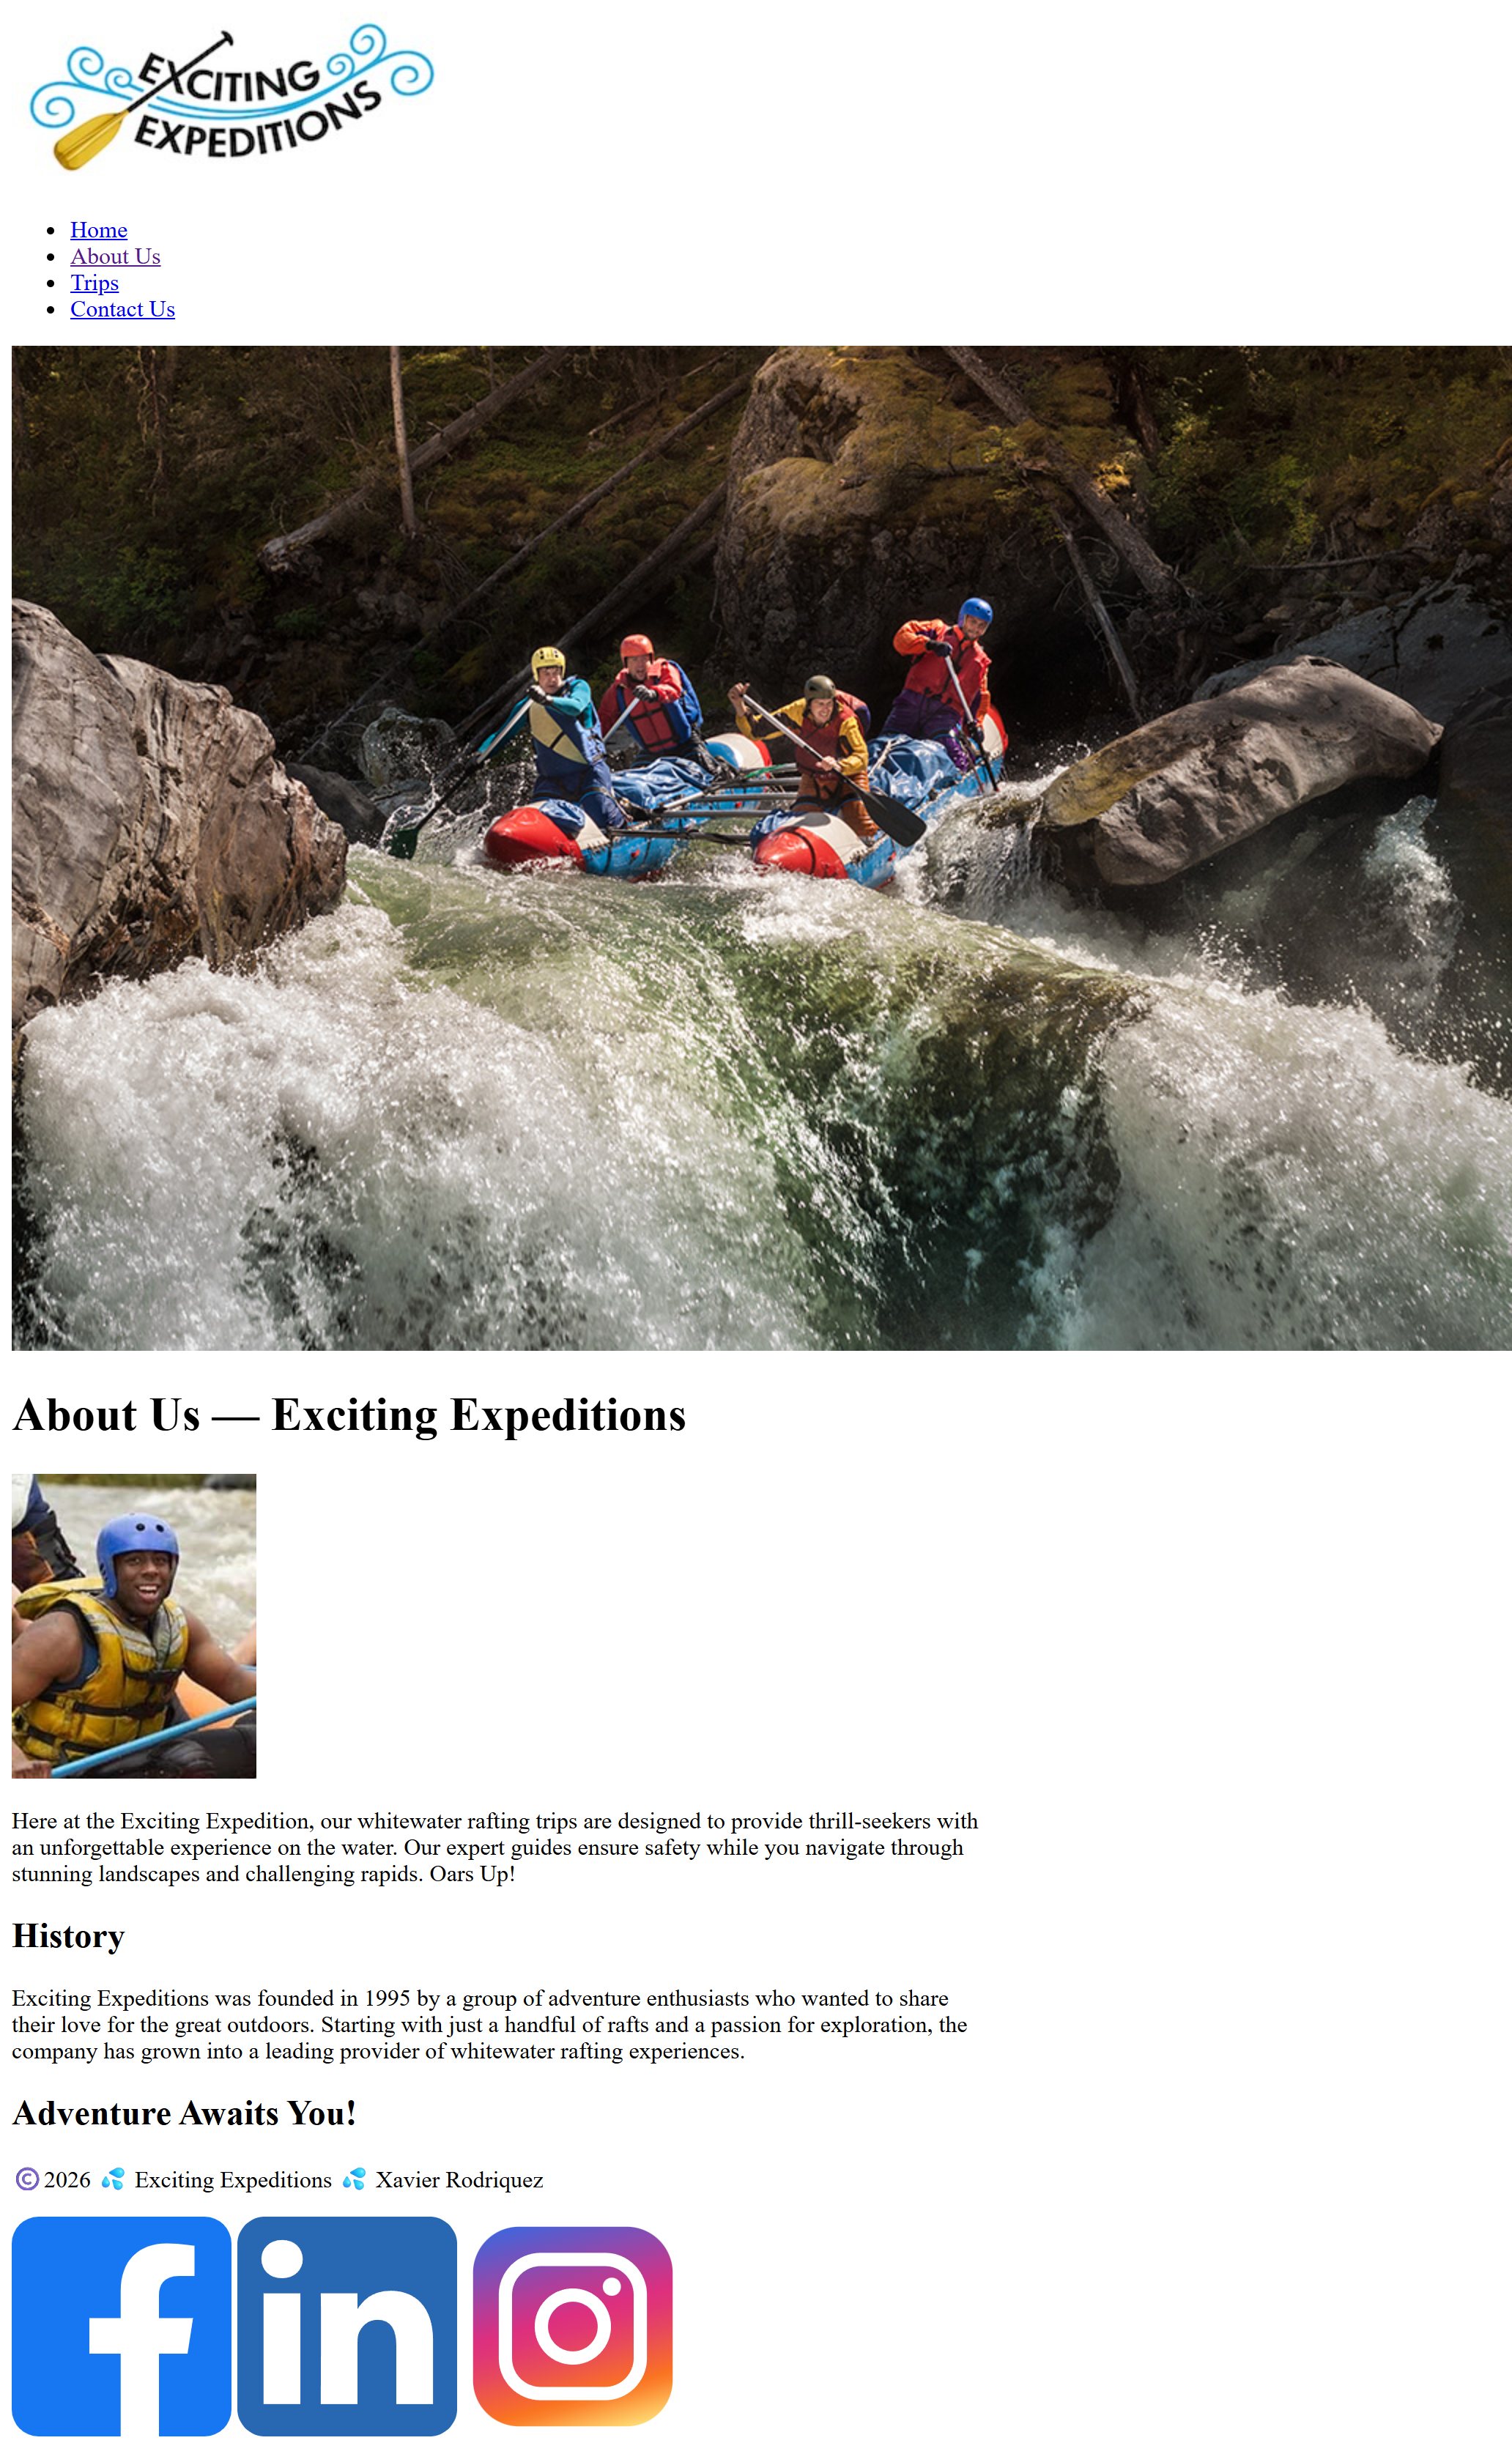
Here is an example of what the page looks like rendered in a browser to this point:
Write the CSS
- Create a CSS file for your rafting site named "rafting.css" and store it in the styles folder within the wwr folder.
- Link the CSS file to your about.html page using the
<link>element in the<head>of your HTML document.Check Your Understanding
<link rel="stylesheet" href="styles/rafting.css"> - Define CSS variables in the document
:rootpseudo-class selector at the top of your rafting.css file by using a color scheme of your choice. This means choose colors that work well together providing enough contrast when used together.Check Your Understanding
The following is just an example. Use your own colors and fonts that you selected and referenced.
:root {
  --primary-color: #055a05; /* forest green */
  --secondary-color: #f4a261; /* warm sand */
  --accent1-color: #264653; /* dark slate blue */
  --accent2-color: #e9c46a; /* light golden yellow */
  --heading-font: "Times New Roman", "Georgia", serif;
  --body-font: Arial, Helvetica, sans-serif;
}
The fonts used in this example are classic serif and san-serif fonts that provide a formal and traditional look, they are generally available to all modern browsers.
You will use these variables in your CSS rules.
For example, to set the header background color to use the primary-color and the foreground color (font color) to --accent2-color:
header { background-color: var(--primary-color); color: var(--accent2-color); } - Reset the CSS box-model properties for all elements to zero (0) using the universal selector and these
declarations:
* { margin: 0; padding: 0; box-sizing: border-box; } - Style the entire document
bodytext content to use thebody-fontCSS variable. Also add a CSS declaration to set the text color for the content.body { font-family: var(--body-font); color: var(--accent1-color); } -
Limit the page width by combining the
header,main, andfooterelements and center the content on the display using an auto left-right margin.header, main, footer { width: 840px; margin: 0 auto; }This CSS selector
header, main, footer {targets three different HTML elements simultaneously by using a comma to specify each of these child elements of the document body. - Style the headings (all or just those you are using) by declaring the
font-familyand textcolor.h1, h2 { font-family: var(--heading-font); color: var(--primary-color); } - Style some basic, consistent
marginandpaddingdeclarations for thenav, paragraph,section, andarticleelements.nav, p, section, article { margin: 16px; padding: 8px; } - Remove the underlines from the social media image links in the
footer.
This default underline on hyperlinks is considered to be visually distracting and unnecessary when applied to images as links..socialmedia a { text-decoration: none; }The descendant selector
( .socialmedia a )only applies to anchor tags (a) that are children of elements with thesocialmediaclass and not to all anchor tags.
Style the Hero Div with Overlays
The following image is an example of the overlay.
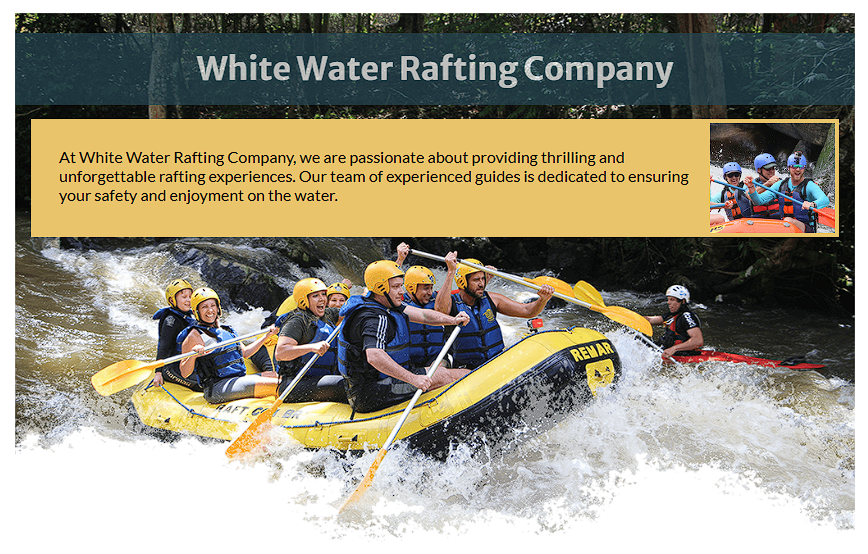
- Style the
divwith the class ofherowith arelativevalue so that its children elementsh1andarticlecan be positioned over the topabsolutewithin thatdiv.Check Your Understanding
.hero { position: relative; } - Style the image within the
div class="hero"to fill the entire width of thedivand to be a block element. This is important because the image is the background of the hero div and it needs to fill the entire width of the div..hero img { display: block; width: 100%; height: auto; }The image should be large enough to fill the space without being pixelated or distorted because its intrinsic size is too small to fill the space.
We use height auto in order to maintain the aspect ratio of the image based upon the given width, in this case, 100% of the container.
- Style the
h1heading using apositionthat isabsoluteand decide where to position over the image so that it fits. The example given above uses the following CSS declarations:h1 { position: absolute; top: 20px; width: 100%; padding: 16px; text-align: center; opacity: 0.7; background-color: var(--accent1-color); color: #fff; /* white text – make sure there is enough contrast with the background-color */ } - Style the
articleusing absolute positioning and a style of your choice. - Style the
imginside the article by floating it to the right and providing some margin and a specific width. The CSS for this image is important as we need to be specific to only this image on the page. The example above uses the following CSS:
You may wish to add other styling to the image such as a.hero article img { float: right; width: 125px; }border,margin,box-shadow, etc., depending upon your image and design.
Help: Example Page Screenshot
Click
here to see another example of what the page will look like at this point.
Your page will have
different colors, fonts, content, and images than the example page, but at this point it should have a similar
layout.
Testing
- Test your work continuously as you work through the steps by having your page loaded in your local browser
using Live Server or Five Server.
You do not need to be connected to the internet while using a local server to test your pages locally during development.
- Commit your changes and sync them to your wdd130 GitHub Pages enabled repository.
- Audit your page using the ✔ Page Audit tool to verify that you have the basic document content.
- Make corrections as needed and be sure to recommit and sync your updated work as needed.
Submission
- Submit your GitHub Pages enabled URL address in Canvas. Here is an example of the URL you
will submit.
https://yourgithubusername.github.io/wdd130/wwr/about.html