W04 Activity: Regression and Integration Tests
Overview
The developers have finally figured out how to connect the web site to a live weather data source and are ready to test it out. The developers have also moved the information about the member directory from a static file deployed with the web site to an API call that reads data from a back-end system. The requirements of the system haven't changed, but their implementation has! This means we need to do a regression test.
Your are tasked with creating new test cases to include manual integration tests that will verify the interactions between the web site and the weather API, as well as interactions between the web site and the new directory data web service. You must also decide which of your test cases should be run in consideration of the changes to the system that have been made. This is called a limited regression test.
Preparation
To complete the regression and integration tests you will need to setup some testing tools and and test environment. Complete the following Activities.
Installing the Source Code
Typically, the developers will give you an installation package of some kind to install on your local environment, or it will be installed automatically on a dedicated testing environment. Today you will receive a .zip file which contains all the files you need to run the web site.
Download the code to test here:
Extract the files to a well known location on your computer. This will create a folder called cse270 with the files you need. If you are unsure how to extract files from a ZIP archive, ask a classmate or your instructor for assistance. Then click these links and follow those instructions.
Part 1: Create test plan
Instructions
You must have completed the previous activity W04 Activity: End to End Testing before beginning this activity. Using the information in the Teton Chamber of Commerce Requirements v 1.1 Document. This test plan will include 2 new test cases one for each integration (weather and data). It will also include selected tests from each component to perform a limited regression test.
Create New test cases
Create test cases to validate the APIs
- Create a new folder in Test Cases called Integration Tests
- Create a test case for the weather integration. Include steps to test the API using Postman, and compare the returned data to the data displayed on the web page.
- Create a test case for the Directory Data API. Include steps to use the browser developer tools to compare the data returned by the API to that displayed on the web page.
Create a Test Plan
Create a test plan that will validate the two API services and perform a limited regression test
- Create a new folder in Test Plans called Integration Tests.
- Create a test plan called Integration and Regression Test Plan in the new folder.
-
Add the following test cases
- The Weather API test case just created.
- The Data Directory API test case just created
-
Select existing test cases to perform a limited regression test. Use your test cases for the following
requirements.
-
Common 1.2.1 Given the visitor is browsing any page of the site,
when the visitor views the site header in the screen view
then the link to the home page is clearly visible,
and the link to the join page is clearly visible
and the link to the directory page is clearly visible. -
Home Page 2.2.1 Given the visitor is browsing the site home page,
when the user view the hero image described
then a button labeled “Join Us” will be prominently displayed over the hero image
and clicking the “Join Us” button will take the user to the join page -
Join Page 3.2.1 Given the visitor is browsing the site join page
when the user views the page
then a field for first name will be displayed
and the user cannot submit the form when the first name field is empty -
Directory Page 4.1.2 Given the user is browsing the directory page
when the user views the directory page
and the user clicks on the “list” button
then a list of members of the chamber of commerce is visible
and clicking the link to the member’s website will open the site in a new tab
-
Common 1.2.1 Given the visitor is browsing any page of the site,
Document your test plan
Create a PDF of the new test plan you have created
- Click on the Test Plans tab at the top of RTM.
- In the Folder view, choose the Integration Tests folder you have created.
- Inside the Integration Tests folder should be the new test plan you have created. Select the test plan by clicking on it.
-
Click the Issue Key in the details portion of the page. This will display the detailed Test Plan in a new page.
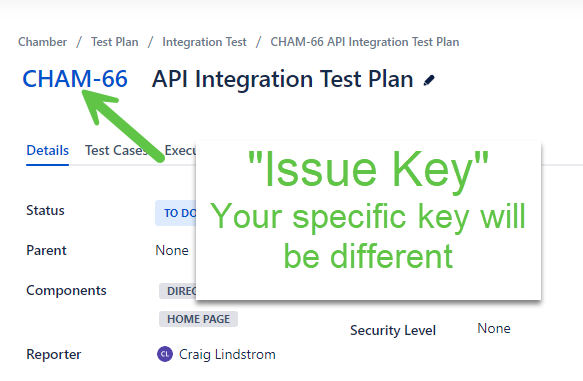
Issue Details - Using your browser, print this page to a PDF file by choosing Print.. then selecting "Save as PDF" in the destination drop down.
- You will submit this file as part of your assignment submission.
Part 2: Execute the test
Instructions
- If you need a reminder, refer to the page W03 Activity: Using RTM to Execute Tests and Report Results for specific instructions on how to execute tests and report results as required below.
- Using RTM, create a new folder for your Week 4b test plan execution. The folder name should follow the pattern of previous weeks with your name and the week (in this case 4b).
- This test will require you start your local test environment as instructed in the prepare portion of this assignment. Make sure the data service is started.
-
Using RTM, create a new test execution for the
API integration and limited
regression
Plan.
Make sure you put the test executions in the folder you just created.
-
Execute all the test cases in your regression plan.
- Execute your tests against the 1.2 version of the Teton Chamber of Commerce web site on your local test environment.
-
Use Postman to conduct the integration test against the Weather API. For more information see the page
W04 Activity: Integration Testing Tools and
Techniques
- Take a screenshot of your test that shows the URL and the API response in Postman.
-
Use your browser Developer Tools to conduct the integration test against the Directory Data Service. For
more information see the page
W04 Activity:
Integration Testing Tools and Techniques
- Take a screenshot of your test in the browser that shows the API response
- Document the results of executing the tests in the RTM execution you created indicating pass or fail for each test.
-
If a test fails, generate a defect report by following the instructions in W04 Activity: Creating A Defect Report in RTM and
include the following information:
- Priority (use the provided field in RTM)
-
Summary of the error (bug title).
- Make sure this title is brief, but descriptive enough so the instructor can tell which defect this report is addressing.
- Procedure steps to reproduce the error
- Expected results / Actual Results
- Any other relevant notes about the environment (for example, which browser was used, etc.)
-
In the Defects tab, create a Week 4b folder under your name
- Be sure to put each defect in the folder with your name and week 4b as explained earlier
Note: Both of these integration tests have errors. If you want a fun challenge, use the information provided about the expected API response found in W04 Activity: Integration Testing Tools and Techniques to troubleshoot the problem. This is NOT required but, you just might enjoy it!
- Execute the remainder of the regression tests as you have done before.
Prepare Documentation
-
Generate a PDF report of the Test Executions
- From the dashboard, choose Reports, then Test Executions.
- In the Test Executions Report page, choose the Test Execution Folder that contains your execution for this assignment (4b).
- This will generate a report that includes your test execution from Week 4b.
- Remember to click over to the Details view before generating.
-
Generate a PDF printout of your Week 4b Defects folder
-
Go to the Defects tab and choose the folder where you have placed your week 4b defects.
- This will display a list of all the defects you created.
- Be sure the title of each defect is descriptive enough to allow me to determine what defect you found.
- In your browser menu, choose Print... then "Save as PDF" for the print destination.
-
Go to the Defects tab and choose the folder where you have placed your week 4b defects.
Submission
Submit the following artifacts in canvas.
- Test plan document created in part 1
- Test executions report from part 2
- Defect reports from part 2
- Submit the two screenshots you created using Postman and Chrome Dev tools for your integration tests. Your screenshot should clearly show the test setup and response received from the server.
Useful Links:
- Return to: Week Overview | Course Home | Canvas