W05 Activity: Conducting a Load Test
Overview
Stress testing is an important part of determining if a system is ready to handle the load that is expected to be placed on it. Testers can use special applications to simulate multiple users hitting the system at the same time. If we put more than the usual load on the system, this is a stress test. If we put only the normal amount of load on the system and observe the behavior this is a load test. If we elevate the load on the system and run the test for an extended period of time this is called a soak test or a longevity test.
Today, we are going to use the Postman tool to conduct a load test and a stress test on our system in our local testing environment. Why not in production?
Doing load tests and stress tests against production environment can be very problematic. In the first place, it wastes resources and can be costly in cloud environments where you pay per compute. Also, it can have an unintended side-effect of slowing down your production site which impacts customers and may lose the company money. For this reason, it is best to conduct these tests against a dedicated production-similar environment.
In this module we will test the two non-functional requirements below:
- As the chamber of commerce, I want the website server to respond with an average response time of less than 50 milliseconds under average load (5 simultaneous users).
- As the chamber of commerce, I want the website server to respond with an average response time of less than 100 milliseconds under peak load (100 simultaneous users).
Instructions
Setup the Local Test Environment
Configure your test environment as follows (If you need a refresher view W04 Activity: Setup a Local Test Environment):
- Use this updated zip instead of the one found in the Week 04 instructions cse270-v13.zip
-
Verify/Update the config.js so that apiURL points to WEATHER_URL_STUB (so we don't call the weather API in
production) file and the
businessDataUrl to point to DIRECTORY_DATA_URL_TEST (so we are using our local directory data service for the
test). Confirm the following
settings:
- apiURL = WEATHER_URL_STUB
- businessDataUrl = DIRECTORY_DATA_URL_TEST
-
The file should look as follows:
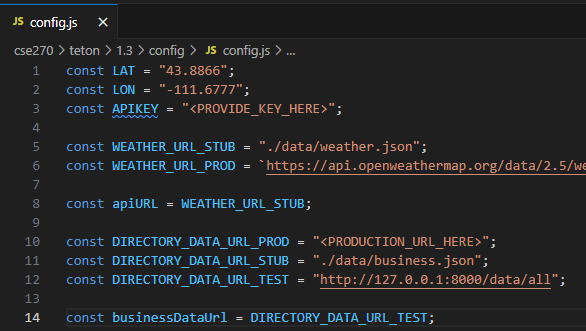
config.js file
-
Start the web server by selecting the index.html file then clicking the "Go
Live" button in VS Code.
Note: This should open the home page in your web browser. Notice the URL in the browser, this is the URL of your test site. It may differ slightly from the URL in the instructions. Port 5500 is the default port that Live Server runs on. Depending on your environment, you may have to change the URL of your test to 5501 or something else. Check the port number at the bottom right of your VS Code after clicking the "Go Live" link.

VS Code status bar -
Start the directory data service by opening a terminal and issuing the following commands:
-
Windows
cd directorydata_service python manage.py runserver -
Mac
cd directorydata_service
python3 manage.py runserver
-
Windows
- Your test server is running and ready for testing.
Postman Setup
- Open Postman, which you previously installed in W04 Activity: Integration Testing Tools and Techniques
-
Click on the Collections icon in the left hand navigation, and choose Create
Collection. This creates a
collection for you to organize tests that run together.
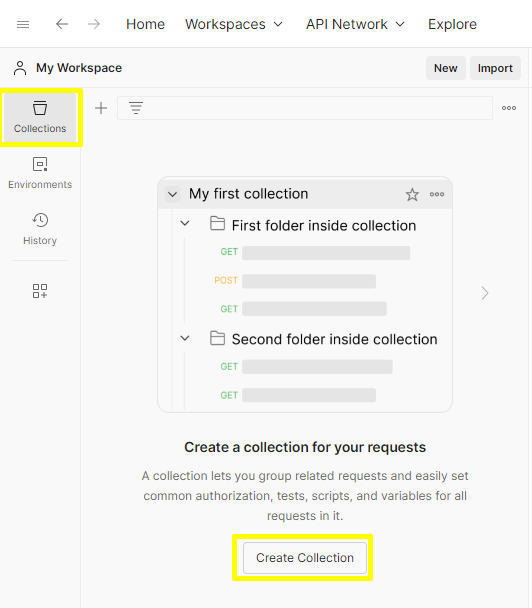
Postman Collections - Rename your collection to Web Site Test by clicking the three dots next to the collection name and choosing Rename from the menu.
- Create a new request by clicking the Add a request link as shown.
- Create the request as shown below by putting the URL http://localhost:5500/teton/1.3/index.html (or whatever URL is appropriate for your test site) in the request text box.
- Update the name of the request and call it Home Page Request.
-
Important: Click the Save button so your changes are saved.

Postman request
Running Tests
Ensure your test site is running and conduct the test.
-
In Postman, highlight the Web Site Test collection you created, then click the Run button on the right hand
side.
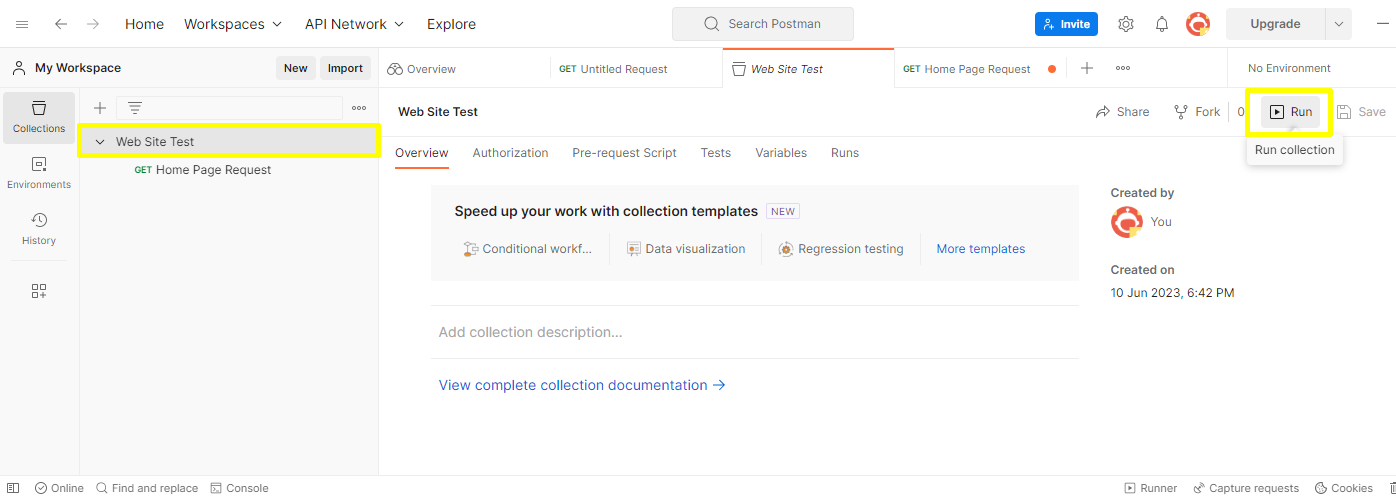
Postman Collections Screen Run - In the Runner tab, click the Performance link as shown.
- To set up the load test set the Virtual Users to 5 as in requirement 10.10, and set the test duration to 1 minute. In this case, the load profile can be fixed because we are simulating normal usage for the full one minute.
-
Click the orange Run button to start the test.
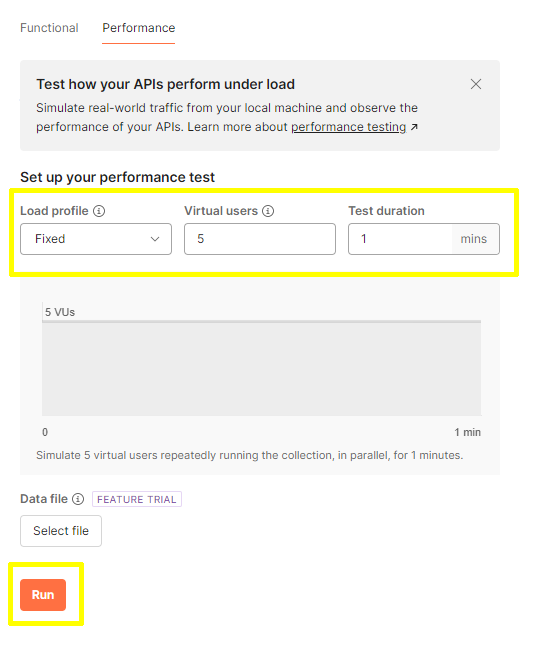
Postman Load Test Screen -
After running for a minute, you should see a graph that looks similar to this:
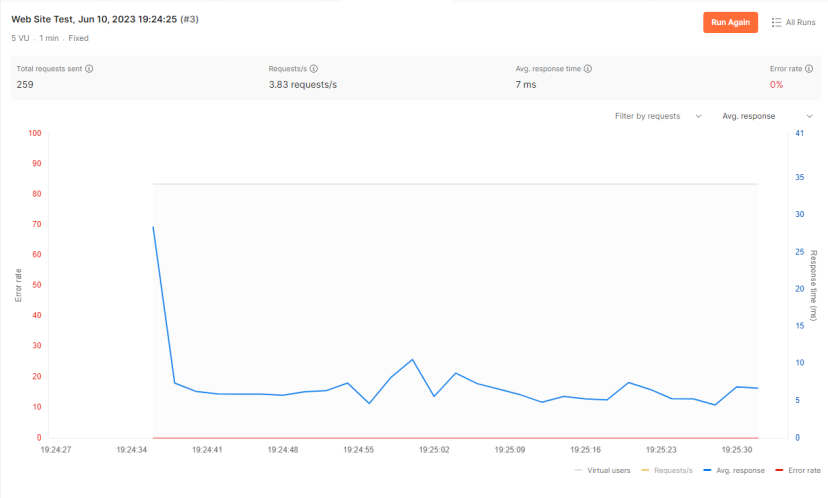
Load Graph Take a screen shot of your test results including the graph, performance data, and date and time. Save it as home-load-test.jpg (or whatever extension it saves as)
Test summary -
From this graph you can see that for this run, the average response time was 7ms with average of 3.83 request/s.
The little spike at the beginning of the graph is somewhat typical - the beginning of a load test can be slow while things get warmed up for the first time.
- To conduct at stress test, we need to change the parameters of the test a little.
- Start a new test as we did before, but with new values.
-
This time, when we start the test we are going to use 100 virtual users (which is the limit
Postman will allow). The
test duration will be 2 minutes, but we will ramp the test up over time. See the example below.
Allowing the test to ramp
up simulates load that builds gradually, then we see how the system performs under this peak load for a period
of time.
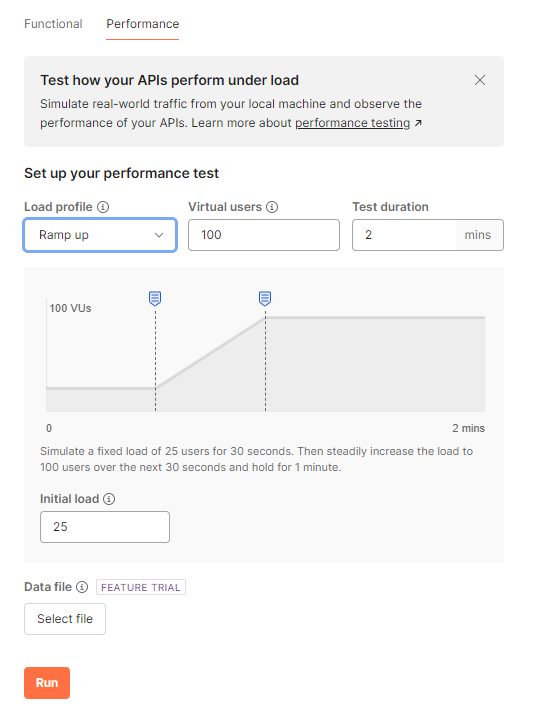
Stress test settings - Run your test, and observe your results. You should get a graph similar to one below.
-
You are likely to observe some larger spikes in response times, and a much higher overall average response time.
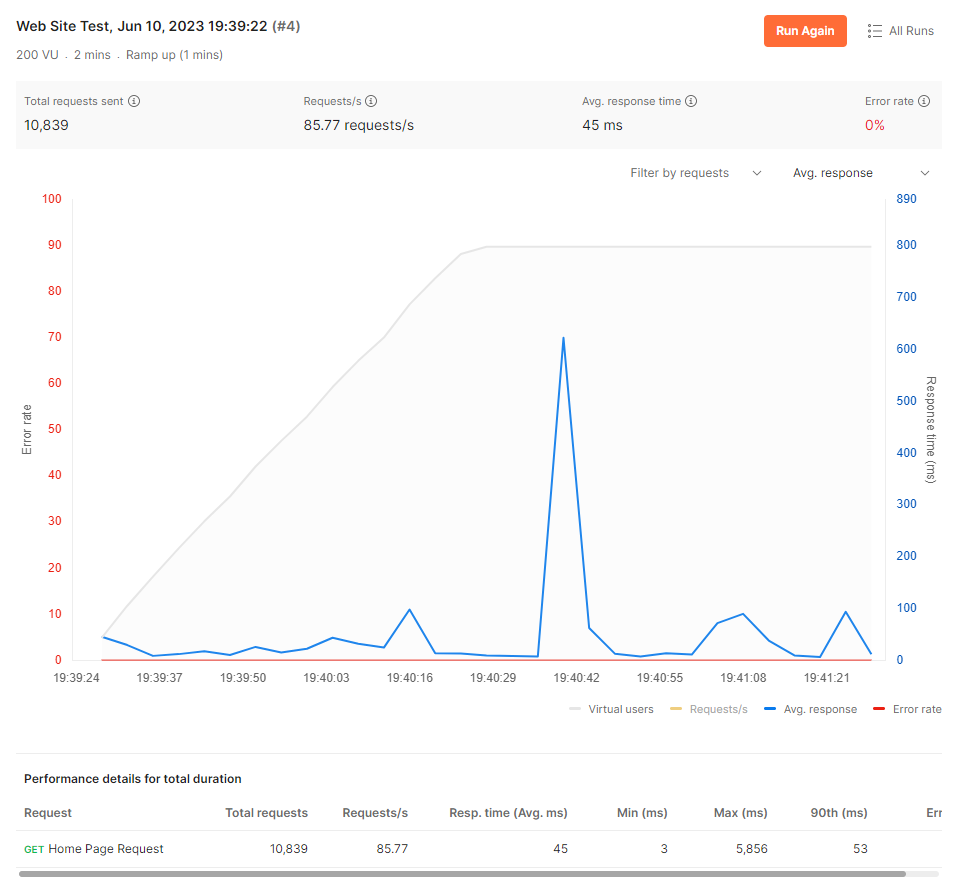
Stress test results Take a screen shot of your test results including the graph and date and time and save it as home-stress-test.jpg (or whatever extension it saves as)
-
Create a load test and stress test for the directory page.
- Be sure to name the new request something like Directory Page Request.
- After executing each test, take a screen shot of the results
- Name the files directory-load-test.jpg and directory-stress-test.jpg (use whatever file extension for the format your screenshot is in)
- Compare your test results to the Teton Chamber of Commerce Requirements Nonfunctional Requirements 12 and 13
Submission
Return to Canvas and upload the following files
-
Upload the following files
- home-load-test
- home-stress-test
- directory-load-test
- directory-stress-test
- In the comments section record if the load test and stress test met the Nonfunctional Requirements 12 and 13 for the home and directory pages.
Useful Links:
- Return to: Week Overview | Course Home | Canvas
