Consuming a Weather API
Overview
The purpose of this activity is to introduce an external weather API that can be used to serve up live, weather information based on location and other parameters. We will be using the site API specifications and Fetch to retrieve data in the JSON format.
"The APIs we've covered so far are built into the browser, but not all APIs are. Many large
websites and services such as Google Maps, Twitter, Facebook, PayPal, etc. provide APIs
allowing
developers to make use of their data (for example displaying your twitter stream on your blog)
or
services (for example using Facebook login to log in your users)." - MDN web docs
Prepare
- Read 📃 What are third-party APIs? - MDN
This activity uses the third-party OpenWeatherMap API which will require you
to obtain a free account in order to consume the data. You will only need to
submit some basic information to obtain your free account.
OpenWeatherMap API Documentation
- Navigate to OpenWeatherMap and enter your city name in the input box provided and
click Search. Click on the appropriate search result for your city/town.
Review the weather data that is provided. You may want to switch to metric (C) or imperial
(F)
based results using the buttons in the upper-right corner of the search interface.
You will be using results like these and placing them into the weather summary section in your project.
- Navigate to the API menu list OpenWeatherMap: Weather API.
- Scroll down to the Current Weather Data API section, and click on the
API doc button.
The current weather data page explains how to call the current weather data for one location. Most APIs provide useful documentation to help you use the data. You will find how to make an API call documentation in this document along with examples of responses.
- In the current weather data API documentation, find the Call current weather data - 📃 How to make an API call section and study the API parameters and examples provided.
- Bookmark this documentation for future reference.
Get an Account
- Go to OpenWeatherMap: Pricing. Scroll down to the Current weather and
forecasts collection. The Free account column has limitations on the number
of "calls" to the service. It will be sufficient for our needs.
This service is provided under Creative Commons Attribution-ShareAlike 4.0 International license (CC BY-SA 4.0). The data is open and licensed by the Open Data Commons Open Database License (ODbL).
- Click on the Get API Key button under the Free column.
- Proceed through the account sign up directions to get an API key which you will need to
store and keep secure for your use only. This unique key is required in the URL requests
that we make to this service.
Do not use other people's API keys. Doing so is a sign that you may not be learning through proven patterns of digesting material and then producing original content, which is essential.🗝️ Record this API key (appid) in a safe place. You will need it for this activity and for your assignments.
Activity Instructions
Setup
- Using VS Code, in your week05 folder, add a new HTML file named "weather.html".
- Add a file named "weather.js" to the scripts sub-folder of week05.
- Reference this JavaScript file from your weather.html file.
Get Location
- Navigate to this weather station location map and find the station for
Trier, Germany in southwest Germany near Luxembourg.
You will need this map to find the closest station for your home page and for your the closet weather station for your chamber of commerce site.
- Using Google Maps, find the
latitude and longitude coordinates of Trier, Germany.
- First locate the city on the map.
- On the map, right-click on the city name.
- Click on the latitude and longitude coordinates given. This will copy the coordinates
to your clipboard.
You will not need to be so specific with so many significant digits after the decimal on the coordinates to use the closest weather station. Use two (2) digits after the decimal.
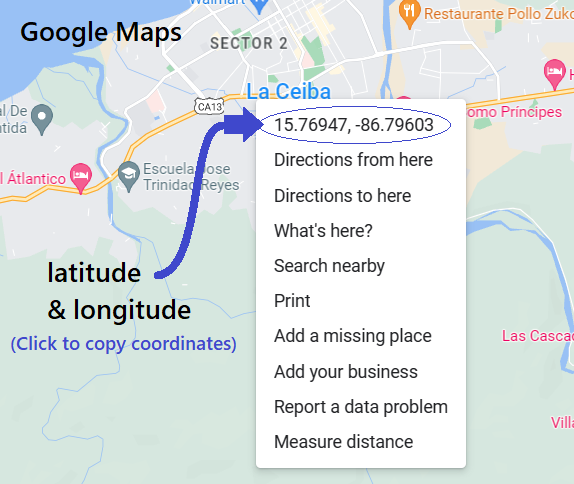
Figure 1: Google Maps Location Information Example Check Your Coordinates
Trier, Germany is located at 49.75° N latitude and 6.64° E longitude.
It is OK to use other methods to find the coordinates of a specific location.
HTML
- Use the following template for the body of your HTML document:
<h1>OpenWeatherMap.org API Test</h1>
<main>
  <p>The current temperature in Trier, Germany is <span id="current-temp"></span></p>
  <figure>
    <img id="weather-icon" src="" alt="">
    <figcaption></figcaption>
  </figure>
</main>
<footer>
  [Enter Your Name Here] | OpenWeatherMap.org | CC BY-SA 4.0
</footer>
JavaScript
- In the weather.js file, first select all of the HTML elements that will
need to be manipulated and assign them to
constvariables.// select HTML elements in the document const currentTemp = document.querySelector('#current-temp'); const weatherIcon = document.querySelector('#weather-icon'); const captionDesc = document.querySelector('figcaption'); - Declare a
constvariable named "url" and assign it a valid URL string as given in the openweathermap api documentation.const url = 'https://api.openweathermap.org/data/2.5/___________';- Use the Current Weather API named '
weather'. - Start a query string with the "
?" character as shown in the examples. - Use a
&between each key/value pair in the query string in these next steps. - Specify the latitude and longitude of Trier, Germany using the information you have gathered and the examples provided.
- Set the units to imperial: "
units=imperial" - Provide your API key:
"
appid=[enter your key here]"
- Use the Current Weather API named '
- Define an asynchronous function named "apiFetch()" that uses a try block to handle errors.
- Store the results of the URL fetch into a variable named
"
response". - If the response is OK, then store the result of
response.json()conversion in a variable named "data", and - Output the results to the console for testing.
- Else, throw an Error using the
response.text(). - Finish off the catch block by outputting any try error to the console.
- Store the results of the URL fetch into a variable named
"
- Remember to invoke the apiFetch() function with a call somewhere in your script.
Example
async function apiFetch() { try { const response = await fetch(url); if (response.ok) { const data = await response.json(); console.log(data); // testing only // displayResults(data); // uncomment when ready } else { throw Error(await response.text()); } } catch (error) { console.log(error); } } apiFetch(); - Run the page locally and view the console output. Find the current temperature
(
temp) and the weather event description (weather.description), and image icon reference (weather[0].icon- 3 characters) in the data.The weather array indicates that there can be more than one current weather event. You only need to focus on the first weather event if there is more than one.
The icon is just a preset code name that corresponds to OpenWeatherMap's library of images which is found at the base addresses of:
https://openweathermap.org/img/w/
Example 10d.png: Rain https://openweathermap.org/img/w/10d.png
https://openweathermap.org/img/wn(This version allows sizing using @.)
Example 10d@2x: Rain https://openweathermap.org/img/wn/10d@2x.png
All these images are .png file types. Here is a link to the documentation about Weather icons.
- Build the displayResults function to output to the given HTML document.
Example - Fill in the blanks.
function displayResults(data) {
  currentTemp.innerHTML = `${data._____}°F`;
  const iconsrc = `https://openweathermap.org/img/w/${______}.___`;
  let desc = data.weather[0].______;
  weatherIcon.setAttribute('___', _____);
  weatherIcon.setAttribute('___', _____);
  captionDesc.textContent = `${desc}`;
}
Submission
- Update your course home page with a link to this activity.
- Commit and push your work to your wdd230 GitHub Pages repository.