W01 Setup: Install Git and Clone Your Repository
Overview
You must complete the steps to install VS Code and set up your GitHub repository before starting this activity.
If you have not completed those activities successfully, you should stop and complete them before starting this activity.
Now that you have created your course repository at GitHub, you need to download a copy of that repository to your computer so that you can work on your files on your computer and then upload them to GitHub when you are ready to publish and submit them.
Git is a software product that manages the files you use in programs and webpages. It is very popular in industry and helps keep track of different versions of files and helps team members share code with each other. Using Git, you can clone, or download a repository to your computer. You can also push, or upload your code to GitHub when you are done.
This setup activity will help you install Git on your computer and use it to clone the repository you created at GitHub.
Instructions
Install Git on your computer
Select only one of the following instruction sets depending on your operating system.
Windows Users
- Before downloading Git, check to make sure you don't already have
Git installed on your computer.
- Open a command prompt by clicking the Start button and typing
cmdin the search box. The command prompt terminal will open.Alternatively, in VS Code, you can use the terminal panel to complete any command line task. use the
Ctrl+`keyboard shortcut to toggle the terminal panel. - Enter the following command and then press Enter:
git --version - If you see a version number, you already have Git installed. If you don't see a version number, you need to install Git.
- Open a command prompt by clicking the Start button and typing
- To install Git for Windows. Go to
git-scm.com/downloads and select Download for
Windows.
An .exe file will be downloaded. - Double click that .exe file to open and run the installation executable. The process
of installing Git will start.
- Allow the installer to make changes to your computer.
- Select Next through all of the setup windows, leaving all the defaults. There will be many windows.
- The last window will let you select Install and then click Finish.
- Open a new Command Prompt window by closing the first Command
Prompt window and start a instance by clicking the Start button and typing
cmdin the search box. - Enter the
git --versioncommand and then press Enter to see if Git is installed. You should see the version number. - While in the Command Prompt, type in two more commands to set up the username and email that are associated
with your GitHub account.
Make sure you to use your own username and email between the "" quotation marks. Use the username and email you used for the GitHub account. These will be different for each student.
- Type in this configuration command to set the global git username:
and select Enter. Nothing will happen if you did it right. If you get an error, you need to fix it.git config --global user.name "yourusername" - Enter this configuration command to set the email:
Nothing will happen if you did it right. If you get an error, you need to fix it.git config --global user.email "youremail@byupathway.edu" - Type in this configuration command in order to not ignore case changes in files and
folder names:
Nothing will happen if you did it right. If you get an error, you need to fix it.git config --global core.ignorecase false
- Type in this configuration command to set the global git username:
Demonstration
Link: ▶️ Windows Git Installation – [ 6:07 minutes ]
macOS Users
- Before downloading Git, check to make sure you don't already have
Git installed on your computer.
- Select the Search icon (it looks like an magnifying glass) on your screen near the top right of your screen.
- Type in
"Terminal"and open the Terminal application. It doesn't matter what path our command prompt is showing. All the commands we type will work anywhere. - Type in
git --versionat the prompt and select Enter. - You should now either see a git version number or a pop up window that says something along the lines of
'The git command requires the command line developer tools ...'. If you see the git version number, you already have git installed and do not need to install git, but you will want to set your config setting as shown below. If you get the pop-up message, select Install and Agree. - The installation may take a few minutes. With the installation, you will get a set of development tools, including Git.
- Type in
git --versionat the prompt and select Enter. You should now see the version number. - While in the command prompt, type in additional commands to configure our username and email that are
associated with our GitHub account. Again, since these are global settings you can type them from any path
prompt.
Make sure you use your own username and email between the "" quotation marks. Use the username and email you used to create your GitHub account. These will be different for each student.
- Type in this configuration command to set the global git username:
and select Enter. Nothing will happen if you did it right. If you get an error, you need to fix it.git config --global user.name "yourusername" - Enter this configuration command to set the email:
Nothing will happen if you did it right. If you get an error, you need to fix it.git config --global user.email "youremail@" - Type in this configuration command in order to not ignore case changes in files
and folder names:
Nothing will happen if you did it right. If you get an error, you need to fix it.git config --global core.ignorecase false
- Type in this configuration command to set the global git username:
- If you want to check the global configurations, type
to review the user.name and user.email. Do not worry about the other configuration settings reported.git config --list
Demonstration
Link: ▶️ MacOS Git Installation – [ 3:19 minutes ]
Linux Users
- Guide: Linux Git Install
- Install Git using the link above and then follow the last few steps from the Windows or Mac instructions to set up your global config username and email settings to match your GitHub account.
Clone your GitHub Repository
Now that you have Git installed on your computer, you can use it to clone, or download, your repository from GitHub. VS Code is integrated with Git, so you can perform Git functions directly in VS Code.
- Open VS Code.
- If your VS Code window does not open to the Welcome page, select File -> New Window to open a new window that should begin with the welcome page.
- On the Welcome page, select the option: Clone Git Repository....
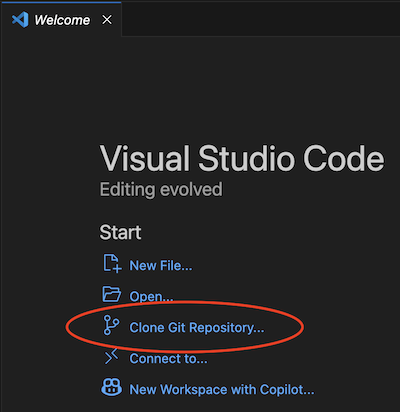
VS Code Welcome Page showing the "Clone Git Repository..." option. - After clicking Clone Git Repository... VS Code will display a box for you to type in your
Repository URL. Enter the URL of your repository and press the Enter or Return
key.
- The URL of your repository is:
https://github.com/yourusername/wdd130(replaceyourusernamewith your actual username). - You may find it easiest to copy and paste this URL from a Web browser where you have opened your repository.

An example of the GitHub URL box. - The URL of your repository is:
- At this point, a sign in box may pop up and prompt you to enter your GitHub username and password and give permission for VS Code to connect to GitHub.
- You will be prompted for a location on your computer where you want to save your repository. This can be anywhere you would like, but you should remember the location so you can find it in the future.
- Git will now clone a copy of your repository to your computer. You can then select the option to open this repository in your current window.
Open a Web Page
Now that you have cloned your repository to your computer, you can edit the html files and view them in your web browser using the Live Server (Five Server) extension you installed previously.
- In the VS Code File Explorer pane, find the file
index.html. - Right-click
index.htmland select Open with Live/Five Server.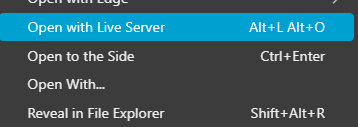
The option for Open with Live/Five Server - The starting webpage should display in your web browser.

An example webpage that should display in your browser.