In this exercise you will create and execute end-to-end tests for the teton chamber of commerce.
This week we have discussed end-to-end testing as part of verification and validation. As a result of the testing, the requirements document has been modified to correct inaccuracies and to add missing information. A new version is available in a link below, and the changes have been highlighted for ease of use.
The development team has also reviewed our test case reports and corrected several errors. They have now created a
version 1.1 web site for us to test.
This version of the site now also contains the Directory page which was missing from the version 1.0. This version should complete all the
requirements listed in the requirements document.
First you will use the acceptance criteria in the Directory section of the requirements document to generate new test plans for the Directory page with accompanying test cases using Squash. You will also need to update any test cases with the new information found in the requirements document. You will have four test plans when complete. One each for Common, Home Page, Join Page and Directory Page with their relevant test cases included.
Squash provides a traceability report that shows you have test case coverage for all your requirements prior to completing the end-to-end testing. After you verify full test coverage you will then perform an end-to-end test on the system.
Using Squash Test Management, create requirements, test plans and test cases for the following:
Section 4: Directory Page Requirements
Add requirements to Squash for the Directory page.
Create a folder for the Directory page in the Requirements section of Squash.
Add each requirement in Section 4 of the Requirements document to the new folder.
Create test cases for each of the new acceptance criteria in the Test cases section of Squash.
Add a new folder named Directory to the Test cases section of Squash.
Create a test case for each new acceptance criteria in the Directory section of the requirements document.
For each test case you create, be sure to link it to the appropriate requirement
Add each the steps for each acceptance criteria to the test case as you did for the other pages.
Create a Test plan for the Directory page in the Executions section of squash.
Create a new test plan (campaign) for the directory page.
Add each of the test cases for the directory page to the test plan
Update acceptance requirements
Several of the acceptance criteria have been modified in the updated Requirements document (they are indicated in bold text)
Update the necessary steps in the test cases by modifying/adding steps as necessary.
Test case coverage
It is important to ensure that all requirements are covered by test cases. This can quickly be determined by a traceability matrix or in the case of our testing tool a requirements coverage report or visually using the dashboard view of the requirements.
View test case coverage using the dashboard.
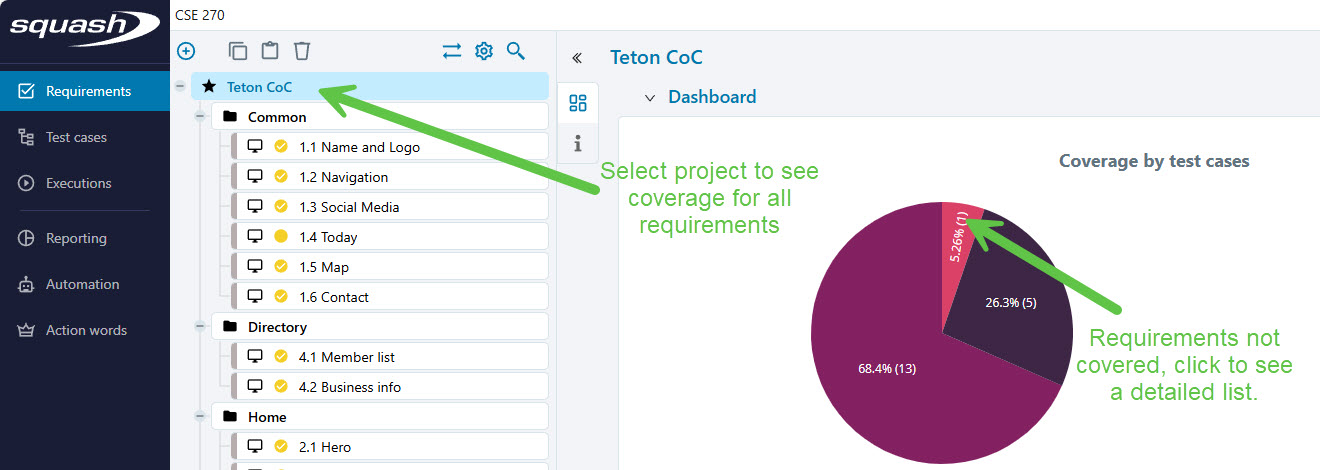
Open the Requirements view in Squash using the left navigation bar.
Select the Teton CoC project to see coverage for the whole project. If you wish to see coverage for a specific area, select that area.
Select the dashboard view. We are mostly interested int the top left pie chart. If there is red slice (which indicates Requirements that do not have a test case associated with it.) you do not have complete test coverage. You can click on the pie slice to see a list of the requirements that are not covered.
Requirements dashboard
Create a test case coverage report (traceability matrix).
Open the Reporting view in squash using the navigation bar.
Click the plus icon then select the Add a report menu item.
Choose the report.
Configure the report as follows:
Name Traceability.
Leave other fields as they are.
Click the Add button to create the report.
Execute the report by clicking the download icon.
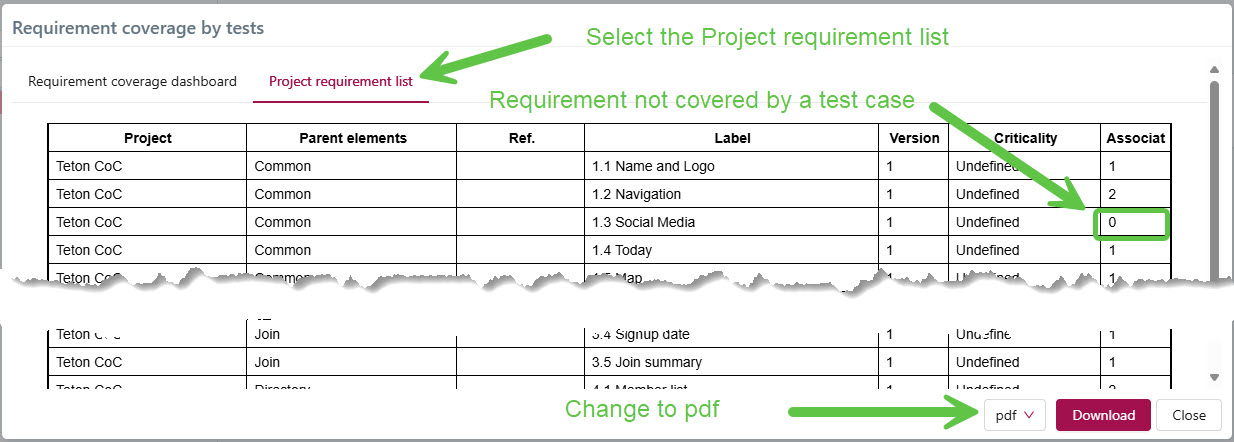
Select the Project requirement list link.
Project requirement list
Any requirement that has a 0 int the assocait column is not covered by any test cases an indicates incomplete testing.
Change the download type to pdf.
Click the Download button to download your report.
Save the report as yourname-traceability.pdf where yourname is your last name.
Prepare for defect tracking
This time as you test, when a defect is discovered you will create a defect report. Most organizations will use a bug tracking system to manage defect tracking. For our class you will use a simple spreadsheet to record and track software bugs.
The spreadsheet has three tabs. Select the first tab Project Details.
Enter the current date in the date cell, and your name as the project manager.
The second page is where you will record any defects found.
This document will be submitted as part of your assignment submission.
Test execution
Now it is your job as a tester to execute the test cases and report the results.
If you can't remember how to conduct tests Refer to Tutorial: Test Execution for specific instructions on how to execute tests and report results as required below.
Create a new test iteration for each test plan in squash. Name the iteration yourname W4 where yourname is your last name.
Execute all the test cases for the Common, Home, Join and Directory test plans.
 plus icon then select the Add a report menu item.
 report.
 download icon.