3.3 Defect Reporting
Overview
A key component of any tester’s job is to effectively communicate findings to the development team. In the course of testing, it is inevitable that a defect will be found. The development team needs to know what went wrong so they can diagnose and correct the problem. In most instances, testers can assist the development team by sharing vital clues about what went wrong by being complete in their description of the inputs and outputs.
A Good Defect Report
Effectively reporting defects is a crucial aspect of the testing process. Clear and comprehensive defect reports not only facilitate efficient defect resolution but also contribute to overall project communication.
Defect Report Essentials
- Title and Summary: Clearly state the defect title and provide a concise summary.
- Steps to Reproduce: Clearly outline the steps needed to reproduce the defect.
- Expected vs. Actual Results: Clearly articulate the expected behavior and highlight the observed behavior.
- Environment Details: Include information about the environment in which the defect was observed.
- Severity and Priority: Clearly define the severity and priority of the defect.
Visual Aids and Attachments
- Screenshots or Images: Include screenshots or images that visually highlight the defect.
- Log Files or Error Messages: If applicable, provide relevant log files or error messages.
Additional Context
- Browser Console Output (if applicable): Include console output for web applications to provide additional technical context.
- User Impact: Describe the potential impact on end users.
Example Defect Report
Below is an example of a defect report that puts this all together. It should be noted that many modern bug tracking systems will have fields for you to input this information in.
Title: Dropdown Menu Selection Issue
Summary:
The dropdown menu on the Settings page does not display the selected option correctly, leading to a user interface inconsistency.
Steps to Reproduce:
- Navigate to the Settings page.
- Click on the dropdown menu next to the Display Preferences section.
- Select an option from the dropdown menu.
- Observe the display of the selected option.
Expected Results:
The selected option should be displayed visibly in the dropdown menu, providing clear feedback to the user.
Actual Results:
The selected option is not displayed correctly in the dropdown menu. It appears as if no option is selected, causing confusion for users.
Environment:
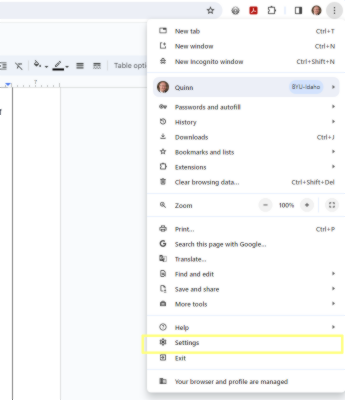
- Browser: Google Chrome Version 120.0.6099.218
- Operating System: Windows 11
Severity: Major
Priority: High
Visual Aids and Attachments:

Additional Context:
Browser Console Output (if applicable):
- [Console log output showing potential JavaScript errors]
User Impact:
- The incorrect display of selected options in the dropdown menu may lead to users unintentionally choosing the wrong setting, impacting their overall experience on the Settings page.
Bug Life Cycle
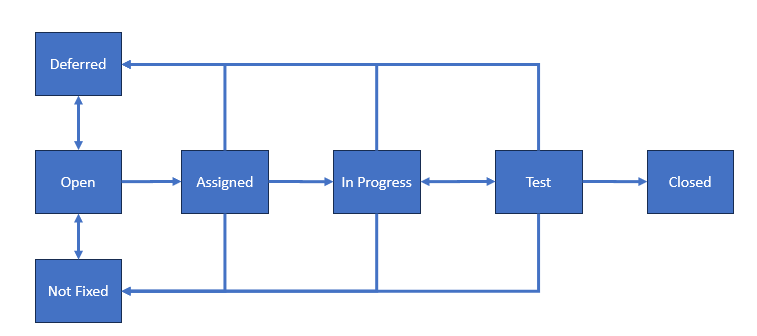
The bug life cycle is a structured process that defines the stages a defect goes through from identification to resolution. Understanding the bug life cycle is helpful for effective defect management and collaboration between testers and developers. The typical bug life cycle consists of the following stages:
- New:
- The defect is identified and reported by a tester.
- It is labeled as New and enters the bug tracking system.
- Assigned:
- The bug is reviewed by the development team.
- A developer is assigned to investigate and address the defect.
- In Progress:
- The developer actively works on resolving the defect.
- Regular updates are provided to the testing team on the progress.
- At any point during the development of the fix, the developer may move the bug to deferred or not fixed state upon consultation with business stakeholders.
- Test:
- Testers retest the fixed defect to verify if the resolution is successful.
- If verified, the defect moves to the next stage; otherwise, it returns to the In Progress stage.
- At this stage, the tester may also choose to move the bug to deferred or not fixed states upon consultation with the business stakeholders.
- Deferred:
- In some cases, a decision may be made to defer the resolution of a defect.
- Reasons for deferral could include a low impact on the software or a decision to address it in a future release.
- When the team is ready to address the issue, the bug moves back to the open state
- Closed:
- The verified defect is marked as Closed if it meets the acceptance criteria.
- It is considered officially resolved and closed in the bug tracking system.
- Not Fixed:
- After evaluation, some defects may be deemed as not critical or not affecting the software significantly.
- Such defects are labeled as Not Fixed and remain documented in the bug tracking system without further action.
- At a later date, a business person may choose to revisit the decision to not fix a bug and reopen the issue.

Understanding the bug life cycle ensures a systematic and organized approach to defect resolution. Effective communication between testers and developers at each stage is essential for a streamlined bug resolution process, leading to the delivery of high-quality software.
When To Not Fix Bugs
Surprisingly, not every bug that is found is treated equally. Some bugs never make it all the way to the closed state. Bugs may be marked as Deferred or Won't Fix; for various reasons, and the decision is often influenced by project priorities, resource constraints, and strategic considerations.
Here are common reasons for marking bugs as deferred or not fixable:
- Low Priority:
- Bugs that have a low impact on the software's functionality or user experience may be deferred if higher-priority issues need immediate attention.
- Resources are allocated to address critical defects or implement new features.
- Resource Constraints:
- Limited resources, such as time, manpower, or budget, may lead to the decision to defer certain non-urgent bugs.
- Focusing on high-impact issues or upcoming releases may take precedence over addressing lower-priority defects.
- Strategic Planning:
- In some cases, bugs may be deferred as part of a strategic decision related to product roadmap planning.
- Deferring noncritical issues allows teams to align bug-fixing efforts with broader development goals and milestones.
- Upcoming Releases:
- Bugs may be deferred if they are not critical and can be addressed in future releases.
- This approach allows development teams to release a product on schedule while planning to resolve non-urgent issues in subsequent updates.
- Not Reproducible:
- Bugs that are challenging to reproduce consistently may be marked as Won't Fix if they cannot be reliably identified or verified.
- It is essential to prioritize issues that can be consistently replicated and addressed.
- Feature by Design:
- Some reported issues may align with the intended design or functionality of a feature.
- In such cases, the bug may be marked as Won't Fix if it is determined that the reported behavior is as intended.
- This is jokingly referred to as A Feature Not A Bug.
- End of Product Life:
- If a product is reaching the end of its life cycle, certain noncritical bugs may be marked as Won't Fix as the focus shifts to supporting newer versions or products.
- Dependency on External Factors:
- Bugs that depend on external factors beyond the control of the development team (for example, third-party libraries or external APIs) may be deferred until those factors are addressed.
- Risk Assessment:
- Bugs that pose minimal risk or have a workaround available may be deferred or marked as Won't Fix if addressing them introduces potential risks to other parts of the system.
- Scope Change:
- If a project undergoes a change in scope or requirements, bugs that are no longer aligned with the project's goals may be deferred.
The decision to defer or mark a bug as Won't Fix is often made collaboratively by project stakeholders, including product managers, developers, and quality assurance personnel. It involves a careful evaluation of priorities, available resources, and the long-term strategic goals of the software development project.
Useful Links: ←Unit 3.2 | Unit 3.4→ | Table of Contents
