Software Development | MS Teams – Instructor Information
Using Microsoft Teams in Your Course
Purpose
This Document will help you setup your Microsoft Teams team for your class. We encourage you to
communicate as much as possible using Microsoft Teams. The goal is that students have place to ask and answer
questions in real-time that is much more authentic than Canvas discussion boards. We also hope it helps introduce
them to the
kinds of tools professionals use. In addition, as part of the Office 365 suite, Microsoft Teams is fully supported
by the University and its IT staff.
Students will use Microsoft Teams consistently through the program, and are introduced to it early in the
program, so
hopefully as they move through the courses they will become more familiar with it. However, especially in the
beginning classes, you may need to encourage good practices.
If you are new to Microsoft Teams, yourself, you can read the student-facing Teams
introduction for basic information and setup.
As explained in the student-facing instructions, while Microsoft Teams can be used in a browser, it is highly
recommended to download and use the desktop app, and possibly the mobile app as well if you would like.
Create the Team
Canvas has a Microsoft Education integration, however you will need to enable it for your class. This integration
will
create a Microsoft Teams Teams for your section and add you as the admin. The integration will
also automatically synchronize the students in your Canvas class with members of the Team. This is very handy as
it continues to sync the user list as students add and drop the course.
Enable the integration
The follow steps are used to enable the integration:
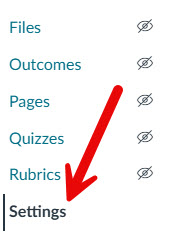
Login to Canvas and go to your class settings.
Class settings
Click on the navigation tab.
Navigation
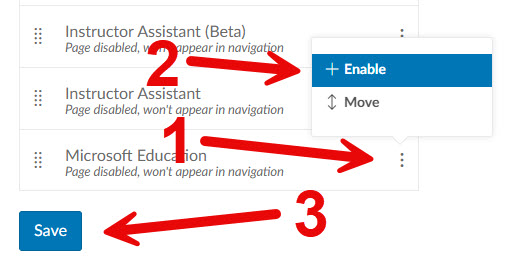
Enable the Microsoft Education Navigation link.
Scroll down the list of available navigation items until you find the Microsoft Education item.
Click the kebob menu and select + Enable option (you can also drag and drop it if you
would rather).
The screen will refresh with the Microsoft Education link shown in the enabled list, scroll to the bottom
of the screen and click the Save button.
Enable Microsoft Navigation
Configure your team and features.
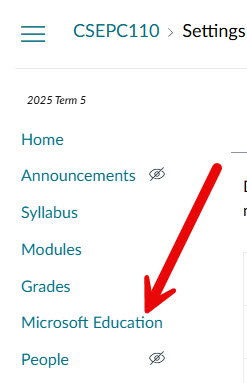
You should now see the Microsoft Education navigation link in your course.
Course Navigation
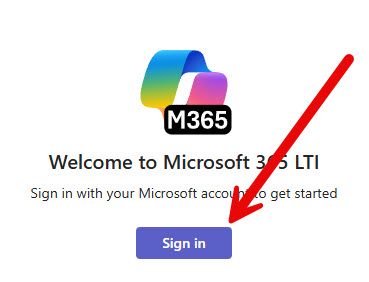
When you click on the Microsoft Education link you will see a Microsoft sign in page. You will need to
sign in to your pathway account to finish the configuration.
Sign in
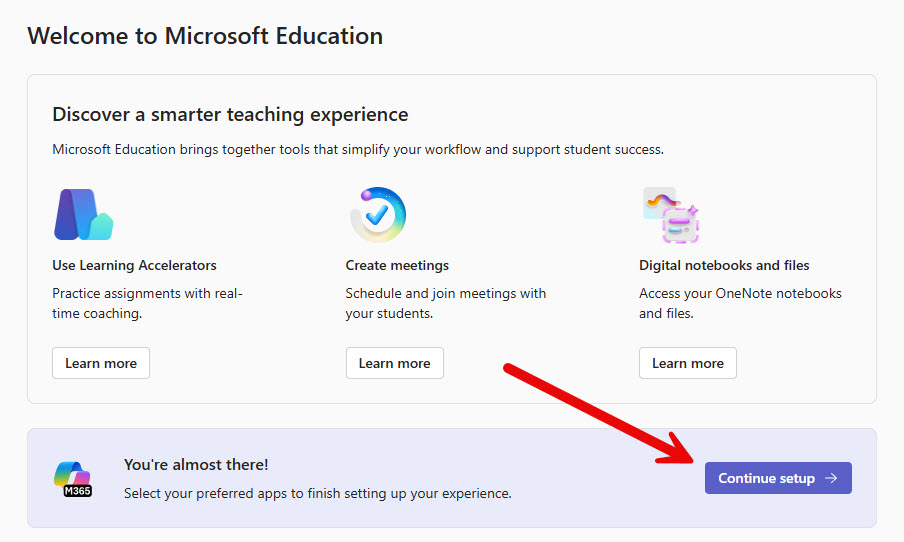
You should see a welcome page. Click the Continue Setup button.
Welcome screen
This new integration provides much more than just MS Teams support, our team will explore the new features
and see how they might be used to improve our courses but for now you will enable Teams and OneDrive. Enable
the following features:
OneDrive
Teams Meetings
Teams
Add Microsoft Teams
Course settings
When your settings match the image above, click the Done button.
After a short while a new team will be created for your course. It takes a few more minutes for the course's
OneDrive to be provisioned. OneDrive is necessary so you can add attachments to your Teams posts and files to
your course. Once configured, the Microsoft Education link will provide direct access to the provisioned
features from within canvas.
Microsoft Education (complete)
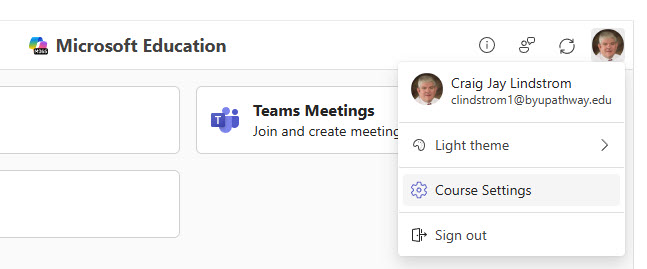
If you need to modify your course settings, click your profile icon then select Course Settings.
Change settings
The name of the new team will be the same as your course name. It will look something like this
CSE111.002 – Programming with Functions. If you would like, you can rename it to add
a semester in parenthesis to help distinguish it such as: "CSE111.002 – Programming with Functions (Blk
1 2024)" or whatever you like.
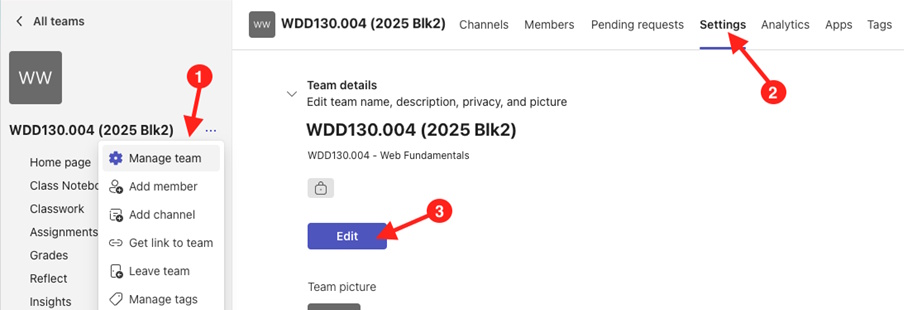
Click the three dots next to the Team name - Select Manage Team.
Go to Settings in the top menu.
Click the Edit button and rename the team.
Rename team
The only channel that will exist is General. The General channels is a good place to message
all members of the class. . Create additional channels as needed by your course.
Add channel
Check the Teaching Notes to see if specific channels are needed for your course.
Here are a few ideas for channels you may wish to create:
Announcements: Messages from your instructor.
Introductions: Class introductions.
Random: Anything you want to talk about.
Group Channels
If your course has team/group work you will need to make Channels for each group. It is best to use the group
names in Canvas as the names for the Teams channels.
You can create Standard or
Private channels. Private channels can only be accessed by the Team users you add to the channel. Standard
channels can be used by anyone in the Team. Private Channels are a bit more work since you will have to maintain
group membership of the channels. Make sure you add yourself to the channel as
well. The benefit of private channels is less noise in the team and private file storage for each group. The
channel type cannot be changed after it is created.
Each student should join a group in Canvas so the instructor can track group membership and adjust private
channels as necessary.
If a team becomes too crowded (more that 6 or 7 in a team) the teacher can create another Canvas group and MS
team for the same
date/time and move half the students to the new team.
Another great advantage of having the team named by the day/time of the meeting is that a student can easily
attend another team meeting if something unplanned comes up and they can't attend their normal meeting.
Weekly Meetings
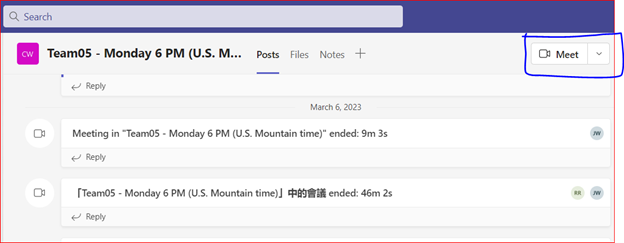
Microsoft Teams has a "Meet" button in the upper right corner of the screen.
NOTE: if you use standard groups all students in the class will see the
meeting start request. If you use private channels only the members of the channel will see the meeting request.
Meet as a Team
If a team member clicks on this icon a meeting starts. Then any other person who wants to join this meeting will
see that a meeting is in session by looking at the channels list on the main Microsoft Teams screen. Then they can
join
the meeting in progress. This way all team members know when the meeting is scheduled (by virtue of the team name)
and the first person to arrive starts the meeting and all other team members can join the meeting in progress. It
is also possible to record the meeting – team members can decide if they want to record or not.
The Team Channel history also tracks who attended the meeting. In the screenshot above you can see the initials
of the people who attended next to the meeting notes, and also see how long the meeting lasted.
There is one more advantage to using the Microsoft teams Meet button – you as the instructor can see in real-time
if a
meeting is being held at the scheduled day/time and you can “drop in” to any meeting in progress to say “hi” or to
help students or answer questions. The students seem to really appreciate this surprise visit because it shows the
teacher is interested in them individually.
Announce Microsoft Teams in the Course.
Once the Microsoft Teams team has been created, you need to tell the students about it and give them instructions
for how to sign up. The most important things to tell them are that:
Login to teams with their Pathway email.
Participation in the Microsoft Teams discussions is not optional and will be the primary communication method
used in
the course.
How to download Microsoft Teams for their computer or mobile device.
In addition, to ensure that students are aware that the course discussion is occurring in Microsoft Teams, for
each of the
first three weeks, after posting a weekly introduction to Microsoft Teams, please post an announcement in Canvas
reminding
the students to go look at Microsoft Teams for this introduction as well as other discussions.
Using Microsoft Teams vs. Announcements and E-Mail
While Microsoft Teams will be the primary vehicle for course discussion and coordination, Canvas announcements
and email
have important roles as well.
Microsoft Teams
Microsoft Teams should be used for Q&A about the course and it's topics. This is ideal for discussion about the
weekly
topics and assignments. In addition, students should be encouraged to use Microsoft Teams for all of their team
discussions
and as the primary way to contact the instructor.
You can respond to a specific student by prefixing their Microsoft Teams user name with the @ symbol. This will
send a
notification to whatever device they've used to sign up for Microsoft Teams. It is customary to reply to direct
questions
from students in this fashion.
In addition, you can send a notification to the entire class by posting in the General channel and addressing the
message to @general.
Finally, anytime you post to a private channel, every member of that channel is notified by default.
Announcements
Canvas Announcements should be used for any official course business or announcements, such as changing the due
dates or the scope of assignments. You should consider Microsoft Teams as the medium for discussion, but
Announcements the
avenue for core, official business.
E-mail
E-mail should be used for any sensitive or personal communication with an individual student. For example, a
discussion about plagiarism or directly trying to contact a student that has not been responsive to their
teammates, or is missing assignments. Email is the official medium of communication recognized by the university
for university business.
Troubleshooting
Team is not created
MS Sync note enabled
Solution: Enable Microsoft sync for course as described in this document
Instructor email not verified
Solution: Verify email in canvas. Go to your profile page, and then click settings. If your email address in the
top right corner has an "!" next to it, you need to verify it.
Student not in team, or disappears from team
Email not setup correctly
Solution: For the Teams integration to work properly it is necessary for to use pathway email in canvas: Each
user must have their @byupathway.edu email listed as their primary email AND it must be verified. If you are a new
teacher, your email is likely not verified yet. Go to your profile page, and then click settings. If your email
address in the top right corner has an "!" next to it, you need to verify it.