
Streaming
Overview
Slow data fetches can impact the performance of web applications. Streaming is a technique for delivering content to users as it becomes available, rather than waiting for the entire resource to be generated or downloaded. This approach can improve perceived performance and user experience, especially for large files or real-time data.
Prepare
With streaming data, you can start processing and displaying content as soon as it begins to arrive, rather than waiting for the entire resource to be generated or downloaded. This can significantly improve the perceived performance of your application, especially when dealing with large files or real-time data. In this activity, you will prepare your application to handle streaming data effectively.
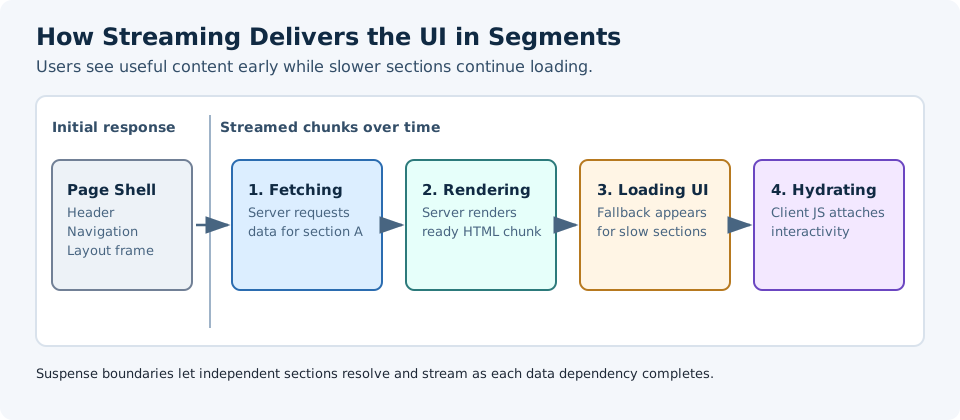
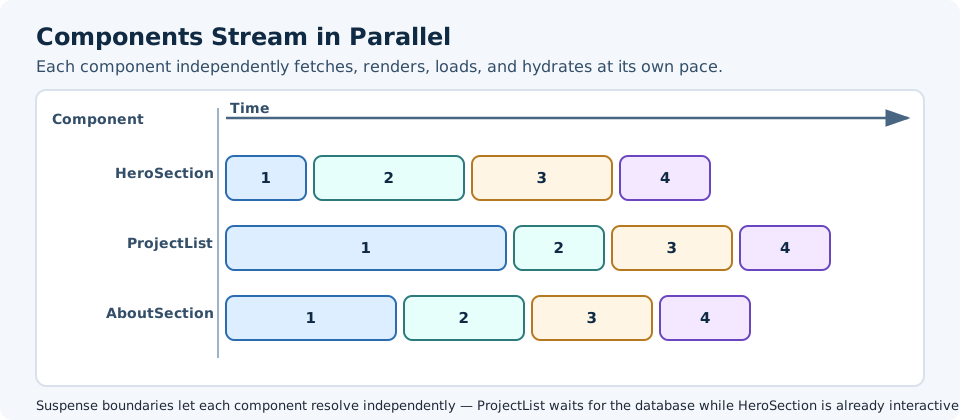
Streaming works well with React's Suspense and Server Components. Each component can be considered to be a chunk of the overall UI.
Implementing Streaming
There are two ways to implement streaming in Next.js:
- At the page level, with the loading.tsx file which creates a loading state
<Suspense>. - At the component level, with
<Suspense>for more granular control.
— Streaming a Whole Page
To stream an entire page, you can create a loading.tsx file in the same directory as your page component. This file will define a React component that serves as a fallback while the page is loading. When the page is requested, Next.js will render the loading component immediately and then stream the actual page content as it becomes available.
For example, if your portfolio home page is in app/page.tsx, you can create an
app/loading.tsx file with the following content:
export default function Loading() {
  return <div>Loading ...</div>;
}
Note the following:
- loading.tsx is a special file in Next.js that defines the loading state for a page and is built on top of React Suspense.
- Static content can be displayed while the page is loading the dynamic content (see the example above of a
simple
<div>Loading ...</div>element). - When the user navigates to the portfolio page, they will see the loading message immediately while the actual page content is being fetched and rendered in the background.
- The user does not have to wait for the entire page to load before interacting with the available content like navigating away from the page.
Loading Skeletons vs Text
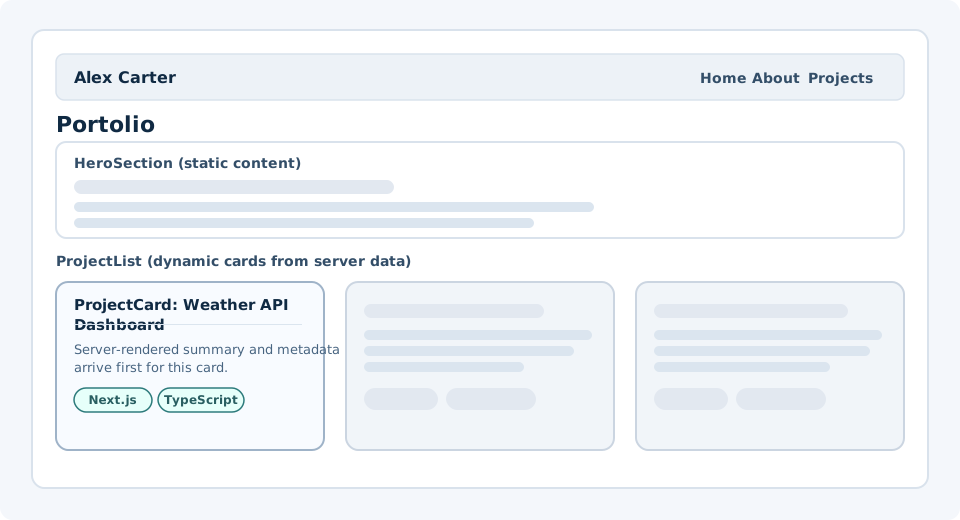
Instead of displaying a simple loading message, you can create a more engaging user experience by using loading skeletons. These are placeholder elements that mimic the structure of the content being loaded, providing a simplified, visual cue to users about what to expect.
Leveraging AI
This is a good opportunity to use AI to help draft a skeleton file for your portfolio page. Ask AI to generate
a simple app/loading.tsx that matches the major sections of your app/page.tsx, then
review, simplify, and test the result so you understand every line you keep.
For example, you can use gray boxes or animated placeholders to indicate where images, text, or other components will appear once they are fully loaded.
In the loading.tsx file:
import DashboardSkeleton from '@/app/ui/skeletons';

export default function Loading() {
  return <DashboardSkeleton />;
}
For your portfolio app, a good skeleton should roughly match the structure of the page so users can immediately
tell what is loading. For example, your app/loading.tsx file might look like this:
export default function Loading() {
  return (
    <main className="animate-pulse space-y-10 p-6">
      <section className="space-y-4">
        <div className="h-10 w-2/3 rounded bg-slate-200" />
        <div className="h-4 w-full rounded bg-slate-200" />
        <div className="h-4 w-5/6 rounded bg-slate-200" />
        <div className="h-10 w-40 rounded bg-slate-300" />
      </section>

      <section className="space-y-4">
        <div className="h-8 w-48 rounded bg-slate-200" />
        <div className="grid gap-4 md:grid-cols-2">
          <div className="h-40 rounded-xl bg-slate-200" />
          <div className="h-40 rounded-xl bg-slate-200" />
        </div>
      </section>

      <section className="space-y-4">
        <div className="h-8 w-40 rounded bg-slate-200" />
        <div className="h-4 w-full rounded bg-slate-200" />
        <div className="h-4 w-4/5 rounded bg-slate-200" />
      </section>
    </main>
  );
}
Fixing the Skeleton Bug
In the Route Groups learning activity, you will see that the skeleton applies to all the pages since the loading.tsx file is a level higher than the projects/ pages and about/ pages, and so on., and the skeleton layout is applied to all these pages. This bug or unintended UI behavior can be changed by using Route Groups.
— Streaming Individual Components
For more granular control, you can use React's <Suspense> component to stream individual
components within a page. This allows you to display different loading states for different parts of the UI,
improving the user experience by providing feedback on which content is loading.
To stream a component, wrap it in a <Suspense> component and provide a skeleton fallback. For
example, on your school projects page you might have an async SchoolProjectList component that
fetches from a database. Wrapping it in <Suspense> lets the rest of the page render immediately
while that component loads independently:
// app/(projects)/school/page.tsx
import { Suspense } from 'react';
import SchoolProjectList from '@/app/ui/school-project-list';
import ProjectCardSkeleton from '@/app/ui/skeletons';

export default function SchoolPage() {
  return (
    <main>
      <h1>School Projects</h1>

      {/* Skeleton renders immediately; list streams in when data is ready */}
      <Suspense fallback={<ProjectCardSkeleton />}>
        <SchoolProjectList />
      </Suspense>
    </main>
  );
}
SchoolProjectList is an async Server Component — it awaits a data fetch internally.
Because it is wrapped in <Suspense>, Next.js streams its HTML chunk to the client as soon as it
resolves, without blocking the rest of the page.
Where to place <Suspense> boundaries depends on a few things:
- What you want the user to experience while content is loading.
- What content should be prioritized.
- How long different content takes to load; do they depend upon data fetching.
- Consider placing wrappers around components to create a staggered loading effect.
The overall goal with Streaming and Server Components is to improve the user experience by allowing parts of the UI to load independently and display loading states for each component.
Activity Instructions
Apply both streaming approaches to your portfolio app — one per route.
Full-Page Streaming on Open-Source Projects Page
- Create a loading.tsx file inside your open-source projects route folder (for example,
app/(projects)/open-source/loading.tsx). Build a skeleton that roughly matches the layout of that page using the same Tailwind approach shown above. - To make the effect visible in development, temporarily add an artificial delay to the data-fetching function
used by that page:
// Temporarily in your data fetch — remove after testing await new Promise(res => setTimeout(res, 2000)); - Navigate to the open-source projects page and confirm the skeleton renders immediately before the real content replaces it.
- Remove the delay when you are satisfied the skeleton is working correctly.
Component-Level Streaming on School Projects Page
- On your school projects page, move data fetching into a dedicated async Server Component (for example,
SchoolProjectList) if it is not already structured that way. - Wrap it in a
<Suspense>boundary using a skeleton fallback, following the pattern shown in the example above. - Add a temporary delay inside the component's data fetch function, then run the app and confirm the skeleton shows while data loads independently from the rest of the page.
- Remove the delay when done.
Route Group Scoping Check
Verify the loading.tsx from Part 1 only affects the open-source route. If the skeleton appears on unrelated pages, use a route group to scope it correctly. Refer to the Route Groups activity for guidance.