W04 Individual Activity: Error Checking and Validation
Overview
In the last activity, the checkout was working at a minimum level. If the user does everything exactly the way you want the to the order will succeed. You cannot rely upon users to do the right thing every time. You need to make sure that the user is doing the right thing. Do this by adding error checking and validation.
Activity Instructions
Complete the following assignment individually. Each student will write code for their own copy.
Start the task
- Visit the team's copy of the Trello board for the project.
- Add yourself to the
Individual Activity W04: Error Checking and Validationcard. - If no one else has done it yet, move it to
'Doing'. - Read the details of the card.
- Make sure to pull any changes from GitHub before proceeding.
- Create a new branch called
yourinitials--individual4.
Figuring out what went wrong
Currently if the order fails, an error message is sent saying "Bad Request". Turns out that the server is actually sending back much more information than that, but it is being discarded because of the current response processing.
- Open the
ExternalServices.mjsmodule and take a look at theconvertToJsonfunction. It should look something like this:async function convertToJson(res) { if (res.ok) { return res.json(); } else { throw new Error('Bad Response'); } }A detailed error message is required from the response body.- On line 1, check the response to see if it is 'ok' (res.ok). 'Ok' is any status of 200, or most 300s.
- On line 2, return the response as json.
- On line 4, throw an error if the response is not ok. If the status on the response is 40x or 50x then it is NOT okay. The server sends back a 400 response if something goes wrong. Then it puts the details in the body of the response.
- Refactor this function by converting the response body to JSON before checking if it's okay.
- Then if it is not okay then send the response body on in the
throwstatement.throw new Error()is a nice way to let the application know that something went wrong. In this case, there is a problem with it becauseError()takes a simple string as an argument. You cannot send an object. There are a couple of ways to get around this.- You could
stringifythe object. - You could send a custom object back with the
throwinstead of the defaultnew Error().
In this case the second method makes more sense.
- You could
- Use the
Error()object'snameandmessageproperties to send the response body back to the calling function. Change the line that looks likethrow new Error('Bad Response');to something more like this:
The variablethrow { name: 'servicesError', message: jsonResponse };jsonResponseshould be the body of the response from the server that converted to JSON.
Catching the error
Errors are only useful if they are caught and handled. Simply throwing an error without a corresponding catch block is ineffective.
When handling the error, there are two options for the catch block's location. You can place it within the checkout method of the ExternalServices module, or within the checkout method of the CheckoutProcess module. Consider the advantages and disadvantages of each approach.
Where to put the error handling
Handling an error close to where it happened is usually a good thing, but the user know needs
to know what they did wrong in this case. The form and form handling is in the CheckoutProcess
module, and so in this case it makes
sense to catch the error there.
- Add a
try { } catch(err) { }block in theCheckoutProcess->checkout.- The part of the code that can break should go inside
try { // code here } - And whatever you want to happen if the code in the try has an error should go in the
catch(err) { }
- The part of the code that can break should go inside
Form Validation
The server requires all fields to be filled. HTML provides client-side validation for missing information using
the required attribute on input elements. This allows for immediate feedback to the user before form
submission.
- Add the HTML
requiredattribute to all the form inputs.
Depending on how you are listening for the form submission, the HTML validation may or may not be working. If you
attached a click listener on the button you will need to trigger the validation ourselves, if you
listened for the submit event on the form the validation should automatically be working. Previously,
you determined that since you were submitting the form through AJAX, you did not want the form to do what it
normally would do if submitted. In the listener for the form button you have added
e.preventDefault();. That part of your code should look something like this:
document.querySelector('#checkoutSubmit')
.addEventListener('click', (e) => {
  e.preventDefault();
  myCheckout.checkout();
});
Do the following in your listener handler function if the form validation is not working:
- Get the form from the DOM.
-
Forms have a method called
checkValiditythat will return false if it finds anything in the form data that goes against the validation rules. Call it and store the result into a variable. -
You can also manually trigger the messages that the browser
will add to the page when something is wrong. That is done
with
myForm.reportValidity() -
Finally, if the validity test came back false, you do not
want to continue.
WrapmyCheckout.checkout();in an if statement to stop it from continuing.
Click for example
document.querySelector('#checkoutSubmit').addEventListener('click', (e) => {
  e.preventDefault();
  const myForm = document.forms[0];
  const chk_status = myForm.checkValidity();
  myForm.reportValidity();
  if(chk_status)
    myCheckout.checkout();
  });
By leveraging the built in HTML validation that the browser can manage, the total of error handling is dramatically reduced.
Thinking back to the reading from earlier (MDN: Client side form validation), what else should you add to the HTML validation to help the users to give us good input? Plan on discussing this with your team and add those things you think appropriate.
Handling the Happy Path 😁
Currently the application does not give any feedback to the user about whether the order succeeded or failed. Let's start by responding to a successful order. You should do the following:
☑️ Give the user a success message.
☑️ Clear out the cart.
☑️ Anything else?
This is not a very long list. The main decision to be made is how do you want to message the user? You could either pop something up in the current page, or take the user to a new page with a success message. Leaving them on the page with the form does not make a lot of sense. Let's move to a success page.
- Inside of the
checkoutdirectory create a new file:success.html. - Add the base formatting including header and footer, and then add a success message for the user.
- Then add the code to your checkout process to take the user to this page upon a successful checkout.
- Make sure to also clear out the cart contents in localStorage.
Stretch Goals
Handling the Unhappy Path 😢
The last thing you need to do is to handle the few last errors the user might get. You will want to stay on the checkout form page so the user does not lose what they have already entered and so they can know what went wrong and fix it if possible. So a popup message would be appropriate here.
'popup' does not refer to an alert. The objective is to have something much less intrusive that
will not overpower the user's interface.
Creating custom alert messages is something that could be useful outside of errors, so a new function in the utilities module sounds appropriate.
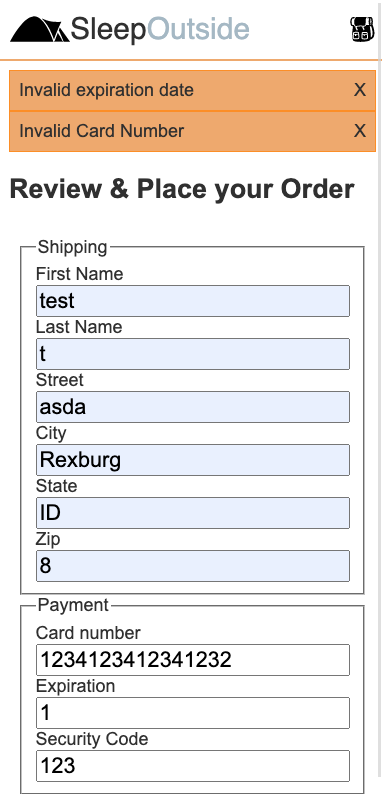
- Create and export a function called
alertMessage(message, scroll=true)inutils.mjs. - Create an alert that matches the screenshot below.
- Insert your alert at the top of the
mainelement. - Since the checkout form is longer than will fit on the screen of a mobile device, your alertMessage should have the option to scroll the page back to the top to make sure the user sees the error messages.
Click for example
export function alertMessage(message, scroll = true) {
  // create element to hold the alert
  const alert = document.createElement('div');
  // add a class to style the alert
  alert.classList.add('alert');
  // set the contents. You should have a message and an X or something the user can click on to remove

  // add a listener to the alert to see if they clicked on the X
  // if they did then remove the child
  alert.addEventListener('click', function(e) {
      if( ) { // how can you tell if they clicked on the X or on something else?  hint: check out e.target.tagName or e.target.innerText
        main.removeChild(this);
      }
  })
  // add the alert to the top of main
  const main = document.querySelector('main');
  main.prepend(alert);
  // make sure they see the alert by scrolling to the top of the window
  // you may not always want to do this...so default to scroll=true, but allow it to be passed in and overridden.
  if(scroll)
    window.scrollTo(0,0);
}
Add an alert to Product detail
When you add a product to the cart there is a good chance that the action gives no feedback to the user. If you have already fixed this and yours does give feedback, Kudos! If not, you can use this utility alert to quickly send the user a message that the item was successfully added.
Example Solution
As a part of this individual activity, you are expected to look over a solution from the instructor, to compare your approach to that one. One of the questions on the Canvas submission will ask you to provide insights from this comparison.
Do NOT open the solution until you have worked through this activity for at least one hour. At the end of the hour, if you are still struggling with some of the core requirements, you are welcome to view the example solution and use it to help you complete your own code.
After working individually for the one hour activity, click here for the example solution.
Make a Pull Request
Wrap up this individual project work by finishing up your individual work and then coordinating with your team.
- Commit and push your changes.
- Meet with your team and discuss which team member's changes (branch) you would like to
keep.
Your team will only keep one. - Submit a request for the branch that you decided to keep.
- Review the Pull Request, close it, and merge the branch back into the Main branch.
- Move the task to the
"Done"column.
Submission
Return to Canvas to report on your work.