NPS - part 7
Time: 3 hours

Yellow: Instructor-Specified AI Usage
You may use AI as described in the assignment with the appropriate attribution.
AI can be used to help you with this assignment, but you should not rely on it too heavily. Use it to help you understand concepts, troubleshoot or get unstuck, or generate ideas. Do not use it to generate large amounts of code. If you do use AI, make sure to validate what it tells you with other sources.
Instructions
Complete the following assignment individually. Feel free however to work together with your classmates to accomplish the task. You are all solving the same problems and have different insights.
01 Review the provided screenshots
For the last part of this project we will create detail pages for each of the Visitor centers. We need to be strategic about this though. While some parks don’t have a ton of visitor centers, others do. Manually creating a page for each of the centers at Yellowstone for example with it’s eleven would be a fair amount of work. Since the pages for each visitor center are quite similar, we can leverage Javascript to create one HTML page as a template, and URL parameters to send in an identifier for the center we want to display.
We will be creating a simplified version of the offical page again. Here is the page for the Canyon Visitor Center in Yellowstone. Review the page to get a feel for what the goal is. Then review the following screenshots to understand how the changes we will make for our version.
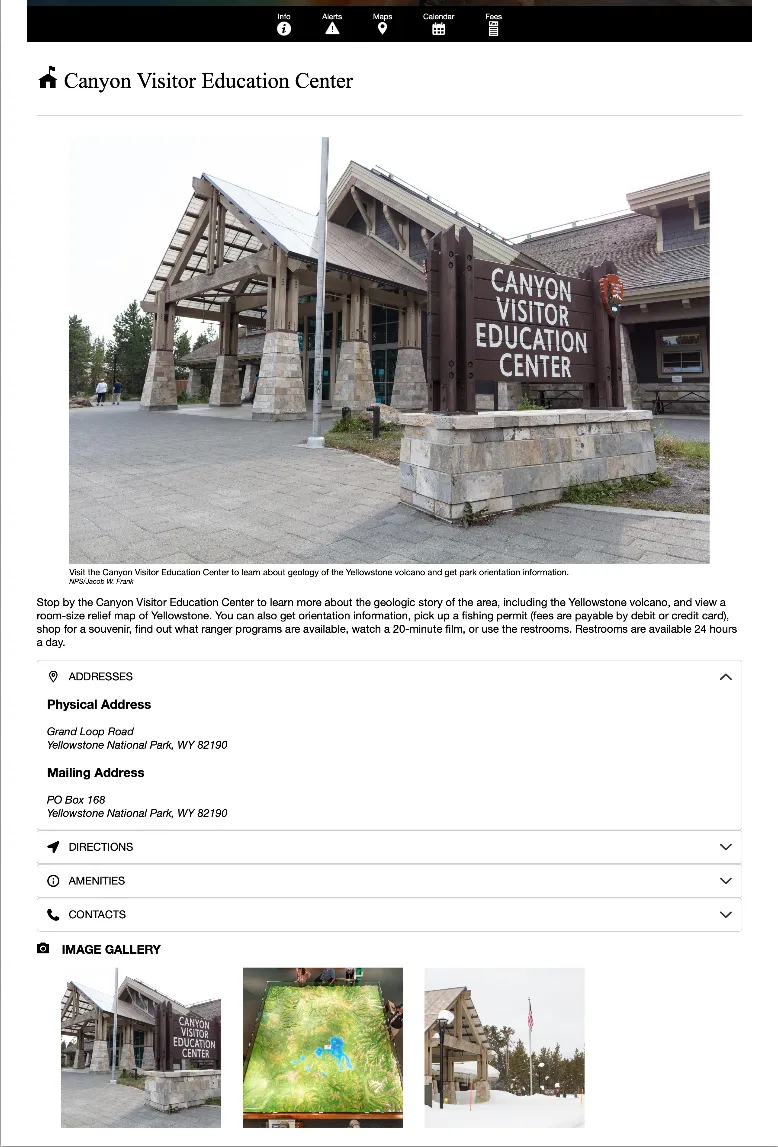
The screenshot does not show all of the accordians open. You should style them similar to the official pages
Remember to type npm run start to start up your development server.
02 Update the conditions.html page
On the Conditions/alerts page (conditions.html) we added a list of the visitor centers. We need to update that list to be links. Each visitor center will actually link to the same HTML file, but we will add specific information for the particular center in the URL through a URL Search Parameter.
Create a new HTML file called visitor-center.html. You may want to start with copy/pasting the HTML out of one of the other files as a starting point. The header and footer will be the same, but clear out main.
Then update the template that creates the list of visitor centers on the conditions.html page. It should turn the visitor center name into a link. As you construct you links, think about how we will identify the center. You may need to goto the NPS API Documentation to remember what data was sent back from the visitor center endpoint. What property can we use to uniquely identify the centers?
After you have completed your version of this step, take a look at the example below.
Example step 2
export function visitorCenterTemplate(center) {
  return `<li class="visitor-center">
  <h4><a href="visitor-center.html?id=${center.id}">${center.name}</a></h4>
  <p>${center.description}</p>
  <p>${center.directionsInfo}</p>
  </li>`;
}
03 Retrieve the URL parameters
The next thing we need to do is to write the Javascript to retrieve the data sent in the URL. Create a file called visitor-center.js in that file create a function called getParam(param). That function needs to do the following:
- Get the search string from the
locationobject. - Create a new
URLSearchParamsobject from the search string. - Return the value of the specified parameter.
After creating your version of the function you should use it to get the id of the visitor center. Store it in a variable. Feel free to check out the instructor solution below to compare or troubleshoot.
Step 3 example
function getParam(param) {
    const search = location.search;
    const params = new URLSearchParams(search);
    return params.get(param);
}
04 Retrieve the visitor center data from the API
Now that we know which center we are interested in, we can retrieve the data. Write a new function in the parkService.mjs file called getParkVisitorCenterDetails(id) It will actually look pretty similar to the existing getParkVisitorCenters function.
Make the changes to get the function to work.
Hopefully your first thought here was to go review the NPS documentation to see how to make a call with a visitor center id. Go take a look if you have not already.
You might be surprised to note that there does not seem to be an option to use id! It is not listed as an option, but it actually works to do something like this:
visitorcenters?id=longidstringThe next question though is: should we use undocumented features of APIS? There is some risk with doing this. If the feature is not in the documentation, it might suddenly change or even disappear! In this case however, the risk is low. There is very little chance that the
idfield will change or go away.If we had another option we would take it, but
idreally is the best thing to use here.
Return to the visitor-center.js file. Import your new function, as well as the other functions we need to setup the header and footer of the site. Call all the functions and check to make sure that everything is working correctly.
Step 4 example
parkService.mjs
export async function getParkVisitorCenterDetails(id) {
  const parkData = await getJson(`visitorcenters?id=${id}`);
  return parkData.data[0];
}
visitor-center.js
import setHeaderFooter from "./setHeaderFooter.mjs";
import { getParkData, getParkVisitorCenterDetails } from "./parkService.mjs";

function getParam(param) {
  const search = location.search;
  const params = new URLSearchParams(search);
  return params.get(param);
}

async function init() {
  const parkData = await getParkData();
  const id = getParam("id");
  const centerDetails = getParkVisitorCenterDetails(id);
  setHeaderFooter(parkData);
}

init();
05 Write/generate the HTML for the visitor-center.html page
We are now ready to build out our new page. We will build out the following sections in main:
- The name of the visitor center should be at the top of the page.
- The first section will be an image and a paragraph of text that describes the visitor center.
- The second section will be a collection of accordians: Addresses, Directions, Amenities, Contact Information. Only one accordian should be able to be open at a time.
- And finally the last section will be a gallery of images
All of this information is in the data we just retrieved from the API. All of the icons you need (see the screenshot above) are in the sprite.symbol.svg file. Just to save you some time here are the ids:
“ranger-station”, “heading-icon_map-pin”, “directions”, “heading-icon_info”, “phone”, “camera-alt”.
In order to save your time to work on the CSS and the Javascript, you have permission to open up the Example code section below and copy/paste the HTML there into your visitor-center.html file directly. Make sure to review what you have been given to understand the structure. Then move on to the next step.
Step 5 Example
visitor-center.html
 <h1 class="vc-name">
    <svg class="icon" role="presentation" focusable="false">
        <use
        xmlns:xlink="http://www.w3.org/1999/xlink"
        xlink:href="/images/sprite.symbol.svg#ranger-station"
        ></use>
    </svg>
    [Visitor center name]
</h1>
<section class="vc-info">
    <figure>
        <img src="https://via.placeholder.com/150" alt="center image" />
        <figcaption>
        [visitor center image] <span>[attribution]</span>
        </figcaption>
    </figure>
    <p>[info here]</p>
</section>
<section class="vc-details-list">
    <details name="vc-details" id="vcAddresses">
        <summary>
        <svg class="icon" role="presentation" focusable="false">
            <use
            xmlns:xlink="http://www.w3.org/1999/xlink"
            xlink:href="/images/sprite.symbol.svg#heading-icon_map-pin"
            ></use>
        </svg>
        Addresses
        </summary>
        <!-- Remove later -->
        <section class="vc-addresses__physical">
        <h3>Physical Address</h3>
        <address>
            [Address part 1]<br />
            [park name], [state] [zip]
        </address>
        </section>
        <section class="vc-addresses__mailing">
        <h3>Mailing Address</h3>
        <address>
            [Address part 1]<br />
            [park name], [state] [zip]
        </address>
        </section>
    </details>
    <details name="vc-details" id="vcDirections">
        <summary>
        <svg class="icon" role="presentation" focusable="false">
            <use
            xmlns:xlink="http://www.w3.org/1999/xlink"
            xlink:href="/images/sprite.symbol.svg#directions"
            ></use>
        </svg>
        Directions
        </summary>
        <p>[directions]</p>
        <!-- remove later -->
    </details>
    <details name="vc-details" id="vcAmenities">
        <summary>
        <svg class="icon" role="presentation" focusable="false">
            <use
            xmlns:xlink="http://www.w3.org/1999/xlink"
            xlink:href="/images/sprite.symbol.svg#heading-icon_info"
            ></use>
        </svg>
        Amenities
        </summary>
        <ul> <!-- Remove later -->
        <li>All</li>
        <li>the</li>
        <li>amenities</li>
        </ul>

    </details>
    <details name="vc-details" id="vcContact">
        <summary>
        <svg class="icon" role="presentation" focusable="false">
            <use
            xmlns:xlink="http://www.w3.org/1999/xlink"
            xlink:href="/images/sprite.symbol.svg#phone"
            ></use>
        </svg>
        Contact Information
        </summary>
        <!-- Remove later -->
        <section class="vc-contact__email">
        <h3>Email Address</h3>
        <a href="email:">Send this visitor center an email</a>
        </section>
        <section class="vc-contact__phone">
        <h3>Phone numbers</h3>
        <a href="tel:+12083591111">[phone]</a>
        </section>
    </details>
</section>
<section class="vc-gallery">
    <h2>
        <svg class="icon" role="presentation" focusable="false">
        <use
            xmlns:xlink="http://www.w3.org/1999/xlink"
            xlink:href="/images/sprite.symbol.svg#camera-alt"
        ></use>
        </svg>
        Image Gallery
    </h2>
    <ul> <!-- Remove later -->
        <li><img src="" alt="" /></li>
    </ul>
</section>
06 Style the new page
You were given a bunch of HTML in the previous step that you have hopefully reviewed. You will notice that it does not contain the real information, but just placeholder text instead. We will replace that in the next step. It does provide enough structure for us however to be able to add the CSS necessary to style it according to the mockups you were provided above. Style the page now. Feel free to add more classes if needed, or even change up the HTML structure as you do this.
Because we have broken up our CSS into partials…you should create a new file for this page: visitor-center.css for example. Then make sure to import it and style.css into visitor-center.js
Much of what you need to do is just make things the right size, and get the padding and margin right. On the image gallery to get the images to crop to a square with CSS look at the object-fit property.
The mockup above does vary in a few ways from the original. One of those is in how the markers on the accordian boxes that show if it is open or closed are styled. The example below contains a solution to change our default
detailsstyling to look more like the one on the official page. Look it over if you are interested to see how that would be done. It references an image that you may not have: Arrow svg
Step 6 Example
CSS
/* visitor center styles */

.vc-name {
  border-bottom: 1px solid var(--bs-gray-400);
  padding-bottom: 1em;
  margin-bottom: 1em;
}
.vc-name svg {
  width: 1em;
  height: 1em;
}
.vc-info figure {
  margin: 1em 3em;
}
.vc-info figcaption {
  font-size: 0.8em;
}
.vc-info figcaption > span {
  display: block;
  font-size: 0.8em;
  font-style: italic;
}

.vc-details-list svg,
.vc-gallery svg {
  width: 1.25rem;
  height: 1.25rem;
  margin-right: 1rem;
  fill: black;
}
.vc-details-list summary {
  display: flex;
  align-items: center;
  text-transform: uppercase;
  cursor: pointer;
  position: relative;
}

#vcAmenities ul {
  list-style: none;
}
#vcAmenities li {
  margin-bottom: 1em;
}

.vc-gallery > h2 {
  text-transform: uppercase;
  font-size: 1.25rem;
}
.vc-gallery ul {
  list-style: none;
  display: flex;
  gap: 1em;
  flex-wrap: wrap;
}

/* This is an example of how to clip an image into a square shape */
.vc-gallery img {
  width: 265px; /* set the width to the desired size */
  height: 265px; /* set the height to the same value as the width */
  object-fit: cover;
  object-position: center;
}

/* Optional re-styling of the open/closed markers for the details elements */

/* First we have to hide the default markers */
.vc-details-list summary::marker,
.vc-details-list summary::-webkit-details-marker {
  display: none;
}
/* then we can use ::after to insert in a new image and position it to the right place */
.vc-details-list summary::after {
  content: "";
  position: absolute;
  right: 0;
  width: 1.25rem;
  height: 1.25rem;
  background-image: url("../images/arrow.svg");
  background-size: 1.25rem 1.25rem;
  background-position: 0 0;
  background-repeat: no-repeat;
}

/* when you open a details element the browser automatically adds an "open" attribute to the detail.
We can use this with some fancy selector work to change the background position of the arrow image to show the open state. */
.vc-details-list details[open] > summary::after {
  transform: rotate(180deg);
}
07 Use Javascript to insert data
We now know what the HTML should look like, and we have the data from the API. We need to combine the two now to complete the page.
There is a programming principle called “composition”. This principle is based on the idea that a complex system can be represented as a collection of smaller, independent components that work together to achieve a common goal.
Here, we will use this principle to break down the task of creating the page into smaller template functions that can be assembled and re-used in whatever way we might need.
Scan over the HTML again and start identifying blocks of related content. This will provide the start to our template function list. Don’t stress too much about “getting it right”. There is often a lot of opinion in this type of exercise. As long as you are thinking about keeping things simple and making things re-usable you are doing OK.
Here is one potential list of template functions you might make.
- page title template
- Visitor center general info template
- template to create a details box. We do need a bit of flexibility in this one to make it reusable. We need to send in the summary label for the details box, an ID so we can manipulate it with Javascript, the ID for the icon we would like it to use, and finally the content of the details element…in HTML.
- image gallery template
- template to generate a simple HTML list (we will use this for the amenities and gallery sections).
- other templates to generate the content for the detail elements. (Addresses, Contact Information)
Note that this is not the only way to break this down. And even with this list there is a fair amount of flexibility. For example, how much of the markup should we leave in the HTML file and how much should we generate with Javascript? I’m not sure there is one correct answer for this. You get to decide some of those details, and hopefully you have some justification for each decision you make.
Let’s work on the gallery section to get started. The gallery will be a list of images…in the HTML given earlier it looked like this:
<section class="vc-gallery">
<h2>
    <svg class="icon" role="presentation" focusable="false">
    <use
        xmlns:xlink="http://www.w3.org/1999/xlink"
        xlink:href="/images/sprite.symbol.svg#camera-alt"
    ></use>
    </svg>
    Image Gallery
</h2>
<ul><li><img src="" alt=""></li></ul>
</section>
Most of the markup will stay the same no matter which park we might be looking at, so it makes a certain amount of sense to leave that static markup in the HTML instead of generating it with Javascript. The actual list of images will change with every park, so that we need to generate. Note as well that we will need another list as well when we create the Amenities section. If possible we should create a function that could create both lists to reuse. The trick is that the content inside the li will be different with both lists. So our list template needs to allow for that.
export function listTemplate(data, contentTemplate) {
  const html = data.map(contentTemplate);
  return `<ul>${html.join("")}</ul>`;
}
Notice that we pass in the template function we want at run time, which makes this function very flexible. So in the case of the images we might use something like:
export function vcImageTemplate(data) {
  return `<li><img src="${data.url}" alt="${data.altText}" ><li>`;
}
And for the Amenities list we could use this:
export function vcAmenityTemplate(data) {
  return `<li>${data}</li>`;
}
Putting it all together might look like:
  // gallery section
  const galleryHTML = listTemplate(data.images, vcImageTemplate);
  document.querySelector('vc-gallery').insertAdjacentHTML("beforeend", galleryHTML);
If you are not familiar with
insertAdjacentHTMLyou should become familiar with it. It is much more flexible than just usinginnerHTML, and has better performance. insertAdjacentHTML
We can’t finish the Amenities quite yet. It is also inside of a details element. One of the things on our list of templates was a function that would produce the HTML to build that element. To review the markup looks like this:
<details name="vc-details" id="vcAmenities">
    <summary>
    <svg class="icon" role="presentation" focusable="false">
        <use
        xmlns:xlink="http://www.w3.org/1999/xlink"
        xlink:href="/images/sprite.symbol.svg#heading-icon_info"
        ></use>
    </svg>
    Amenities
    </summary>
    <ul>
    <li>All</li>
    <li>the</li>
    <li>amenities</li>
    </ul>
</details>
There are four sections that are very similar. To make a function that could be used for all four sections we will need to send in a fair amount of info: an id unique to the section, the icon id we would like to use, the text for the summary, and the actual content. In this example the content will be a ul with all the amenities in it.
Create the remaining template functions in templates.mjs, then create a function in visitor-center.js that we will use to call all of the related template functions to build the complete page. Test to make sure that the info all loads correctly.
For the contacts, just grab the first email and first phone number in the lists (most only have one).
Step 7 Example
export function vcTitleTemplate(text) {
  return `${iconTemplate("ranger-station")} ${text}`;
}

export function vcInfoTemplate(data) {
  const image = data.images[0];
  return `<figure>
          <img src="${image.url}" alt="${image.altText}" />
          <figcaption>${image.caption} <span>${image.credit}</span></figcaption>
        </figure>
        <p>${data.description}</p>`;
}
export function listTemplate(data, contentTemplate) {
  const html = data.map(contentTemplate);
  return `<ul>${html.join("")}</ul>`;
}

function vcAddressTemplate(data) {
  return `<section>
            <h3>${data.type} Address</h3>
            <address>
              ${data.line1}<br />
              ${data.city}, ${data.stateCode} ${data.postalCode}
            </address>
          </section>`;
}

export function vcAddressesListTemplate(data) {
  const physical = data.find((address) => address.type === "Physical");
  const mailing = data.find((address) => address.type === "Mailing");
  let html = vcAddressTemplate(physical);
  if (mailing) {
    html += vcAddressTemplate(mailing);
  }
  return html;
}
export function vcAmenityTemplate(data) {
  return `<li>${data}</li>`;
}
export function vcDirectionsTemplate(data) {
  return `<p>${data}</p>`;
}
export function vcContactsTemplate(data) {
  return `<section class="vc-contact__email">
            <h3>Email Address</h3>
            <a href="email:${data.emailAddresses[0].emailAddress}">Send this visitor center an email</a>
          </section>
          <section class="vc-contact__phone">
            <h3>Phone numbers</h3>
            <a href="tel:+1${data.phoneNumbers[0].phoneNumber}">${data.phoneNumbers[0].phoneNumber}</a>
          </section>`;
}

export function vcImageTemplate(data) {
  return `<li><img src="${data.url}" alt="${data.altText}" ><li>`;
}
08 Stretch - Add the Hours and Seasons info
This step is optional. If you are up for a bit of a challenge, implement the Hours and Seasons section.
09 Commit and push to Github
Commit your changes, then push them to GitHub. Wait a few minutes then check to make sure they show on Netlify.
Instructor’s Solution
As a part of this activity, you are expected to look over a solution from the instructor, to compare your approach to that one. One of the questions on the I-Learn submission will ask you to provide insights from this comparison.
Please DO NOT open the solution until you have worked through this activity for at least one hour. At the end of the hour, if you are still struggling with some of the core requirements, you are welcome to view the instructor’s solution and use it to help you complete your own code. Even if you use the instructor’s code to help you, you are welcome to report that you finished the core requirements, if you code them up yourself.
After working as far as you can, click here for the instructor’s solution.