NPS - part 2
Time: 2 hours

Yellow: Instructor-Specified AI Usage
You may use AI as described in the assignment with the appropriate attribution.
AI can be used to help you with this assignment, but you should not rely on it too heavily. Use it to help you understand concepts, troubleshoot or get unstuck, or generate ideas. Do not use it to generate large amounts of code. If you do use AI, make sure to validate what it tells you with other sources.
Instructions
Complete the following assignment individually. Feel free however to work together with your classmates to accomplish the task. You are all solving the same problems and have different insights.
01 Review the provided screenshots
We are going to be building a simplified version of the NPS park page. Review the mockups below to get a feel for the changes we will make and what your page should look like when you are done.
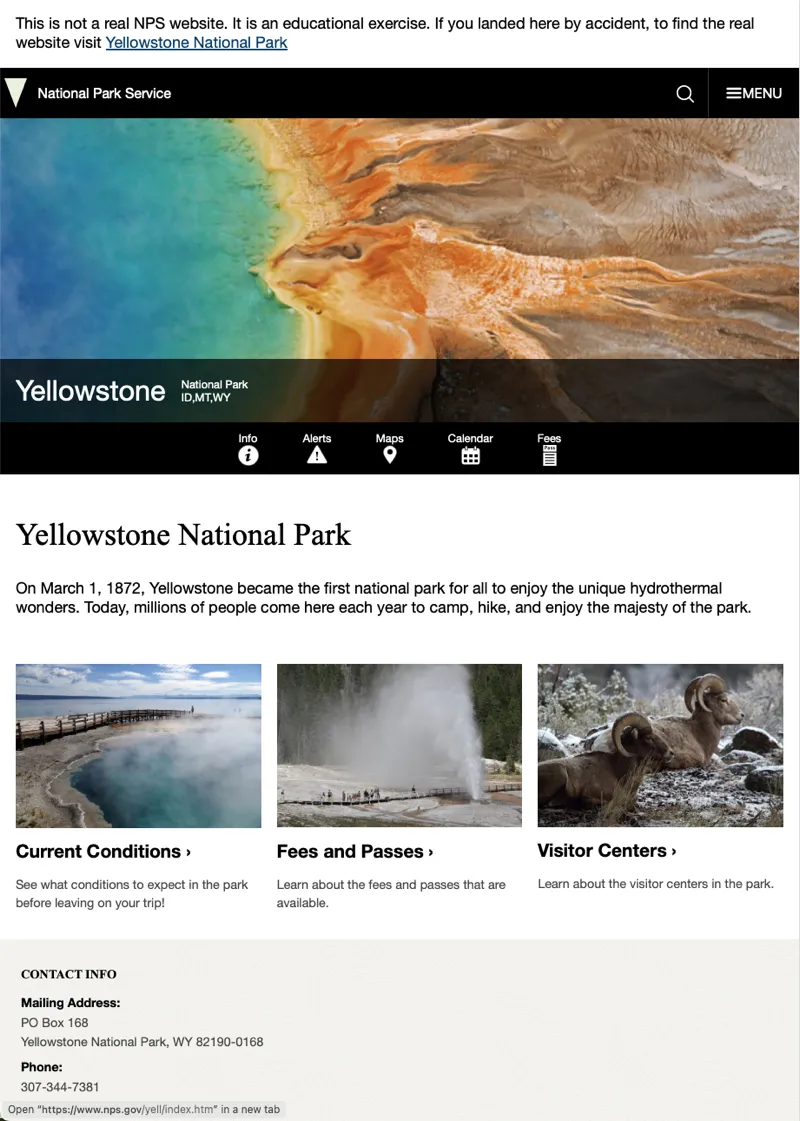

Here are a few things in particular to note:
- We will use the full park name for the main headline (h1)
- We will only have 3 sections on our page: “Current Conditions”, “Fees and Passes”, and “Visitor Centers”. We will build those actual pages later
- The footer has also been simplified to just the address and phone number for the park.
After reviewing the mockups type npm run start to start. Remember that this will start up our development environment and should open the page in your default browser.
02 Finish the HTML
Open up the index.html file. We need to add sections to our main element to hold the new content. Give them a class as well. Something like intro for the first and info for the second will work.
Next open up the main.js file. Since we are pulling the content from a dataset, we will add the rest of the HTML with Javascript!
First let’s do a little organization. Let’s take the code we wrote last week and wrap it up into a function. It should look like the following:
function setHeaderInfo(data) {
  // insert data into disclaimer section
  const disclaimer = document.querySelector(".disclaimer > a");
  disclaimer.href = data.url;
  disclaimer.innerHTML = data.fullName;
  // update the title of the site. Notice that we can select things in the head just like in the body with querySelector
  document.querySelector("head > title").textContent = data.fullName;
  // set the banner image
  document.querySelector(".hero-banner > img").src = data.images[0].url;
  // use the template function above to set the rest of the park specific info in the header
  document.querySelector(".hero-banner__content").innerHTML =
    parkInfoTemplate(data);
}
Remember to run your new function as well!
Next we should make a list of the other things we need to do:
- Set the information in the
introsection. This will be the park full name, and the description from our data. You can do this in much the same way we inserted data in the header. - Create a template function that will create a component consisting of an image, headline, and paragraph. If you check out the real Yellowstone site you will notice that the image and headline are also links. You can call this function
mediaCardTemplate(info) - We know that we want to create certain blocks, but they are not directly represented in our data. We could just hard code everything, but what if we want to change the content sections later? We should represent the sections in data…to make it easier to change later if necessary. We will create a new array called
parkInfoLinksand add the following objects to it:
const parkInfoLinks = [
  {
    name: "Current Conditions ›",
    link: "conditions.html",
    image: parkData.images[2].url,
    description:
      "See what conditions to expect in the park before leaving on your trip!"
  },
  {
    name: "Fees and Passes ›",
    link: "fees.html",
    image: parkData.images[3].url,
    description: "Learn about the fees and passes that are available."
  },
  {
    name: "Visitor Centers ›",
    link: "visitor_centers.html",
    image: parkData.images[9].url,
    description: "Learn about the visitor centers in the park."
  }
];
- Loop through this new array and run the
mediaCardTemplatefunction once for each content area. Then take the HTML returned and insert it into theinfosection. (Hint:mapworks great for things like this) - Create another template function that will create the information in the footer. If you look at the data you will see that there are multiple phone numbers and addresses. We need to make sure to output the
Mailingaddress and theVoicephone number. - Use all our template functions to set the information in the
intro,info, andpark-footersections. I would recommend creating a set of functions likesetParkIntro(data),setParkInfo(data), andsetParkFooter(data) - Don’t forget to call all the functions!
Most of this should be review. Similar to what we did last week. There is one part that is new however, filtering to the correct address and phone number in the footer template.
If you look at the data you were given (open up the parkService.mjs file) you will see that the contact information is marked with a type field. We can use the Array.find() method to get to just the right one. Find returns the first match. So to find the Mailing address you could do something like this:
function getMailingAddress(addresses) {
  const mailing = addresses.find((address) => address.type === "Mailing");
  return mailing;
}
To use this we could call it and store the data returned…then insert that into our HTML.
function footerTemplate(info) {
  const mailing = getMailingAddress(info.addresses);
  const voice = getVoicePhone(info.contacts.phoneNumbers)

  return `<section class="contact">
  <h3>Contact Info</h3>
  <h4>Mailing Address:</h4>
  <div><p>${mailing.line1}<p>
  <p>${mailing.city}, ${mailing.stateCode} ${mailing.postalCode}</p></div>
  <h4>Phone:</h4>
  <p>${voice}</p>
  </section>`;
}
Once you have completed this step feel free to review the instructor’s code. Don’t just copy and paste this into your file! Review it, note the differences, and then add or remove whatever you think appropriate once you understand what the differences mean.
Click here to see the new template functions
function mediaCardTemplate(info) {
  return `<div class="media-card">
  <a href="${info.link}">
  <img src="${info.image}" alt="${info.name}" class="media-card__img">
  <h3 class="media-card__title">${info.name}</h3>
  </a>
 <p>${info.description}</p>
   </div>`;
}
function getMailingAddress(addresses) {
  const mailing = addresses.find((address) => address.type === "Mailing");
  return mailing;
}
function getVoicePhone(numbers) {
  const voice = numbers.find((number) => number.type === "Voice");
  return voice.phoneNumber;
}
function footerTemplate(info) {
  const mailing = getMailingAddress(info.addresses);
  const voice = getVoicePhone(info.contacts.phoneNumbers);

  return `<section class="contact">
  <h3>Contact Info</h3>
  <h4>Mailing Address:</h4>
  <div><p>${mailing.line1}<p>
  <p>${mailing.city}, ${mailing.stateCode} ${mailing.postalCode}</p></div>
  <h4>Phone:</h4>
  <p>${voice}</p>
</section>
Click here to see the set functions
function setHeaderInfo(data) {
  // insert data into disclaimer section
  const disclaimer = document.querySelector(".disclaimer > a");
  disclaimer.href = data.url;
  disclaimer.innerHTML = data.fullName;
  // update the title of the site. Notice that we can select things in the head just like in the body with querySelector
  document.querySelector("head > title").textContent = data.fullName;
  // set the banner image
  document.querySelector(".hero-banner > img").src = data.images[0].url;
  // use the template function above to set the rest of the park specific info in the header
  document.querySelector(".hero-banner__content").innerHTML =
    parkInfoTemplate(data);
}

function setParkIntro(data) {
  const introEl = document.querySelector(".intro");
  introEl.innerHTML = `<h1>${parkData.fullName}</h1>
  <p>${parkData.description}</p>`;
}

function setParkInfoLinks(data) {
  const infoEl = document.querySelector(".info");
  const html = data.map(mediaCardTemplate);
  infoEl.innerHTML = html.join("");
}

function setFooter(data) {
  const footerEl = document.querySelector("#park-footer");
  footerEl.innerHTML = footerTemplate(data);
}

setHeaderInfo(parkData);
setParkIntro(parkData);
setParkInfoLinks(parkInfoLinks);
setFooter(parkData);
03 Finish Styling
Open up the style.css file and begin styling the new content. Refer back to the real and the mockups often as you are styling. If there is a difference with the mockups and the real site go with the mockup.
Continue adding css until your page matches the mockups above. The background for the footer is actually an image. Here is the image:

04 Refactor
If you go back and look at the main.js file you will see that it has gotten quite large. We should take a minute to organize our code. This process of improving your code is called refactoring. This process has us look for places where we can make our code more efficient, and DRY (Don’t Repeat Yourself). We can look for code that we might want to reuse, and move it into modules. Sometimes we are able to identify code that we need to re-use as we write it, but often it does not become apparent until later. Analyzing and tweaking our code regularly will make things easier for you as your code grows in size and complexity.
We can first consider the new data that we built: parkInfoLinks. It feels a little out of place in main.js. Let’s move it to parkService.mjs instead. Then we can export it and if it is needed in other pages it will be easy to get. Remember to import it back into main.js You will also need to update the image property of each record. It references parkData and in it’s new location the data is found in park
Second: the template functions. Templates are things that are sometimes re-used across a project. Let’s gather them all together in one place to make them easy to find. Create a new file called templates.mjs, copy and paste the functions into that file, and export them. Then go back to main.js and import the templates we need.
Finally we’re going to have to set the header and footer info on every page. In order to avoid re-writing those functions over and over let’s put them in a module as well. Create one more file called setHeaderFooter.mjs. Copy the setHeaderInfo and setFooter functions from main.js into this new file. Then since I can’t think of an instance where we would set one and not the other, create one more function called setHeaderFooter and make it the default export. Call the two functions in that one. Note that you will also need pass the data into that function as well.
Clean up main.js by importing in the new functions and templates and calling them. Also if you have not done so, remove all the code that we moved from main.js into the modules. Your main.js file should look something like this when you are done:
import { getParkData, parkInfoLinks } from "./parkService.mjs";
import setHeaderFooter from "./setHeaderFooter.mjs";
import { mediaCardTemplate } from "./templates.mjs";
const parkData = getParkData();

function setParkIntro(data) {
  const introEl = document.querySelector(".intro");
  introEl.innerHTML = `<h1>${parkData.fullName}</h1>
  <p>${parkData.description}</p>`;
}

function setParkInfoLinks(data) {
  const infoEl = document.querySelector(".info");
  // we have multiple links to build...so we map to transform the array of objects into an array of HTML strings.
  const html = data.map(mediaCardTemplate);
  // join the array of strings into one string and insert it into the section
  infoEl.insertAdjacentHTML("afterbegin", html.join(""));
}

setHeaderFooter(parkData);
setParkIntro(parkData);
setParkInfoLinks(parkInfoLinks);
After refactoring it is important to test and make sure that everything still works. Do that now.
If you are not familiar with
insertAdjacentHTMLyou should become familiar with it. It is much more flexible than just usinginnerHTML, and has better performance. insertAdjacentHTML
05 Commit and push to Github
Run npm run build, then npm run preview to check your production build and make sure it works the same as your normal development site (npm run start).
If everything looks good then commit your changes, then push them to GitHub. Wait a few minutes then check to make sure they show on Netlify.
Instructor’s Solution
As a part of this activity, you are expected to look over a solution from the instructor, to compare your approach to that one. One of the questions on the I-Learn submission will ask you to provide insights from this comparison.
Please DO NOT open the solution until you have worked through this activity for at least one hour. At the end of the hour, if you are still struggling with some of the core requirements, you are welcome to view the instructor’s solution and use it to help you complete your own code. Even if you use the instructor’s code to help you, you are welcome to report that you finished the core requirements, if you code them up yourself.
After working as far as you can, click here for the instructor’s solution.