W02 Learning Activity: Document Object Model
Overview
A key skill for any front-end web developer is the ability to manipulate the DOM (Document Object Model), a JavaScript object the browser creates after it parses the HTML document. Manipulating the DOM means dynamically reading, editing, updating, or deleting elements and their CSS properties. The DOM is the tree-like representation of your page's structure and content nodes.
The purpose of this activity is to introduce the HTML DOM and learn how to manipulate the document using JavaScript.
Associated Course Learning Outcomes
Demonstrate proficiency with JavaScript language syntax.
Use JavaScript
to respond to events and dynamically modify HTML.
Prepare
- Reference: Manipulating documents – MDN.
Note that the Active learning: A dynamic shopping list example found at the end of the MDN article will help you complete this week's activities.
- Practice: Common DOM manipulation concepts and use cases.
- Select an HTML element from the document using the querySelector method.
This line of code selects the first instance of an article element from the document and assigns it as a reference to the variable namedarticle.const article = document.querySelector('article'); - Change the innerHTML property of an existing element.
This line of code uses an existing variable that references a previously selected element and changes its innerHTML property value.article.innerHTML = 'innerHTML supports <strong>HTML</strong> tags. The textContent property does not.'; - Change the inline CSS style of an element.
This line of code changes the text-align CSS property of the selected element.article.style.textAlign = 'right'; - Change an attribute of an element.
This line of code adds a class attribute to the element and assigns it a value.article.setAttribute('class', 'active');An alternative way to change an element's class attribute is by directly manipulating the element's
classListproperty.
This method is often preferred for class manipulation becausearticle.classList.add('active');classListprovides additional methods likeadd,remove,toggle, andcontains, making it more convenient and expressive for managing classes. - Create an element.
This line of code creates a new <p> element and stores it in the variable namedparagraph.const paragraph = document.createElement('p'); - Append content or elements to an element.
These lines of code add content to the end of thearticleelement.article.appendChild(paragraph); article.append(paragraph, 'Hello World Addition!');The append() method allows you to include multiple arguments to append to the element in the specified order.
- Remove an element from the document.
These lines of code remove theparagraphfrom thearticleand then remove thearticleitself.article.removeChild(paragraph); article.remove();
- Select an HTML element from the document using the querySelector method.
Activity Instructions
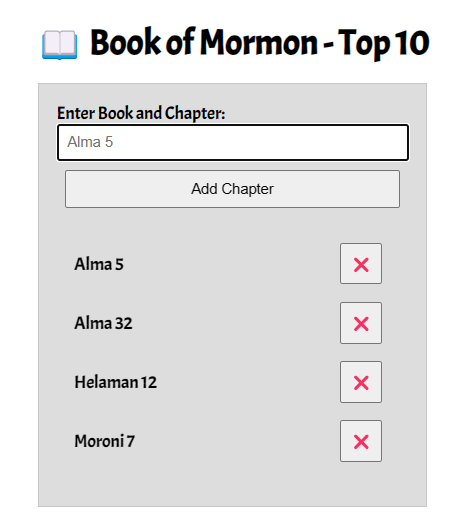
This Book of Mormon application will be expanded upon in future learning activities. We will start by building the interface and implementing basic DOM manipulation.
This app allows users to enter their favorite Book of Mormon chapters and display them in a list that updates automatically on the screen. Entries can then be deleted from the list.
- Create an HTML file named "bom.html" in the week02 folder.
- Your bom.html HTML document should include the basic meta tags and an appropriate title.
- Create an external CSS file and a JavaScript file, placing them in appropriate subfolders within
the week02 folder.
Check Your Understanding
In the week02 folder, create two folders named styles and scripts. Your CSS file will go in the styles folder and your JavaScript file will go in the scripts folder. You may already have folders named styles and scripts in the root wdd131 folder, but that is fine. We will treat the week02 folder independently of the outer wdd131 root folder.
- Copy and paste the basic interface (the HTML and CSS) from the following CodePen ☼ BOM Top 10.
- In your blank JavaScript file, declare three variables that hold references to the
input, button, and list elements.
Check Your Understanding
const input = document.querySelector('#favchap'); const button = document.querySelector('button'); const list = document.querySelector('______'); // Fill in the blank to reference the unordered list element. - Create a
lielement that will hold each entry's chapter title and an associated delete button.Check Your Understanding
const li = document.createElement('li');We named this variable li for simplicity.
The variable name does not have to match the element type being created. - Create a delete
button.Check Your Understanding
const deleteButton = document.createElement('button'); - Populate the
lielement variable'stextContentorinnerHTMLwith the input value.Check Your Understanding
li.textContent = input.value;textContent is preferred over innerHTML because it is more secure.
However, if you need to include HTML tags, use innerHTML.
textContent will not render HTML tags; it will display them as plain text.Why is the value property used?
The input variable references an HTML input text field, and we need to access the user's entry. Here is the HTML that was provided:<input type="text" id="favchap" placeholder="Alma 5"> - Set the delete button's
textContentto ❌.Check Your Understanding
deleteButton.textContent = '❌'; - Append the delete button to the
lielement.Check Your Understanding
li.append(deleteButton); - Append the
lielement variable to the unordered list in your HTML.Check Your Understanding
list.append(li);
So far, you have set up the interface and completed some basic DOM interaction. The application will not work at this point. The next activity will teach you how to respond to events, such as button clicks. You also need to wait for the user to enter a chapter into the text field before processing.
You need to consider screen readers and how they will interpret content. For example, the
delete button only displays an emoticon and may not be correctly identified by screen readers as a button to
remove a chapter.
What can we do? One solution is to add an aria-label attribute to the button with a value like
"Close" or
"Remove Alma 5".
The aria-label attribute defines a string value that labels the element for assistive technologies.
<button aria-label="Close" id="close-button">❌</button>This helps screen readers understand the button's purpose, making your application more accessible.
Submission
- Continuously save your work. We will add additional functionality in the next activity.