W05 Learning Activity: HTML Tables
Overview
HTML table elements are used to create visual representations of tabular data, allowing users to quickly compare and analyze different values. Data tables are particularly useful for displaying large amounts of information in a clear and organized manner with data in rows and columns, similar to a spreadsheet. For example, a table can be used to display product details, schedules, or employee information.
Prepare
Tables are made up of several parts that work together. The main structure includes the table itself, rows, and individual cells that hold the data.
Basic Table Structure
The following are the elements you use to create a table:
<table>– Creates the container for the entire table<tr>– Creates a table row (tr stands for "table row")<td>– Creates a table cell for data (td stands for "table data")<th>– Creates a header cell (th stands for "table header")
Here is a simple table that shows student test scores:
<table>
  <tr>
    <th>Student Name</th>
    <th>Math Score</th>
    <th>Science Score</th>
  </tr>
  <tr>
    <td>Maria</td>
    <td>85</td>
    <td>92</td>
  </tr>
  <tr>
    <td>John</td>
    <td>78</td>
    <td>88</td>
  </tr>
</table>| Student Name | Math Score | Science Score |
|---|---|---|
| Maria | 85 | 92 |
| John | 78 | 88 |
In this example, the first row contains headers that describe what each column shows. The following rows contain the actual data for each student.
Table Headers and Data Cells
The <th> tag creates header cells that usually appear at the top of columns
or the beginning of rows. Browsers typically display header text in bold and centered by default to make it stand
out from
regular data. Header cells also provide important semantic meaning for accessibility.
The <td> tag creates regular data cells that contain the actual information
you want to display. Each cell can contain text, numbers, or even other HTML elements like links or images.
Adding Table Sections
For larger tables, you can organize content using three optional sections. These sections help assistive technologies like screen readers understand your table structure and make your code easier to maintain:
<thead>– Contains the table header rows<tbody>– Contains the main table data rows<tfoot>– Contains footer rows (like totals or summaries)
Here is an example showing a table with all three sections:
<table>
  <thead>
    <tr>
      <th>Item</th>
      <th>Price</th>
      <th>Quantity</th>
    </tr>
  </thead>
  <tbody>
    <tr>
      <td>Notebook</td>
      <td>$3.50</td>
      <td>5</td>
    </tr>
    <tr>
      <td>Pencil</td>
      <td>$0.75</td>
      <td>12</td>
    </tr>
  </tbody>
  <tfoot>
    <tr>
      <td>Total Items</td>
      <td>$26.50</td>
      <td>17</td>
    </tr>
  </tfoot>
</table>| Item | Price | Quantity |
|---|---|---|
| Notebook | $3.50 | 5 |
| Pencil | $0.75 | 12 |
| Total Items | $26.50 | 17 |
This example shows a simple inventory table with headers, data rows, and a footer row that displays totals.
Spanning Multiple Cells
Sometimes you need a cell to take up more space than just one column or one row. HTML provides two attributes that allow cells to span across multiple columns or rows. These attributes help you create more complex table layouts when needed.
The colspan attribute makes a cell stretch across multiple columns horizontally. The
rowspan attribute makes a cell stretch across multiple rows vertically. You add these attributes
to <td> or <th> tags.
Using Colspan
When you want a cell to span across multiple columns, use the colspan attribute. The number you specify tells the browser how many columns the cell should cover.
- colspan="2" – The cell spans across 2 columns
- colspan="3" – The cell spans across 3 columns
- You can use any number based on how many columns your table has
Here is an example of a class schedule where the lunch break spans across all time columns:
<table>
  <tr>
    <th>Time</th>
    <th>Monday</th>
    <th>Tuesday</th>
    <th>Wednesday</th>
  </tr>
  <tr>
    <td>9:00 AM</td>
    <td>Math</td>
    <td>Science</td>
    <td>History</td>
  </tr>
  <tr>
    <td>12:00 PM</td>
    <td colspan="3">Lunch Break</td>
  </tr>
  <tr>
    <td>1:00 PM</td>
    <td>English</td>
    <td>Art</td>
    <td>Music</td>
  </tr>
</table>| Time | Monday | Tuesday | Wednesday |
|---|---|---|---|
| 9:00 AM | Math | Science | History |
| 12:00 PM | Lunch Break | ||
| 1:00 PM | English | Art | Music |
Notice how the lunch break cell uses colspan="3" to stretch across the Monday, Tuesday, and Wednesday columns.
Using Rowspan
When you want a cell to span across multiple rows, use the rowspan attribute. This makes the cell taller by covering multiple rows vertically.
- rowspan="2" – The cell spans down across 2 rows
- rowspan="3" – The cell spans down across 3 rows
- The cell will extend downward to cover the specified number of rows
Here is an example showing student information where some students take the same course across multiple terms:
<table>
  <tr>
    <th>Student</th>
    <th>Course</th>
    <th>Term</th>
  </tr>
  <tr>
    <td rowspan="2">Sarah</td>
    <td>Web Design</td>
    <td>Fall</td>
  </tr>
  <tr>
    <td>Web Design</td>
    <td>Spring</td>
  </tr>
  <tr>
    <td>David</td>
    <td>Programming</td>
    <td>Fall</td>
  </tr>
</table>| Student | Course | Term |
|---|---|---|
| Sarah | Web Design | Fall |
| Web Design | Spring | |
| David | Programming | Fall |
In this example, Sarah's name appears in a cell with rowspan="2", so it covers both rows where her courses are listed.
Important Notes About Spanning
When you use colspan or rowspan, remember that you need fewer cells in the affected rows or columns. If a cell
spans 2 columns, you need one less <td> in that row. If a cell spans 2 rows, you need one less
<td> in the next row.
Always plan your table structure carefully before adding spans to make sure all rows and columns line up correctly.
When to Use Tables
Tables should only be used for displaying tabular data that naturally fits in rows and columns. Never use tables to create page layouts or position elements on your webpage. Modern CSS layout techniques (such as Flexbox and Grid) are the proper tools for page layout.
Activity Instructions
HTML Table Structure
- In the week05 folder of your wdd130 repository, create a new valid HTML file named table.html.
- Create the HTML structure and add the content as shown in the following rendered table using
thead,tbody, andtfoot: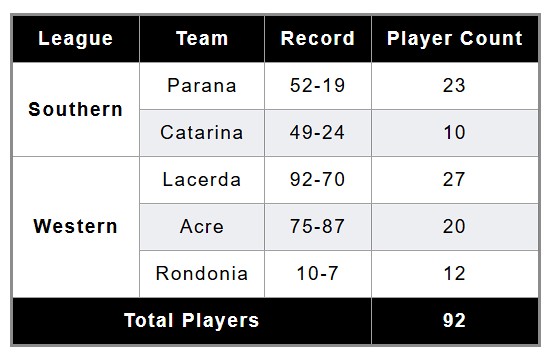
Check Your Understanding
<table>
  <thead>
    <tr>
      <th>League</th>
      <th>Team</th>
      <th>Record</th>
      <th>Player Count</th>
    </tr>
  </thead>
  <tbody>
    <tr>
      <th rowspan="2">Southern</th>
      <td>Parana</td>
      <td>52-19</td>
      <td>23</td>
    </tr>
    <tr>
      <td>Catarina</td>
      <td>49-24</td>
      <td>10</td>
    </tr>
    <tr>
      <th rowspan="3">Western</th>
      <td>Lacerda</td>
      <td>92-70</td>
      <td>27</td>
    </tr>
    <tr>
      <td>Acre</td>
      <td>75-87</td>
      <td>20</td>
    </tr>
    <tr>
      <td>Rondonia</td>
      <td>10-7</td>
      <td>12</td>
    </tr>
  </tbody>
  <tfoot>
    <tr>
      <th colspan="3">Total Players</th>
      <td>92</td>
    </tr>
  </tfoot>
</table>
CSS Styling
- Create a new CSS file named table.css in a styles
subfolder within week05 and
linkit in your HTML file. - Using
table.css, style the table to match the image above. Consider adding styles for the following elements:tablethtdthead th, tfoot tr
Check Your Understanding
table {
  border-collapse: collapse;
  border: 2px solid rgb(140 140 140);
  letter-spacing: 1px;
}

th, td {
  border: 1px solid rgb(150 150 150);
  padding: 8px 12px;
  text-align: center;
}

thead tr, tfoot tr {
  background-color: rgb(0 0 0);
  color: white;
  font-weight: 700;
}
Notes and Challenges
- Why use
rowspanon the first cell of the first data row? How do you determine how many rows to span? - If you have a
border-collapseproperty applied to your table, how does it affect the spacing and borders of the table cells? Try experimenting by turning it off and on. - In the CSS, what does the selector
thead tr, tfoot trtarget? - Experiment with different CSS properties to enhance the visual appeal of your table, such as hover effects, alternating row colors, or custom fonts.
- How can you add a caption to the
<table>element?
A complete example of the modification is provided in the files named table-exercise-solution.html and table-exercise-solution.css in the week05 folder.