W05 Learning Activity: HTML Forms
Overview
HTML forms allow us to interact with users and collect data. The form element is a container for all form elements and includes attributes that enable data processing. In this activity, you will focus only on frontend design and development, learning how to build a form using basic form elements. Processing form data after submission is beyond the scope of this course.
Prepare
HTML forms are special sections of a webpage that allow users to enter and submit information. Think of forms as digital versions of paper forms you might fill out at a doctor's office or when applying for something. Forms collect information from users and send it to a web server for processing.
Forms are essential for creating interactive websites. They allow users to search for information, create accounts, make purchases, send messages, and perform many other tasks that require user input. You will study forms in more detail in future courses. In this activity, you will become familiar with the most important parts of HTML forms.
Basic Form Structure
Every HTML form starts with a <form> tag and ends with a </form> tag. All
form elements must be placed between these tags. The <form> tag tells the browser that
everything inside is part of the same form.
The most important parts of a form include:
- Form container – The
<form>element that holds all form parts - Form fields – Where users type or select information
- Labels – Text that describes the purpose of each form field
- Submit button – What users click to send their information
<form>
  <label for="username">Username:</label>
  <input type="text" id="username" name="username">
  <button type="submit">Submit</button>
</form>
How this form appears:
Some styling has been added otherwise form elements are displayed inline by default.
This example shows a simple form with one text input field for a username and a submit button. The
label element describes what the input is for, and the for attribute connects the label
to the input field. You can test this above by clicking on the label text, which will focus the input field.
Common Form Field Elements
HTML provides several different types of form field elements to collect different kinds of information from users. Each element serves a specific purpose and appears differently on the webpage.
The most commonly used form elements include:
- Text input – For single lines of text like names or email addresses
- Password input – For secret information that should be hidden
- Textarea – For longer text like comments or messages
- Checkbox – For yes/no choices or multiple selections
- Radio buttons – For choosing one option from several choices
- Select dropdown – For choosing from a list of options
<form>
  <label for="email">Email Address:</label>
  <input type="email" id="email" name="email">

  <label for="password">Password:</label>
  <input type="password" id="password" name="password">

  <label for="message">Your Message</label>
  <textarea id="message" name="message" rows="4"></textarea>

  <label><input type="checkbox" id="newsletter" name="newsletter"> Send me updates</label>

  <button type="submit">Send Message</button>
</form>
How this form appears (with some basic block and padding styling):
This example demonstrates several different input types working together in one form. Notice how each input has
both an id and name attribute – these are important for the form to work properly.
Input Attributes
Input elements use attributes to control how they behave and process user input. Understanding these attributes helps you create forms that work correctly and provide a good user experience.
Important input attributes include:
- type – Defines the kind of input (text, email, password, etc.)
- name – A unique identifier for each form element
- id – Another identifier used to connect labels to inputs
- required – Makes a field mandatory to fill out
- placeholder – Shows example text inside an input field
- value – Sets a default value for the input field
<form>
  <label for="fullname">Full Name:</label>
  <input type="text" id="fullname" name="fullname" required>

  <label for="phone">Phone Number:</label>
  <input type="tel" id="phone" name="phone" placeholder="123-456-7890">

  <button type="submit">Submit Contact Information</button>
</form>
How this form appears:
In this example, the full name field is required. You can test this by trying to submit the form without filling it out – the browser will prevent submission and prompt you to complete the field. The phone number field includes placeholder text to help users with the expected input format.
Activity Instructions
Getting Started
- In the week05 folder in your wdd130 course repository, create a new file named "poll-form.html".
- Create a basic HTML page with a
header,main, andfooter.
Build the Form
- Create a
formelement within themainelement. - Add the following form fields to the form. Be sure to use a
labelelement for each form element.- The user's full name using
inputoftypetext,idof "fullname" andnameof "fullname" and make itrequired. - The user's email address using
inputoftypeemail, anidof "useremail", and anameof "useremail" and make itrequired.Check Your Understanding
<form>
  <label for="fullname">Full Name:</label>
  <input type="text" id="fullname" name="fullname" required>
  <label for="useremail">Email:</label>
  <input type="email" id="useremail" name="useremail" required>

</form>
Another valid way to write this is to surround the input elements with the
labelelement. This is called the "implicit label" method. The following is an example of this method:<label>Full Name: <input type="text" name="fullname" required></label> <label>Email: <input type="email" name="useremail" required></label> - Create a multiple-choice format question using a
selectelement that asks for the user's favorite browser. The following is an example of aselectelement with three options:<label for="quantity">Select Quantity</label> <select name="quantity" id="quantity"> <option value="1">One</option> <option value="2">Two</option> <option value="3">Three</option> </select>The question should ask "What is your favorite browser?" Provide aHow this select element appears (with some added styling):
nameandidattribute with a value of"browser"for theselectelement and provide at least three options for the user to choose from. The options could include "Chrome", "Safari", "Edge", "Brave", or "Other". - Include a question, "Do you have a household pet?"
Use a singlecheckboxinput element. Theidandnameattribute values should be"pet". - Include a final question, "List the places you have lived."
Use atextareaelement and provide aplaceholderattribute value. In addition, provide anameandidattribute value of"feedback"and set the number ofrows.
Check Your Understanding
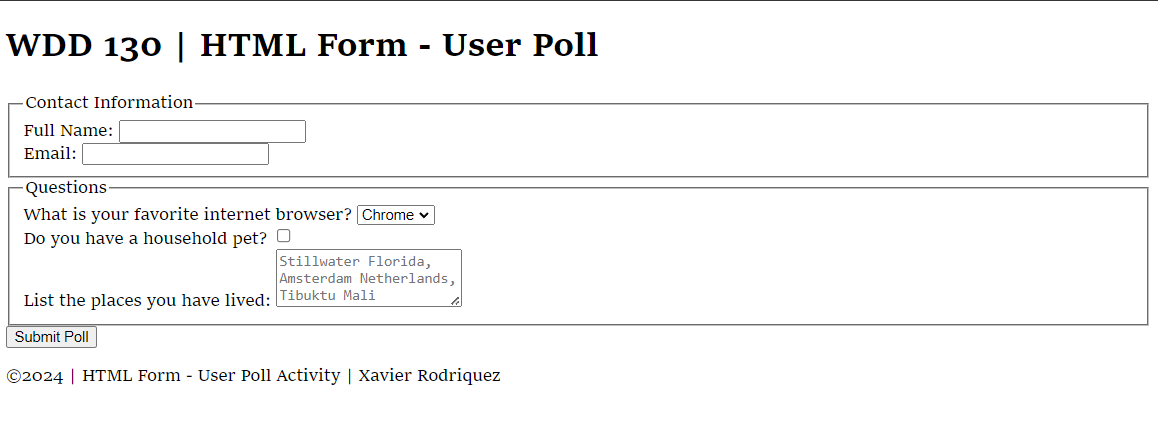
<label for="browser">What is your favorite internet browser?</label> <select id="browser" name="browser"> <option value="chrome">Chrome</option> <option value="firefox">Firefox</option> <option value="edge">Edge</option> <option value="brave">Brave</option> <option value="other">Other</option> </select> <label for="pet">Do you have a household pet?</label> <input type="checkbox" id="pet" name="pet"> <label for="feedback">List the places you have lived:</label> <textarea id="feedback" name="feedback" rows="4" placeholder="Stillwater Florida, Amsterdam Netherlands, Timbuktu Mali"></textarea> - The user's full name using
- Add a
buttonwith atypeof"submit"at the end of the form element. The text content of the button should be"Submit Poll".Check Your Understanding
<button type="submit">Submit Poll</button>
Testing and Submission
- Test and validate your HTML in the browser.
- Save your work. CSS styling will be added in the next activity.