W03 Optional Practice: Home Page Layout Enhancements
Overview
This practice activity has you apply the concepts from the learning activities
to enhance your home page with HTML references, using the CSS box model, CSS selectors, and
layout.
Activity Instructions
Open your home page, index.html for editing.
Add an HTML comment at the bottom of the document, after the closing
</body> tag, that contains the date that you have last modified the page.
Add an unordered list <ul> to your home page.
The list should be located in the main element at the end (before the
closing </main> tag).
Your list must have at least three (3) list items, listing your favorite temples.
At the top of the document, create a CSS rule for the universal selector (wildcard) that
contains three declarations:
Set the margin shorthand property to 0.
Set the padding shorthand property to 0.
Set the box-sizing property to border-box.
Setting the universal selector to have a margin and padding of zero (0) will ensure that
all elements on the page will have no margin or padding, regardless of the browser
defaults. This will make it easier for you to control the page layout.
When the border-sizing property is set to the
non-default value of border-box, this tells the browser to account for any
border and padding in the values you specify for an element's width and height. – Box-sizing – MDN
Add a CSS comment at the bottom of your stylesheet that creates a comment header for a
section called "Class Selectors". You will be putting your class selector rules below this comment.
Check Your Understanding
/* Class Selectors */
Add a class selector to your CSS after the comment. Name it "box".
Style the box class with basic box model properties for margin,
border, padding.
Set the value of the margin and padding to equal 1rem which means, match the root font
size.
Also add decorations of background-color and color of your own design.
Remove any duplication of these properties from the aside CSS rule.
Adjusted aside rule example. (Your aside may have other properties. This is
just an example.)
aside {
  width: 20em;
  text-align: center;
}
Did you miss the period (.) in your syntax when defining
the box class?
In your HTML, give the aside element a class of box.
Check Your Understanding
<aside class="box">
In your HTML, given the ul element list of temples a class of
box.
Check Your Understanding
<ul class="box">
Are you observing and noting the changes by running Live/Five Server
(localhost) while you make changes and build your page?
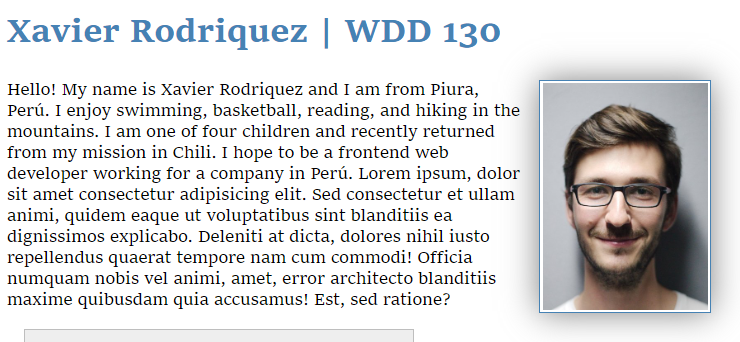
Use CSS to float your profile image to the right. The paragraph should come right after the
picture. If your introduction is too short, you may need to add more content to ensure that the layout looks
appropriate.
Float Profile Image ExampleCheck Your Understanding
      main img {
  /* you most likely will have other declarations here */
  float: right;
}
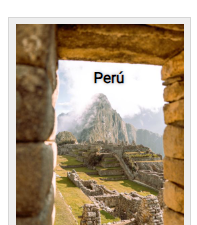
Heading Overlay Example
Using CSS absolute positioning, overlay the the state/country heading element on the image within the
aside element.
This means that you will need to set the container,
aside, to have a position: relative; declaration.
Check Your Understanding
These numbers for top and left may not work for your image. This is just an example.