W02 Learning Activity: HTML Semantic Elements
Overview
HTML describes the structure of a web page. The structure is composed of various categories of elements. Some elements are associated with forms and tabular data. You are not expected to memorize all HTML tags. This course will help you become familiar with the most commonly used elements and then you can refer to others through reliable sources.
Prepare
HTML elements have a specific meaning and are used to structure the content of a web page, but not to style the page. They are used to clearly provide meaning to the browser and developer. Later, once the html structure is in place, you will use styles to adjust the way the page is shown to the user.
Semantic and Non-Semantic HTML Tags
HTML tags can be divided into two main categories: semantic tags and non-semantic tags. Understanding the difference between these types of tags will help you write better web pages that are easier to understand and maintain.
Semantic tags have meaning built into their name. They tell both the browser and other developers what type of content they contain. Non-semantic tags do not have specific meaning about their content. They are used mainly for styling and layout purposes.
What Are Semantic Tags?
Semantic tags describe the meaning and purpose of the content they contain. When you read the tag name, you can understand what kind of information is inside. These tags make your HTML code easier to read and help screen readers assist people with visual impairments.
Common semantic tags include:
- header – Contains introductory content or navigation links
- nav – Contains navigation links to other pages or sections
- main – Contains the main content of the page
- section – Represents a distinct section of content
- article – Contains independent, self-contained content
- aside – Contains content that is related but separate from the main content
- footer – Contains closing information like contact details or copyright
- h1, h2, h3, h4, h5, h6 – Represent different levels of headings
Here is an example of semantic tags used to structure a simple web page:
<!DOCTYPE html>
<html>
<head>
  <title>My Blog</title>
</head>
<body>
  <header>
    <h1>Welcome to My Blog</h1>
    <nav>
      <a href="home.html">Home</a>
      <a href="about.html">About</a>
      <a href="contact.html">Contact</a>
    </nav>
  </header>

  <main>
    <article>
      <h2>My First Blog Post</h2>
      <p>This is the content of my blog post.</p>
    </article>
  </main>

  <footer>
    <p>Copyright 2024 My Blog</p>
  </footer>
</body>
</html>
In this example, each tag clearly indicates what type of content it contains. The header contains the site title and navigation, the main section contains the primary content, and the footer contains copyright information.
What Are Non-Semantic Tags?
Non-semantic tags do not provide information about the meaning of their content. They are primarily used for styling and layout purposes. The two most common non-semantic tags are div and span.
Common non-semantic tags include:
- div – A container used for grouping and styling a section of a page
- span – A container used for styling small portions of text
Here is an example showing how non-semantic tags are used:
<div class="container">
  <div class="sidebar">
    <p>This is sidebar content</p>
  </div>

  <div class="content">
    <p>This paragraph has a <span class="highlight">highlighted word</span> in it.</p>
  </div>
</div>
In this example, the div tags are used to create layout sections, and the span tag is used to highlight a specific word. The tags themselves do not tell us what the content represents, but they allow us to apply styling to organize and format the page.
When to Use Each Type
Use semantic tags whenever possible because they make your code more meaningful and accessible. Use semantic tags when the content has a specific purpose or meaning, such as navigation, main content, or article text.
Use non-semantic tags when you need to group elements for styling purposes but the content does not have a specific semantic meaning. For example, use a div to create a colored background area or use a span to change the color of a few words.
Many web sites contain older HTML constructs like <div id="header"> or
<div id="navigation">. These older sites are using the generic, non-semantic tags, but try to
add meaning through the id. You should not use this approach. Instead, use the semantic HTML
tags, <header> or <nav> tags.
Also, because the semantic tags already describe the meaning, you do not need to add extra ids or classes to
these tags. Do not use <header id="header"> or <header class="header">
which is unnecessary and
redundant.
HTML Heading Tags (h1-h6)
HTML heading tags are used to create titles and section headers on web pages. These tags help organize content and make it easier for users to read and understand your webpage. Search engines also use heading tags to understand the structure and importance of your content.
There are six different heading tags available, numbered from h1 to h6. The
h1 tag creates the largest and most important heading, while h6 creates the smallest
heading. Think of these tags like an outline for a school report where you have main topics and subtopics.
The Six Heading Tags
h1– The main title of your webpage. Use only oneh1tag per page.h2– Major section headings that divide your content into main parts.h3– Subsection headings that break downh2sections into smaller parts.h4– Minor headings for detailed subsections withinh3sections.h5– Small headings for very specific content areas.h6– The smallest heading, rarely used but available for detailed organization.
How to Use Heading Tags
You should use heading tags in order from largest to smallest. Start with h1 for
your main title, then use h2 for major sections, h3 for subsections, and so on. Do not
skip heading levels. For example, do not use an h4 directly after an h2 without using
h3 first.
<h1>My First Website</h1>
<h2>About Me</h2>
<p>This section tells visitors about who I am.</p>
<h3>My Education</h3>
<p>I am studying web development at college.</p>
<h3>My Hobbies</h3>
<p>I enjoy reading books and playing sports.</p>
<h2>Contact Information</h2>
<p>You can reach me through email or phone.</p>
In this example, "My First Website" is the main title using h1. The page is divided
into two main sections using h2 tags: "About Me" and "Contact Information." The "About Me" section is
further divided into two subsections using h3 tags for "My Education" and "My Hobbies."
Why You Should Not Skip Heading Levels
It is important to use heading tags in the correct order without skipping levels. For example, do not jump from
h2 directly to h5 without using h3 and h4 first. Skipping
heading levels can cause problems for people who use screen readers to navigate websites. Screen
readers are tools that help people with vision problems read web content by speaking it aloud.
When you skip heading levels, screen readers cannot understand the proper structure of your webpage. This makes it difficult for users to jump between sections or understand how your content is organized. Search engines also prefer websites that use proper heading structure because it helps them understand what your content is about. Following the correct heading order makes your website more accessible and easier to find in search results.
Activity Instructions
In this activity you will use HTML to build a common page layout with a header, nav,
main, aside, and a footer element.
Folder and File Setup
- using VS Code, open your wdd130 course folder and find the folder named week02.
- In the week02 folder, open the HTML file named basic-layout.html.
HTML Head Content
- Note that some basic HTML
<head>content and HTML structure is already included in the basic-layout.html document.- A valid document type.
<!DOCTYPE html> - An
<html>element with a proper languagelangattribute that wraps the entire document - A
<head>container - The
meta charsetelement - The
meta viewportelement - An empty
titleelement - A
<body>container
- A valid document type.
- Add or modify the following elements in the
<head>:- Content for the
titleelement
The content should be something like: Basic HTML Structure - The
meta descriptionelement.
The content could be: A basic HTML structure example using semantic HTML elements - The
meta authorelement with your name as the content
- Content for the
Check Your Understanding
<!DOCTYPE html>
<html lang="en-US">
<head>
  <meta charset="utf-8">
  <meta name="viewport" content="width=device-width,initial-scale=1.0">
  <title>Basic HTML Structure</title>
  <meta name="description" content="A basic HTML structure example using semantic HTML elements">
  <meta name="author" content="Xavier Rodriquez">
</head>
<body>

</body>
</html>
HTML Body Content
Build a basic HTML page structure within the <body> using the
following semantic elements:
This page will not have any layout or style at this point. It is just the structure. You will add CSS styling and layout in another activity.
- Add a
<header>element- Add an
imgelement to reference an existing logo with the following attributes:- Set the
srcattribute to point to the basic-logo.png file located in the images folder within the week02 folder. - Set the
altattribute to a short description of the image - Set the
widthattribute to a value of "128" which means 128 pixels. - Set the
heightattribute to a value of "128".
- Set the
- Add an
- After the
headerends (</header>), add a<nav>element- The
navelement contains a single unordered list<ul>with two list items - The two (2) list items
<li>each contain a hyperlink<a>to an external site of your choice
- The
- Next, include a
<main>element- Include a first level heading
<h1>within themainelement. - The content of the
h1can be something like: "Basic HTML Structure". - Next, add two (2)
<section>elements. - Each
sectionelement contains:- A second level heading
<h2>with the placeholder language of "Heading", etc. - a single paragraph
<p>The paragraph content can be filler/placeholder text. To automatically fill the paragraph with Lorem ipsum text, in VS Code type
lorem10and then press the Tab key and ten (10) words will be written automatically. You can change the number 10 to the desired size.
- A second level heading
- Include a first level heading
- Next, include a
<aside>element.- In this container element, include an image element
<img>.- Reference (
src) a temple image from the Church Media Gallery.
Copy the image URL of the image you choose by right mouse clicking on the image and selecting Copy image address from the popup menu. - Set the width attribute (
width) to a value of "200" which means 200 pixels.
- Reference (
- In this container element, include an image element
- Next, include a
<footer>element. Within thefooterelement, include a single<p>paragraph tag. The content of the paragraph can just be your name.
Check Your Understanding
  <body>
    <header>
      <img src="images/basic-logo.png" alt="HTML Layout Logo" width="128" height="128">
    </header>
    <nav>
      <ul>
        <li><a href="https://byui.edu">BYU-Idaho</a></li>
        <li><a href="https://churchofjesuschrist.org">The Church</a></li>
      </ul>
    </nav>
    <main>
      <h1>Basic HTML Structure</h1>
      <section>
        <h2>Heading</h2>
        <p>Lorem, ipsum dolor sit amet consectetur adipisicing elit. Molestiae, tenetur ...</p>
      </section>
      <section>
        <h2>Heading</h2>
        <p>Lorem, ipsum dolor sit amet consectetur adipisicing elit. Molestiae, tenetur ...</p>
      </section>
    </main>
    <aside>
      <img src="https://content.churchofjesuschrist.org/templesldsorg/bc/Temples/photo-galleries/payson-utah/800x500/payson-utah-temple-celestial-room-1458545.jpg" alt="Payson Utah Temple Celestial Room" width="200">
    </aside>
    <footer>
      <p>🌴 Xavier Rodriquez</p>
    </footer>
  </body>
Submission
- Remember to always Save your work
- Commit and Push/Sync your work to your
wdd130GitHub Pages remote site.- In VS Code, click on the Source Control icon.
- Type a commit Message in the message input field provided.
This is for your own reference and a message is required.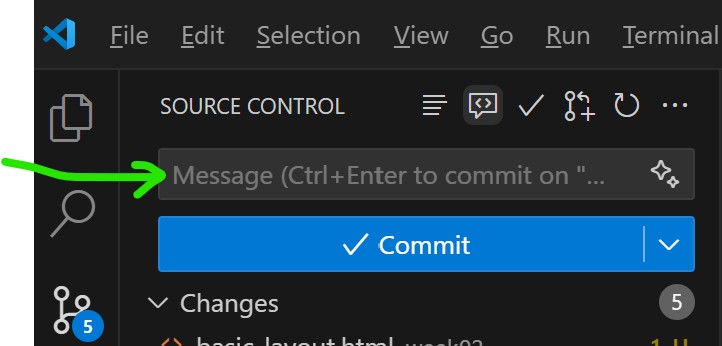
Commit Message Location in VSCode Source Control - Commit the changes by clicking the blue ✔ Commit button.
- Sync your committed changes to your local
wdd130GitHub repository by clicking the Sync Changes 1 ↑ button.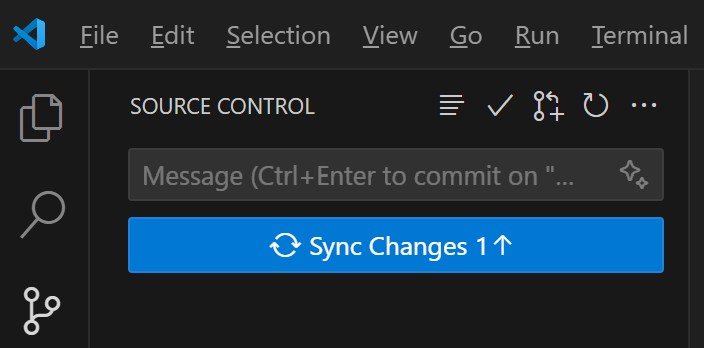
Sync Changes Button Location in VSCode Source Control
- Share your work with class in Microsoft Teams in the Week 02 Forum channel
by
posting your published URL.
Use this format and be sure to always test your own URL submissions:https://yourgithubusername.github.io/wdd130/week02/basic-layout.html