W02 Learning Activity: An Introduction to CSS
Overview
CSS (Cascading Style Sheets) is a rule set language that defines the style and presentation of an HTML document. CSS rules select elements from the document and contain style and layout declarations.
Prepare
Watch the following video:
Link: ▶️ What is CSS? – [ 4:07 minutes, 📄 Transcript ]
CSS Syntax
CSS rules are made up of a selector and a declaration block { }.
The selector is the HTML element(s)
you want to style and the declaration block contains one or more declarations separated by
semicolons (;). Each
declaration includes a CSS property name and a value, separated by a colon
(:). The declaration block is enclosed in curly braces.
CSS Rule Example
The following CSS rule selects all the <h1> elements and sets four
properties:
- the background color of all the
<h1>elements to dark blue - the text color of the content of all the
<h1>elements to white - padding or space around the text content of 16 pixels
- the text is aligned to the center of the
<h1>block
h1 {
  background-color: darkblue;
  color: white;
  padding: 16px;
  text-align: center;
}
CSS Key Terms
Selector — h1
Declaration Block — { }
Declaration — background-color: darkblue; (There are four total declarations in this
example.)
Property — background-color
Value — darkblue
CSS Rule — the entire block of code
Here is how an <h1> with this style renders on the page:
WDD 130: Web Fundamentals
Activity Instructions
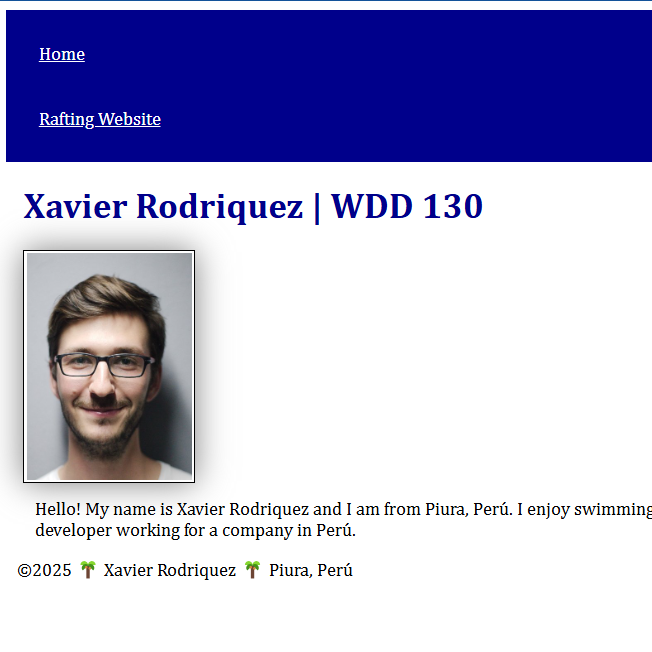
In this activity, you will add some style declarations to your course home page. Currently your home page,
index.html, has default styling applied by the browser that renders the page. For example the
<h1> element is styled as larger and bolder. In this activity, we will apply
custom styling.
Write some CSS
- Open the styles.css file located in the styles folder of your wdd130 folder.
- Add the following CSS rules:
nav {
  background-color: darkblue;
  padding: 10px;
}
This CSS rule names the <nav> element as the selected element to apply two style declarations.
- The background color will be the color "darkblue", which is a valid, named color.
- Padding, or area between the content and border is set to 10 pixels for readability.
nav a {
  color: white;
  display: block;
  padding: 20px;
}
This CSS rule selects all the
<a>(anchor / link) elements in the HTML that are children of the<nav>element and applies the following declarations:- The foreground or font color will be white.
- The display will change from the default of inline to block.
- Each anchor tag will have padding of 20px;
h1 {
  color: darkblue;
}
This CSS rule references the
<h1>(heading 1) element as the selected element and applies the following declaration:- The foreground, font color is set to darkblue.
img {
  width: 150px;
  height: auto;
  border: 1px solid black;
  padding: 2px;
  box-shadow: 0 0 30px gray;
}
This CSS rule references all the
<img>(image) elements as the selector and applies the following declarations:- a set width with a height that will adjust dynamically to fit the image's aspect ratio.
- A border shortcut that names the width, type of border, and color of the border.
- Padding between the image and the border.
- A box shadow around the image border with zero offset and depth of 30px in gray.
p {
  padding: 10px;
}
This CSS rule selects all the
<p>(paragraph) elements as the selector and applies the following declaration:- Padding between the paragraph content and the border is set to 10 pixels.
- Be sure to save your styles.css changes.

Link the CSS file to the HTML page
- Open the index.html file and add the following line in the
<head>section of the HTML document.<link rel="stylesheet" href="styles/styles.css"> - Test the application of the style to your homepage by using Live Server or Five Server. To do this, right mouse click on the file name in the Explorer Panel in VS Code and select Open with Live Server or Five Server.
- Make corrections if needed.
Video Demonstration: ▶️ CSS Introduction – Activity Walkthrough [ 4:30 minutes ]
Remote Render and Test
- In the VS Code Source Control area, publish/upload these additions and changes by
committing with a message and syncing to your wdd130 GitHub
Pages remote site.
Publishing your activity work is good practice and going through the steps will make the process for you more routine. Remember that the message you write with the commit is for you to give the commit some context and does not need to be overly detailed.
- Open up your GitHub Pages rendered URL to test the page in your browser.
Optional Resources
- CSS – MDN
- CSS basics – MDN
