W01 Learning Activity: An Introduction to HTML
Overview
Each time you visit a webpage in your browser, your computer sends a request to a server on the internet. The server responds by sending back a file that your computer then renders, or displays, in the browser. The server can technically send any kind of file, but the most common type is HTML, which is a great way to structure the information so that it can be nicely display in a browser.

HTML stands for HyperText Markup Language and is one of the three core technologies of the web: HTML, CSS, and JavaScript. In this course, you will learn the fundamentals of HTML and CSS so that you can create effective and professional looking websites.
HTML defines the structure and meaning of a web document. Hypertext refers to the way hypertext links are placed in the document that allow users to move from one page to another. Markup is a set of symbols or codes for displaying content on the Internet. Web browsers, like Google Chrome, use HTML markup and content to render pages.
Prepare
Watch the following videos to learn more about HTML:
Link: ▶️ What is HTML? – [ 3:25 minutes, 📄 Transcript]
Video: ▶️ HTML Elements and Attributes – [ 5:52 mins, 📄 Transcript ]
Basic page structure
As shown in the videos, there are many HTML elements. You will start by learning about the most fundamental elements and then learn about others throughout this course. The following is an example of a simple HTML file:
<!DOCTYPE html>
<html lang="en">
  <head>
    <meta charset="UTF-8">
    <meta name="viewport" content="width=device-width, initial-scale=1.0">
    <title>My Favorite Things</title>
  </head>
  <body>
    <h1>Favorite Things</h1>
    <p>Here is a list of some of my favorite things.</p>
    <p>I love my family and the temple. Here are some pictures of them:</p>

    <img src="images/family.jpg" alt="My Family">
    <img src="images/salt-lake-temple.jpg" alt="The Salt Lake Temple.">
  </body>
</html>
As shown in this example, the basic structure of a webpage is to have an html element, or tag, that
defines the entire page and contains two major sections, the head and the body. Notice
that the head and body elements come between the opening and closing html tags:
<html> ... </html>, which is how you define that they are contained within the html
element. They are also indented to make it easier for people to recognize the structure.
The base html tag should define an attribute with the language of the page such as:
<html lang="en-US"> ... </html>. (There is a standard set of language
abbreviations including en for English, or en-US for United States English.)
The Head Section
The head element should contain the following elements as children to help define important
properties of the page:
<meta charset="utf-8">: Meta tags contain extra information about a webpage. Thecharsetis used to tell the computer the way the file stores the characters. The standard type ofutf-8is used for almost all webpages.<meta name="viewport" content="width=device-width, initial-scale=1.0">: This meta tag helps define the way the page should be rendered on various devices. There are different values that can be provided here that you will learn about in future courses. At this point you do not need to worry about the details this attribute.<title>My Favorite Things</title>: Thetitleelement defines the title of the page to show in the browser tab. It does not appear on the page itself.- There are many other things that can be included in the
headthat you will learn about later, such as links to your CSS stylesheets and JavaScript files or ways to specify the favorites icon that you see in the browser tab.
The Body Section
The body element contains all of the content that you want to display on the page. For some pages it
can be very small and simple and for other pages it can be very large and complex. It all depends on the content
that you want the user to see.
The following elements from the example above are common elements that are often used in the body:
<h1>Favorite Things</h1>: This defines a heading for the page. You can useh1,h2,h3,h4,h5, andh6for many levels of sub-headings.<p> ... </p>: Paragraph tags are the most common tag for holding the text of the page.<img src="images/salt-lake-temple.jpg" alt="The Salt Lake Temple.">: Image tags make it possible to display images on the screen. Notice that this image provides the location of the image file and also the alternate text in case the image cannot be seen.- There are many, many other tags that are common in the body of an HTML page. The rest of this course will be devoted to learning about additional elements and how to display them to the user with the proper styling.
Activity Instructions
For this activity you will review the essential concepts of HTML and then update an HTML page.
Review Essential HTML Concepts
Answer the following questions about HTML and ponder the provided solutions.
- The following HTML elements are required for every HTML page created
in this course.
What is the purpose of each of the following HTML elements?-
<!DOCTYPE html>Answer
This is a required component at the very beginning of the page/document to tell the browser what version of HTML is being used.
In the early days of the internet, there were different document types that could define the rules required by a particular version. These days, it is not as important because every HTML page you write will have it, but you should have it on every page to make sure your page behaves correctly.
✔ This is a development checklist item. The development checklist is a list of required components that must be included in every assignment that you submit in this course.
-
<html lang="en-US"> ... </html>Answer
This element wraps all the content on the entire page, meaning that everything else should be inside it. It is sometimes known as the root element, because it is like the root of a tree that everything grows from. It has a
langattribute to specify the primary language of the page.✔ This element, including the language, is also a development checklist item.
-
<head> ... </head>Answer
The head element contains information about the page. The content from this section is not displayed on the page itself, but instead, it is made to be read by the computer to provide information information (metadata) about the document, such as the character set, viewport size, title, scripts, and style sheets.
✔ This is a development checklist item.
-
<meta charset="utf-8">Answer
Located within the <head> element, the meta charset attribute defines the character encoding for the document, which means the way that the text is represented in the underlying binary data that the computer stores. In the past, various character encodings may be used for different languages, such as those that have accent marks or Chinese characters. HTML 5 (the current standard) requires "utf-8" for all HTML documents.
✔ This is a development checklist item.
-
<meta name="viewport" content="width=device-width,initial-scale=1.0">Answer
Located within the <head> element, the meta viewpoint attribute makes sure the page renders at correct width to prevent mobile browsers from rendering the page wider than they should and then shrinking them down.
✔ This is a development checklist item.
-
<title>...</title>Answer
Located within the <head> element, the title element defines the title of your page, which will be displayed in the browser tab or when you bookmark a page.
This title does not show up directly on the page itself, but it should closely match the content you include in the heading 1 <h1> element in the document <body>.
✔ A title element with a meaningful title is a development checklist item.
-
<body> ... </body>Answer
The <body> element contains the main content of the HTML document. There can be only one body element in a document. It contains all the content that you want to show to web users when they visit your page, including text, images, videos, and anything else you want the user to see.
✔ This is a development checklist item.
-
- What is the basic anatomy, or the structure of the basic tags, of an HTML document?
Answer
<!DOCTYPE html> <html lang="en-US"> <head> <meta charset="utf-8"> <meta name="viewport" content="width=device-width"> <title>Relevant Document Title</title> </head> <body> </body> </html> - Using the following example HTML snippet of code, what are the definitions of each of the numbered parts
listed below?
<p>A paragraph containing a hyperlink to <a href="https://www.byupathway.edu">BYU Pathway</a>.</p><p></p>href- "A paragraph containing a hyperlink to BYU Pathway Worldwide."
- The entire snippet.
Answers
- opening or start tag of a paragraph element.
- closing or end tag of a paragraph element.
- attribute. The value of this href attribute, https://www.byupathway.edu, specifies the anchor <a> tag's destination, or the place you will go if you click the link.
- The content the paragraph element.
- An HTML paragraph Element that contains text and a hyperlink.
- Why do some elements, such a
<img>not contain a closing tag?Answer
These tags are called void elements, or self closing tags. They do not require a closing tag, because you can never include anything inside of them—all of the necessary information is provided by attributes.
In the past, sometimes these self-closing tags were written with a slash at the end, such as:
<img />. But the current recommendation on the Web is to NOT include a closing slash.The following is a correct example of a self-closing image tag:
<img src="images/sample.png" alt="A sample image">In this class, we follow the modern recommendation and do NOT include a closing forward slash / in the void element's tag even though it would work fine in all browsers to include it.
Update an HTML Page
Update an HTML page to include your own content.
- On your computer, open the VS Code application.
- In VS Code, open your wdd130 folder if it is not already open.
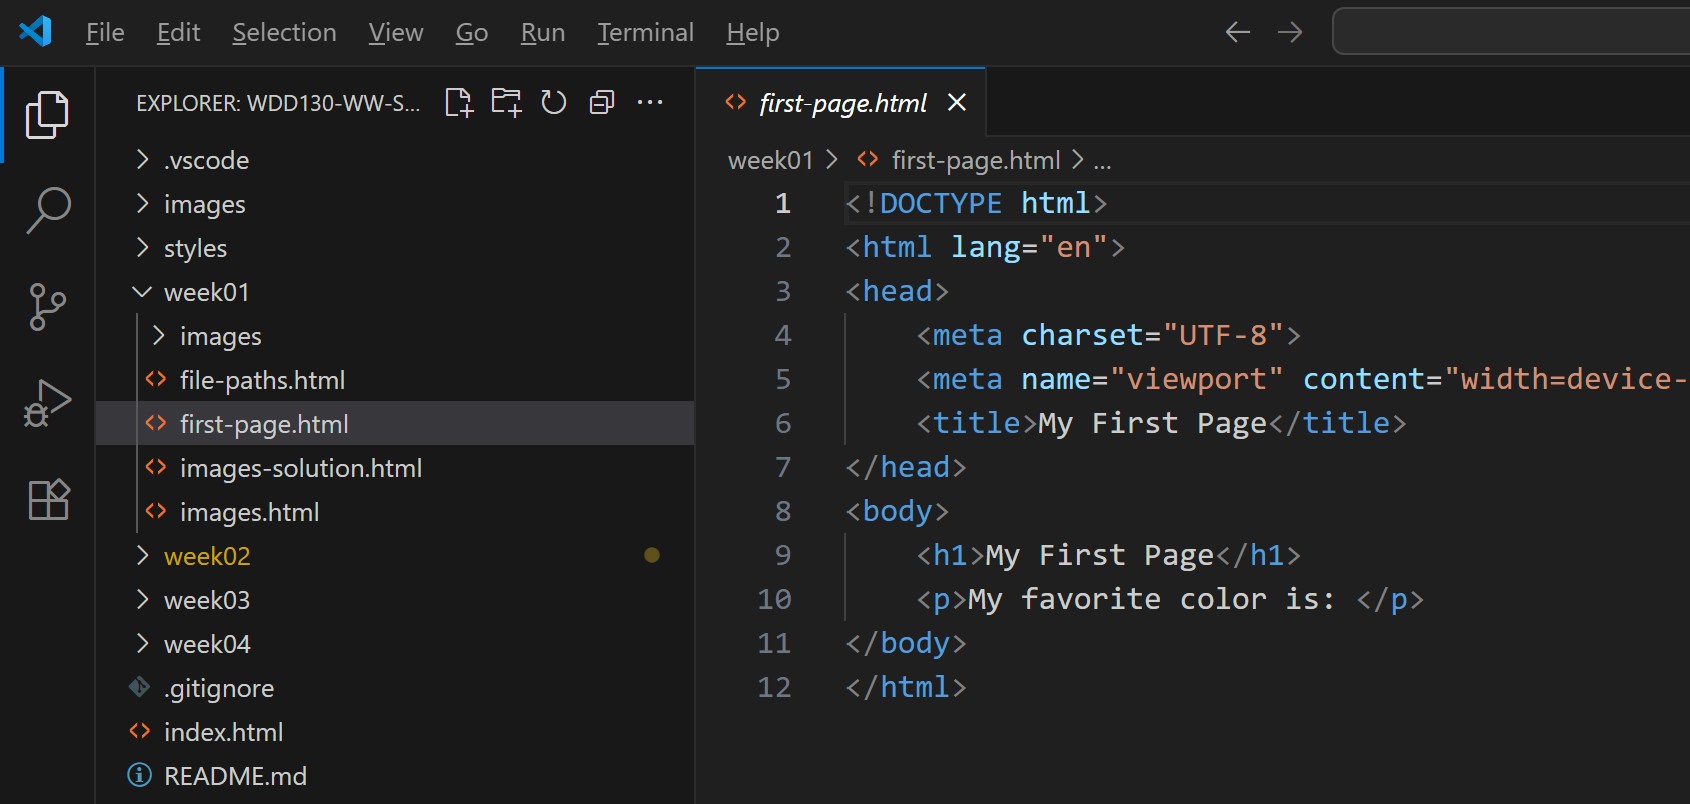
- In the VS Code files and folders explorer, browse to week01/first-page.html and open
it. You should see something like the following:
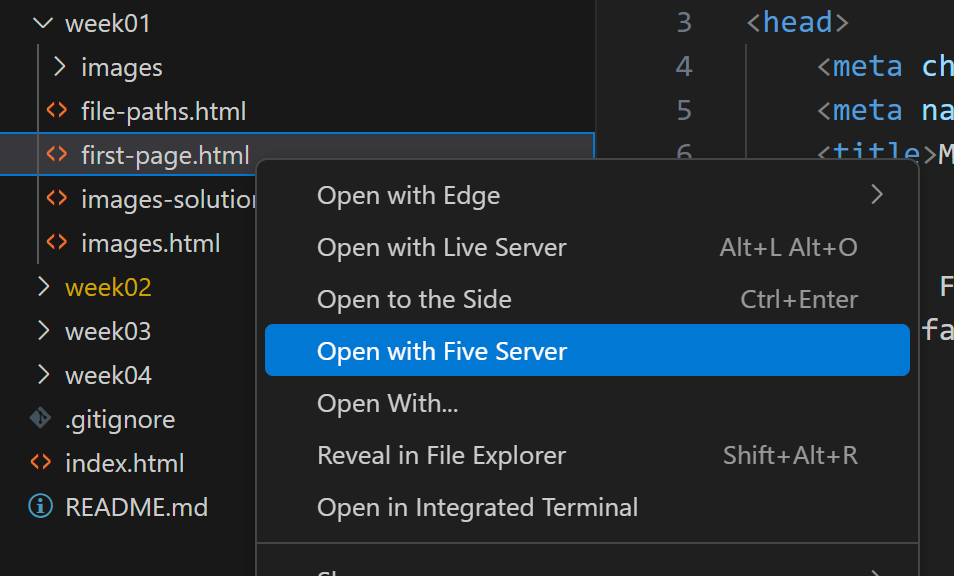
A screenshot of VS Code showing the html file. - Right-click on the first-page.html file in the left-hand pane, and select
Open in Live/Five Server. This should pop up your page in a new browser tab.
Showing the Open with Live/Five Server option. - Update the page by adding your favorite color within the
<p> ... </p>tags where noted. - Add another
<p>tag with the text: I am learning Web development! - Save your page and view it again in the browser. Make sure you can see the next text that you have
added.
Your page should look something like this: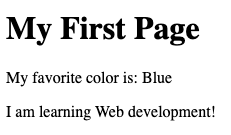
Screenshot of the completed activity. - Feel free to experiment and add other things to this html page.
Submission
You do not need to submit anything yet for this learning activity. When you have finished the remaining learning activities for this week, you will return to Canvas to report on your progress.