W01 Prepare: Publishing Your Pages to GitHub
Overview
In previous activities you have completed the following:
- Created a new GitHub repository
- Enabled GitHub pages for your repository so that it hosts your content as a webpage for others to see.
- Cloned your repository to your computer so that you have a copy of the HTML pages that you can edit.
- Made changes to pages on your computer.
In this activity you will learn to push or upload your changes to GitHub. Because GitHub is hosting your website for others to view, this step of pushing is the way you will publish your pages to the Web.
Prepare
In order to send changes from the files on your computer to GitHub, you need to go through several steps. Some of these steps may seem overly complex, but you should remember that Git is a very powerful tool used by professional software developers every day, it is capable of doing even more that what you will see in this course. In future courses you will use even more features, so it is useful to get familiar with the core features now.
When you created a repository at GitHub and cloned it to your computer, it make a complete copy of that repository on your computer. In order to send your changes to GitHub, you must first commit them into the repository on your computer and then you can push those changes to GitHub.
The following diagram shows the stages on your computer that a file must pass through in order to arrive at GitHub.
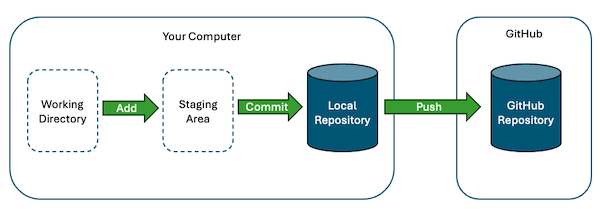
In this class, you will only need to commit your saved changes to your local repository and sync them with GitHub.
Workflow
The following steps outline the general process of your workflow in this class.
Edit files and folders
The first stage of the publishing process using Git is to edit files and folders in the working directory of your repository. You do not need to do anything special for this. You simply need to open your wdd130 folder in VS Code, browse to the files and folders you want to work on and make your changes including additions, deletions, and modifications. Git is automatically keeping track of those changes for you.
Use Source Control to Manage Uploads
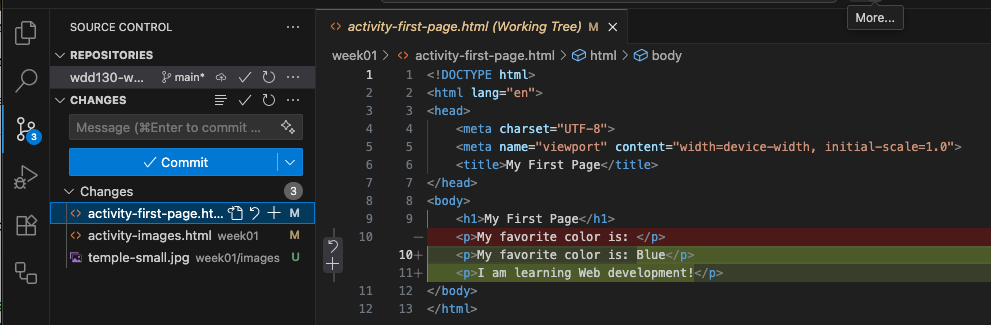
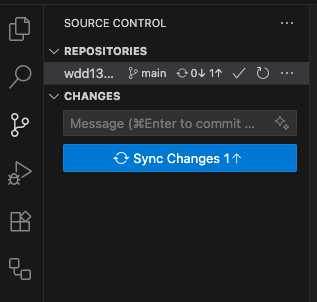
Select the Source Control icon in VS Code's Activity Bar.
On the Source Control tab in VS Code, you will see a list of all the changes you have made. If you would like, you may click on a file and see the changes. VS Code can show the old and new versions to you and highlight the differences.
Committing Changes to your Local Repository
Whenever you commit changes to a repository you must provide a commit message. This is an important message that describes the changes you are making that can be viewed in the future. It is useful if you or anyone else wants to know the purpose of these changes. If you do not enter a commit message, Git will not allow you to commit these changes into your repository.
The easiest way to add a commit message is to type it into the Message box directly above the Commit button.
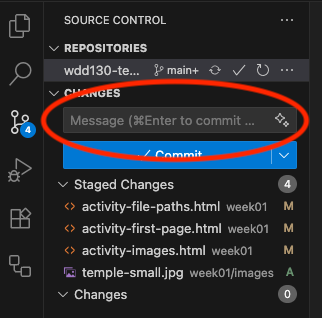
After typing a commit message, you can click the Commit button to commit your changes into your local repository.
At this point, your changes will not show up in the list of changes, because they have been added to the repository. However, they are NOT yet at GitHub. In order for your changes to get to GitHub, you must push them.
If you forget to add a commit message and click the Commit button, VS Code will open a new file and give you a chance to add your message to that file.
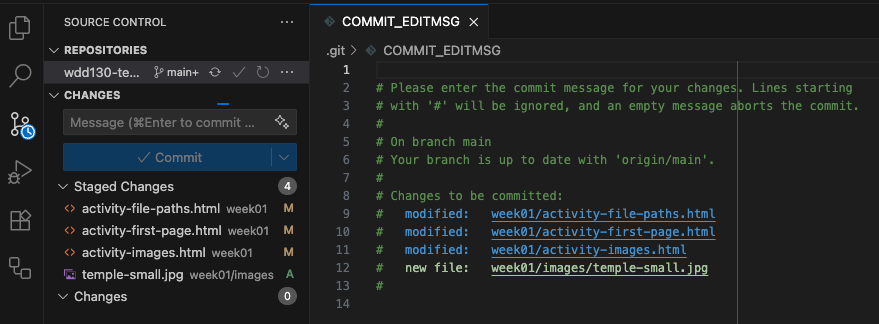
Type your message at the top of this file and save it and close it to allow Git to finish the commit process.
Pushing changes to GitHub
Once you have committed your changes to your local repository you are ready to push them to GitHub.
When you have changes in your local repository that are not present at GitHub, the Sync Changes button will appear. You can click this button to push your changes to GitHub.
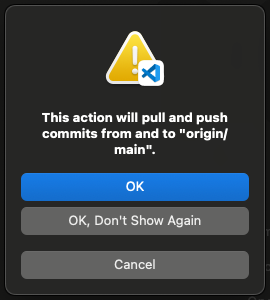
When you click this button, VS Code may tell you that you are about to push and
pull changes from origin (your GitHub repository) on the main branch.
Click the button to allow it to perform this action.
If you are working with other people or you have made changes from another computer, this button will first try to pull or download any changes from GitHub that you do not have on your computer, then it will push your changes to GitHub.
Verifying your changes at GitHub
Once you have Pushed your changes to GitHub, you can navigate to your GitHub repository in a browser and see them.
The URL for your GitHub repository is: https://github.com/yourusername/wdd130 (replace
yourusername with your actual username). At your repository, you should see your commit message
along with how long it has been since you made the change:

If you would like, you may click on the commit message to see the changes that were made.
It may take a minute or two for your changes to get deployed to your GitHub pages site.
When they are
finished you
can see the updated page in a browser by visiting your page URL, which is:
https://yourusername.github.io/wdd130 (replace yourusername with your actual
username).
Activity Instructions
This activity will help you make a change and commit and push that change to GitHub.
- Make a change to one of the html files in Week 01. (You may do something as simple as adding a blank line).
- Save your changes.
- Click the source control icon in the activity bar of VS Code.
- Enter a commit message and commit your changes to the local repository.
- Sync your changes to push them to GitHub.
- Verify that you can see your commit message at GitHub.
Submission
You have now completed all of the learning activities for this week.
Return to Canvas to submit the
W01 Learning Activities quiz.