
W04 Learning Activity: Authentication and Authorization for Web Services
Overview
- Purpose: Learn about authentication for web applications.
- Task: Read the following information and complete the activity instructions below.
Review Previous Course Materials
This learning activity covers authentication and authorization from the perspective of web services. It expects that you have previous experience from CSE 340. If you would like additional information, refer back to the CSE 340 Week 05 Authentication and Authorization materials.
Authentication answers the question, "Who is making this request?" This week, you will begin working with authentication-related issues in a team codebase.
This page introduces the main ideas behind authentication, OAuth, and JSON Web Tokens (JWTs).
Authentication can be difficult to understand because it involves many parts of an application at once: frontend redirects, backend routes, middleware, environment variables, cookies, tokens, database users, and protected business rules. The goal for this week is not to become an authentication expert, but to understand the flow well enough to add authentication to a web service and to work safely in an existing codebase.
Discipleship: Knowing your true identity
Authentication is about understanding who a user is and verifying their identity. Looking at our lives more broadly, it is critical that we understand our true identity and know who we truly are.
President Russell M. Nelson, a modern-day prophet of God, taught about the importance of your identity in his talk Choices for Eternity:
I believe that if the Lord were speaking to you directly tonight, the first thing He would make sure you understand is your true identity. My dear friends, you are literally spirit children of God.
Invitation: Read and ponder President Nelson's talk. Consider which identifiers are most important in your life.
Preparation Material
Authentication versus authorization
- Authentication: proves who the user is.
- Authorization: decides what an authenticated user is allowed to do.
For example, signing in with a school account is authentication. Checking whether that signed-in user can cancel an order is authorization.
In an ecommerce API, authentication might prove that the request came from a real signed-in customer. Authorization might decide whether that customer can view an order, cancel an order, or access an admin route used to manage products.
| Question | Concept | Example |
|---|---|---|
| Who are you? | Authentication | A user signs in and the API identifies their user id. |
| What are you allowed to do? | Authorization | An admin can update product inventory, but a customer cannot. |
Sessions and tokens
Many web apps use either server-side sessions or tokens to remember that a user has signed in.
- Session-based auth: the server stores session data and the browser keeps a session cookie.
- Token-based auth: the server gives the client a signed token. The client sends that token with later requests.
Both approaches can be valid. Session-based authentication is common in traditional web apps because the browser automatically sends cookies. Token-based authentication is common in APIs because mobile apps, browser apps, and other services can all send tokens in request headers.
Authentication flow in an API
A protected API request usually follows this flow:
- The client sends a request to a protected route.
- The request includes proof of authentication, such as a session cookie or bearer token.
- Authentication middleware checks the proof.
- If the proof is missing or invalid, the middleware returns
401 Unauthorized. - If the proof is valid, the middleware attaches user information to the request.
- The route handler uses the user information to complete the request.
- If the user is authenticated but not allowed to perform the action, the route returns
403 Forbidden.
For example, a route that returns a user's orders might only return orders where order.userId matches the authenticated user id.
OAuth
OAuth is a standard that allows a user to grant access through a trusted identity provider or authorization service. Many "Sign in with Google" or "Sign in with GitHub" flows use OAuth or related standards.
At a high level, OAuth often works like this:
- The user clicks a sign-in button in your app.
- The app redirects the user to an identity provider (such as Google or GitHub).
- The user signs in and grants permission.
- The identity provider redirects back to your app with a code.
- The app uses the code to know the user's identity and creates its own authenticated state (such as a session or a token).
- The app sends the user to the authenticated state for future requests.
OAuth is not just "login"
OAuth is about delegated access. A login experience can be built on top of OAuth, but the important idea is that the app does not need to directly handle the user's password for the external provider.
You have probably experienced this flow if you have ever signed in to a website using your Google or GitHub account. As you know, you are redirected back and forth between the app and the identity provider (such as Google or GitHub). This is done automatically by the browser because of the 300 level status codes that tell it to redirect.
The important thing to remember is that the user's credentials are never shared with your app. Instead, the app receives a temporary code that it can exchange for tokens or user information.
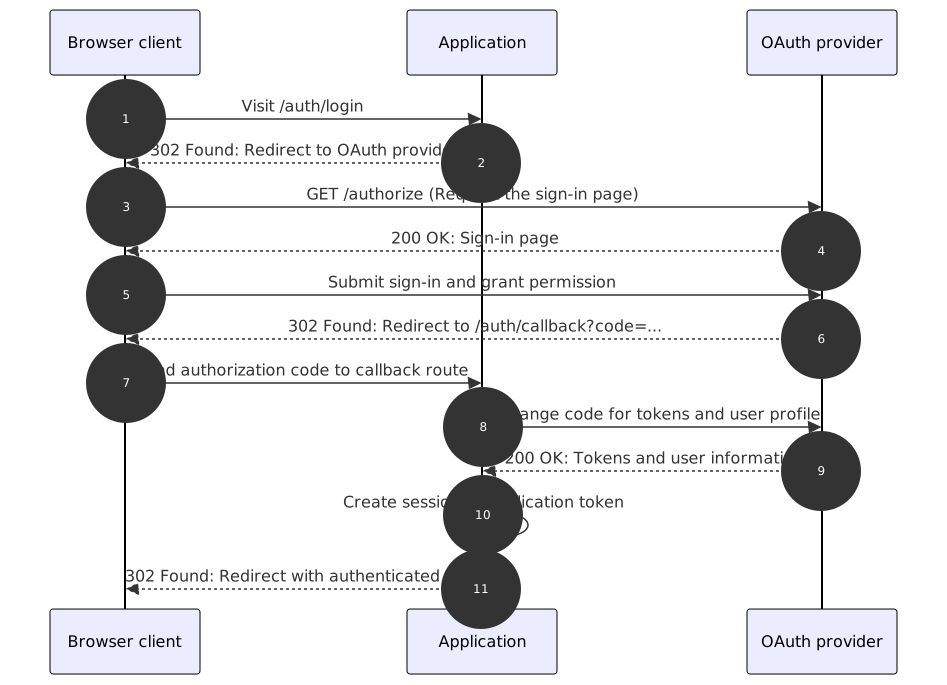
To implement and use OAuth it requires several configuration values such as client id, client secret, callback URL, and provider URLs that have to be set up in coordination with the OAuth provider. These values should be stored in environment variables when they are sensitive or deployment-specific.
Callback URLs must match
OAuth providers usually require an exact callback URL. A local callback URL such as http://localhost:3000/auth/callback is different from a Render callback URL. If the callback URL is wrong, login may fail even when the code is otherwise correct.
JWTs
A JSON Web Token, or JWT, is a signed string that can carry claims about a user or request. Claims might include a user id, email, role, or expiration time.
A JWT has three parts:
- Header: metadata about the token and signing algorithm.
- Payload: claims about the user or request.
- Signature: proof that the token was signed by a trusted secret or key.
The payload of a JWT is encoded, not automatically encrypted. That means clients may be able to read the claims. Do not put passwords, secrets, or sensitive personal information inside a JWT payload.
The following is an example of a JWT payload:
{
  "sub": "64f1a2...",
  "email": "customer@example.com",
  "role": "customer",
  "exp": 1760000000
}
In this example:
subis the subject of the token, usually the user's unique id.emailis a claim that identifies the user.roleis a custom claim that can be used for authorization decisions.expis the expiration time, given as a Unix timestamp.
In an API, a client often sends a token in an authorization header:
Authorization: Bearer <token>Signing and verifying JWTs
When a server creates a JWT, it signs the token with a secret or private key. Later, the server verifies the token to make sure it has not been changed and was signed by a trusted source.
import jwt from 'jsonwebtoken';

const createToken = (user) => {
  if (!process.env.JWT_SECRET) {
    throw new Error('JWT_SECRET is required.');
  }

  return jwt.sign(
    {
      sub: user._id.toString(),
      email: user.email,
      role: user.role
    },
    process.env.JWT_SECRET,
    { expiresIn: '1h' }
  );
};
const decoded = jwt.verify(
token,
process.env.JWT_SECRET,
{ algorithms: ['HS256'] }
);If verification succeeds, the decoded claims can help identify the user. If verification fails, the API should reject the request with a safe response such as 401 Unauthorized. The signing secret should be long, random, stored in environment variables, and different from any example value used in course materials.
Common authentication middleware flow
Authentication middleware is a function that runs before a route handler to verify that a request is authorized. It checks for a token, validates it, and allows the request to proceed only if authentication succeeds. If authentication fails, the middleware responds with an error and the request is finished before proceeding to the route handler.
const requireAuth = (req, res, next) => {
const authHeader = req.headers.authorization;
if (!authHeader) {
return res.status(401).json({ message: 'Authentication required' });
}
// Verify token or session here.
// Attach user information to req.user when valid.
return next();
};
More complete JWT middleware example
The following is a more complete example of a JWT authentication middleware:
import jwt from 'jsonwebtoken';
const requireAuth = (req, res, next) => {
const authHeader = req.headers.authorization;
if (!authHeader || !authHeader.startsWith('Bearer ')) {
return res.status(401).json({ message: 'Authentication required' });
}
const token = authHeader.split(' ')[1];
if (!process.env.JWT_SECRET) {
return next(new Error('Authentication configuration error.'));
}
try {
const decoded = jwt.verify(
  token,
  process.env.JWT_SECRET,
  { algorithms: ['HS256'] }
);
req.user = {
id: decoded.sub,
email: decoded.email,
role: decoded.role
};
return next();
} catch (error) {
return res.status(401).json({ message: 'Invalid or expired token' });
}
};
This middleware does three important things: it checks that a token exists, verifies that the token is valid, and attaches safe user information to req.user for later handlers.
Claims such as role can become stale if a user's permissions change after the token is created. For sensitive authorization decisions, check current user data from the server-side database instead of trusting an old token claim by itself.
Protecting routes
After authentication middleware is written, protected routes can use it before the controller handler.
router.get('/orders/me', requireAuth, getMyOrdersHandler);
router.post('/orders', requireAuth, createOrderHandler);
Inside a controller, the authenticated user can help filter data:
const getMyOrdersHandler = async (req, res) => {
  try {
    const orders = await Order.find({ user: req.user.id });
    return res.status(200).json(orders);
  } catch (error) {
    return res.status(500).json({ message: 'Internal server error' });
  }
};
Authorization middleware
Some routes require more than being signed in. For example, only an administrator should update product inventory or remove products from the catalog.
const requireRole = (role) => {
  return (req, res, next) => {
    if (!req.user || req.user.role !== role) {
      return res.status(403).json({ message: 'Forbidden' });
    }

    return next();
  };
};

router.put(
  '/admin/products/:id',
  requireAuth,
  requireRole('admin'),
  updateProductHandler
);
This pattern separates authentication from authorization. First the API verifies who the user is. Then it checks whether that user has the required role.
Common status codes
401 Unauthorized: the request is not authenticated or the credentials are invalid.403 Forbidden: the user is authenticated but does not have permission for the action.400 Bad Request: the authentication request is missing required input.500 Internal Server Error: something unexpected failed on the server.
Common route examples
| Route | Purpose | Likely auth behavior |
|---|---|---|
GET /products |
List public products | May be public |
GET /orders/me |
List current user's orders | Requires authentication |
POST /orders |
Create an order | Requires authentication |
PUT /admin/products/:id |
Update product inventory | Requires admin authorization |
Security Practices
- Never commit secrets, client secrets, private keys, or token signing secrets to GitHub.
- Store secrets in environment variables.
- Use HTTPS in deployed environments.
- Do not return raw token verification errors or stack traces to clients.
- Check both authentication and authorization when a route changes sensitive data.
Password storage
If an application stores local passwords, it should never store plain-text passwords. Passwords should be hashed with a password-hashing algorithm such as bcrypt before they are saved. A hash is not the same as encryption. The goal is not to recover the original password, but to verify that a later password attempt produces the expected hash.
The following is an example of how to hash a password with bcrypt:
import bcrypt from 'bcrypt';

const passwordHash = await bcrypt.hash(req.body.password, 12);

const user = await User.create({
  email: req.body.email,
  passwordHash,
  role: 'customer'
});
And this example shows how to verify a password against a hash:
const passwordMatches = await bcrypt.compare(
  req.body.password,
  user.passwordHash
);
Never store plain-text passwords
If your feature for this class assignment (or a future project) involves passwords, make sure plain-text passwords are never committed, logged, returned in API responses, or stored in MongoDB.
Authentication and Swagger
Protected API routes can still be documented and tested through Swagger, but the docs must describe how to provide authentication. Many Swagger setups include a bearer token security scheme.
// #swagger.security = [{
//   bearerAuth: []
// }]
// #swagger.responses[200] = { description: 'Authenticated user orders returned' }
// #swagger.responses[401] = { description: 'Missing, invalid, or expired token' }
// #swagger.responses[403] = { description: 'Authenticated but not allowed to access this resource' }
router.get('/orders/me', requireAuth, getMyOrdersHandler);
If a route is protected, the documentation should make that clear. Swagger should explicitly document the possible 401, 403, and successful responses so others knows what to expect when testing the route.
Questions to ask during implementation
- Should this route be public, authenticated, or admin-only?
- Where does the authenticated user id come from?
- Does this route filter data by the authenticated user?
- What happens when the token is missing, invalid, or expired?
- Are secrets stored in environment variables?
- Does Swagger explain how to test the protected route?
Activity Instructions
Check your understanding
- What is the difference between authentication and authorization?
Click to expand the example answer
Authentication verifies who is making a request. Authorization determines whether that authenticated user is allowed to perform a particular action.
- What status code should an API return when a request has no valid authentication credentials?
Click to expand the example answer
The API should return
401 Unauthorized. This means the request is not authenticated or its credentials are invalid. - What status code should an API return when a signed-in customer tries to access an administrator-only action?
Click to expand the example answer
The API should return
403 Forbidden. The user is authenticated, but does not have permission for the requested action. - Why should an application use an OAuth authorization code instead of receiving a user's external-provider password directly?
Click to expand the example answer
The authorization code flow lets the OAuth provider handle the user's password. The application exchanges a temporary code for tokens or user information without needing to store or process that external password.
- Why should token signing secrets, OAuth client secrets, and callback configuration be stored in environment variables?
Click to expand the example answer
Environment variables keep sensitive or deployment-specific values out of source code and allow local and deployed environments to use different configuration safely.
Other Links:
- Return to: Week Overview | Course Home