
W01 Learning Activity: Web Services and Express
Overview
- Purpose: Learn about web services and Express.
- Task: Read the following information and complete the activity instructions below.
In this activity, you will learn the core ideas behind web services. You will learn what a web service is, how it is different from server-side rendering, and how requests and responses move through an app.
You will then create a simple Express application that returns JSON data.
Discipleship: Asking and receiving
Web services are built around a request and response pattern. A client sends a request to a service, and the service returns a response. In a sacred and more personal way, we can turn to our Heavenly Father in prayer, ask for help, and receive answers from Him.
The Savior promised in Matthew 7:7-8:
Ask, and it shall be given you; seek, and ye shall find; knock, and it shall be opened unto you:
For every one that asketh receiveth; and he that seeketh findeth; and to him that knocketh it shall be opened.
As you work through this course, you may face problems you do not know how to solve right away. You may feel stuck on an assignment, uncertain about an error, or unsure how to keep going. Along with studying carefully and asking appropriate technical questions, you can pray and ask God for help. He can bless you with comfort, patience, ideas, and guidance through the Holy Ghost.
President Russell M. Nelson, a modern-day prophet, has taught in Revelation for the Church, Revelation for Our Lives:
In coming days, it will not be possible to survive spiritually without the guiding, directing, comforting, and constant influence of the Holy Ghost.
Invitation: During this course, seek God's help as you learn. When you feel confused, discouraged, or unsure what to do next, remember to take time to pray and look to the Holy Ghost for comfort and answers.
Preparation Material
Web services and APIs
A web service is software that receives network requests and returns responses. Most modern web services use HTTP and send data as JSON.
An API (Application Programming Interface) is the contract that explains how a client should use that service. The contract includes routes, methods, expected input, response shapes, and error behavior.
In simple terms: the API defines the rules, and the web service is the running code that follows those rules.
You can think about an API like a menu in a restaurant. The menu tells you what you can request. The kitchen is like the web service. It takes your request, does the work, and sends back a result.
When a service has a clear API, different developers can use it without guessing. They can read the API rules and know what to send and what they will receive.
This is important in real jobs because teams are often split across frontend and backend. A clear API helps both sides work in parallel.
REST APIs
Many web services are designed as REST APIs. REST stands for Representational State Transfer. In practice, REST is a set of design ideas for using HTTP in a consistent way that is focused on resources.
A resource is a thing your API works with, such as movies, users, orders, or reviews. REST-style APIs usually represent resources with clear URLs and use HTTP methods to describe the action being requested.
GET /moviesmeans retrieve a list of movie resources.GET /movies/m1means retrieve one movie resource.POST /moviesoften means create a new movie resource.PUT /movies/m1orPATCH /movies/m1often means update an existing movie resource.DELETE /movies/m1often means remove a movie resource.
In this course, you will use REST ideas to make your routes predictable. A client should be able to look at a method and URL and have a good idea of what the route does.
How this differs from server-side rendering
You have already used server-side rendering in a previous course. In a server-side rendering approach, the backend builds HTML on the server and sends that HTML to the browser. The browser mostly just displays what the server sends.
In a web services approach, the backend usually sends data only. Then a separate client (or tool) decides how to display that data. For example, a client-side JavaScript library may run in the browser, interact with the web service, and update the page. Separating the data from the presentation logic creates a very clean separation of responsibilities and also makes it possible to have completely different client experiences from the same backend. For example, a mobile app, a website, and a python data science script could all use the same web service.
| Server-side rendering | Web services |
|---|---|
| Server returns ready-to-display HTML. | Server returns data, often JSON. |
| Response is usually designed for direct browser viewing. | Response is designed for programmatic use by many kinds of clients. |
How clients and services interact
Web services are designed for systems to talk to other systems. A client sends a request with a method, URL, headers, and sometimes a body. The service processes that request and returns a response with a status code and body.
The same service can support many clients at once, such as browser apps, mobile apps, and other backend systems. This is one reason APIs are a common design choice.
A request starts when a client sends a URL and method, such as GET /movies. The server finds matching route code and runs it. That code may read from a database, do checks, and prepare a response.
The response always includes a status code. It often includes JSON data too. The client reads both parts. The status code tells the client whether the request worked. The JSON gives the actual data or error message.
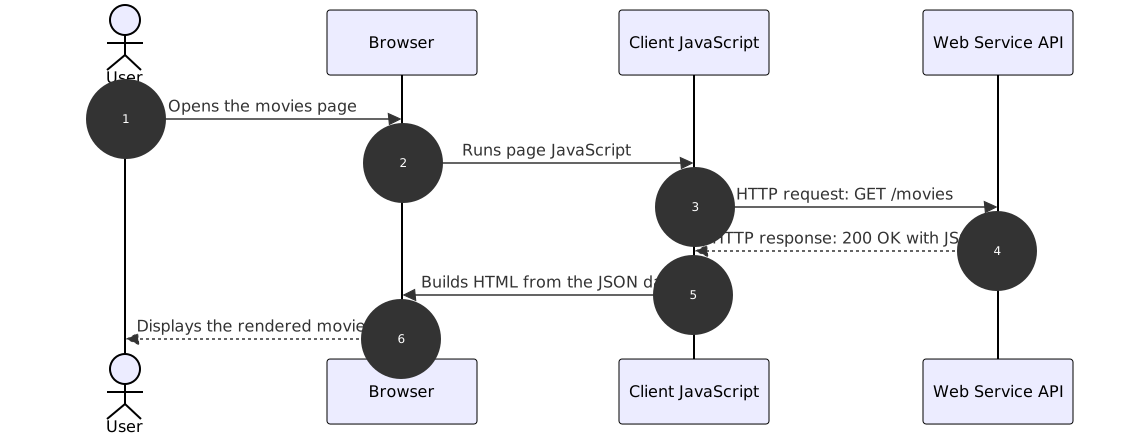
A simple request packet for the GET /movies route could look like this:
GET /movies HTTP/1.1
Host: api.example.com
Accept: application/json
User-Agent: Browser JavaScript
A matching response packet could look like this:
HTTP/1.1 200 OK
Content-Type: application/json

[
  {
    "id": "m1",
    "director": "Ava Morgan",
    "title": "Hidden Harbor",
    "releaseYear": 2021
  },
  {
    "id": "m2",
    "director": "Noah Chen",
    "title": "Mountain Signal",
    "releaseYear": 2019
  }
]
Good API design makes this flow simple and repeatable. If every route behaves in similar ways, clients are easier to build and easier to debug.
Core design ideas in API work
- Consistency: similar routes should behave in similar ways.
- Clarity: request and response formats should be easy to understand.
- Predictability: status codes and error messages should follow stable patterns.
- Separation of concerns: the API returns data; clients decide how to present it.
Consistency helps developers move faster. If one route returns errors in a certain format, other routes should do the same. This means client code can handle errors in one common way.
Clear API rules reduce mistakes. When field names, types, and status codes are easy to understand, you spend less time solving misunderstandings and more time building features.
Separation of concerns gives flexibility. One API can serve a website, a phone app, and even another backend service without rewriting business logic for each client.
Example: server-side rendering response
In a server-side rendered app, the response body might look like this:
<html>
  <body>
    <h1>Movies</h1>
    <ul>
      <li>Hidden Harbor</li>
      <li>Mountain Signal</li>
    </ul>
  </body>
</html>
Example: web service response
In a web service, the same information is usually returned as JSON:
[
  {
    "id": "m1",
    "director": "Ava Morgan",
    "title": "Hidden Harbor",
    "releaseYear": 2021
  },
  {
    "id": "m2",
    "director": "Noah Chen",
    "title": "Mountain Signal",
    "releaseYear": 2019
  }
]
What about XML?
Web services can also return XML. XML was used heavily in earlier web service systems and still exists in some older or specialized APIs. Today, most modern web APIs use JSON because it is smaller, easier to read, and works naturally with JavaScript.
Common HTTP status codes in APIs
200 OK: the request succeeded and data is returned.201 Created: a new resource was created successfully.400 Bad Request: request input is invalid.404 Not Found: the requested resource does not exist.500 Internal Server Error: something unexpected failed on the server.
Why this architecture is valuable
When your backend returns clean data, many clients can reuse the same service. For example, a web app and a mobile app can both call the same API routes.
Activity Instructions
In Weeks 01–02, you will create a simple web service that works with a collection of books. This activity will walk you through the process of setting up a GitHub repository and the basic Express server for this project.
Complete the following steps to create an Express server that returns JSON data:
Create and clone a GitHub Repo
First you need to create and clone your repository.
- In a browser, navigate to GitHub and sign in.
- Create a new GitHub repository for the books api project that you will be using in Weeks 01–02. You might choose a name such as
cse341-books. - Make sure the repository is Public.
- You will not start from a template or create a README.md file at this point, and no license file is needed.
- When creating the repository, under the Add .gitignore section, select Node.
- Create the repository.
- Clone the repository to your computer and open the cloned folder in VS Code.
- You can do this in one step by clicking Clone Git Repository... on the VS Code Welcome page.
- At this point, the repo will be empty except for the .gitignore file.
Create a new Node.js Application
Next you will initialize a new Node.js application and install Express and Nodemon.
- In the terminal, go to the root directory of your project and run
npm init. You can accept the defaults for most questions, however make sure to set the following:- entry point should be server.js (not the default index.js).
- type should be
module(not the default commonjs).
- In the terminal, run
npm install expresswhich will install the Express.js framework. - In the terminal, run
npm install --save-dev nodemonwhich will install Nodemon as a development dependency. - Open
package.jsonand check the settings. You should see your packages and the settings you chose during setup. - In
package.json, add start and dev scripts. The start script should run the server withnode --env-file=.env server.jsand the dev script should run it withnodemon --env-file=.env server.js.
Sample Code (click to expand)
An example package.json:{
"name": "your-repo-here",
"version": "1.0.0",
"description": "",
"homepage": "https://github.com/your-user/your-repo-here#readme",
"bugs": {
"url": "https://github.com/your-user/your-repo-here/issues"
},
"repository": {
"type": "git",
"url": "git+https://github.com/your-user/your-repo-here.git"
},
"license": "ISC",
"author": "",
"type": "module",
"main": "server.js",
"scripts": {
"start": "node --env-file=.env server.js",
"dev": "nodemon --env-file=.env server.js",
"test": "echo \"Error: no test specified\" && exit 1"
},
"dependencies": {
"express": "^5.2.1"
},
"devDependencies": {
"nodemon": "^3.1.14"
}
}
Set up environment variables
To keep your configuration flexible, you will use environment variables for settings such as the port number and database connection string.
- Create a
.envfile in the root of your project. - Add a variable named
PORTand set it to3000. - Open
.gitignoreand verify that.envis listed so you do not accidentally commit it to GitHub. - Update your start and dev scripts to use the environment variables. In your
package.json, make sure both commands include--env-file=.envas follows:"start": "node --env-file=.env server.js", "dev": "nodemon --env-file=.env server.js"
Do not commit your .env file
Never commit your .env file to version control. Environment files often contain private configuration values such as database connection strings, usernames, passwords, API keys, and other secrets. If a .env file is pushed to GitHub, those secrets may be exposed to anyone who can access the repository, and they can remain visible in the Git history even after the file is deleted. Keep .env listed in .gitignore and store production values in the hosting service's environment variable settings instead.
Implement a basic Express app and server
Now you will create a basic Express app that responds to GET /. You will keep the Express app in one file and the server startup in another file. This makes the app easier to test later because tests can import the app without starting a real server port.
- Create a new
app.jsfile. - In your
app.jsfile, add the following: - Import Express at the top of the file.
- Create an Express application instance.
- Add JSON request body middleware with
app.use(express.json()). - Add a root route (
GET /) that returns a short JSON response with a status code of 200. - Export the app.
- Create a new
server.jsfile. - In your
server.jsfile, add the following: - Import the app from
app.js. - Set up a
PORTconstant using thePORTenvironment variable. - Throw an error if
PORTis missing so you know immediately if the.envfile is not being read. - Start the server and have it listen on the specified port.
- Start the app with
npm run dev, then navigate to http://127.0.0.1:3000 in your browser and verify that it responds with JSON.
Sample Code (click to expand)
An example app.js:import express from 'express';
const app = express();
app.use(express.json());
app.get('/', (req, res) => {
return res.status(200).json({ message: 'Server is running' });
});
export default app;
import app from './app.js';

const PORT = process.env.PORT;

if (!PORT) {
    throw new Error('PORT is not defined. Make sure your local npm scripts reference the .env file with --env-file=.env, or define PORT in your hosted environment settings.');
}

app.listen(PORT, () => {
    console.log(`Server listening at 127.0.0.1:${PORT}`);
});
Next Step
After you have completed all the learning activities for this week, return to Canvas to take the W01 Learning Activities quiz.
Other Links:
- Return to: Week Overview | Course Home