
W01 Learning Activity: NoSQL Databases and MongoDB
Overview
- Purpose: Learn about NoSQL databases and MongoDB.
- Task: Read the following information and complete the activity instructions below.
This learning activity introduces NoSQL databases and explains how MongoDB stores and returns data. You will learn the basic ideas behind documents, collections, and simple queries.
By the end of this page, you should be able to explain how MongoDB organizes data and how your API can read from various collections.
What is a NoSQL database?
A NoSQL database stores data in a different way. Instead of requiring all records to fit one table structure, a NoSQL database can store data in formats that are more flexible. Different NoSQL systems use different models, but MongoDB uses documents.
Why MongoDB is useful for web services
MongoDB is a popular NoSQL database that stores data as documents that look very similar to JSON. Because Express APIs often send JSON responses, MongoDB fits naturally into many JavaScript projects.
MongoDB is also useful when different records in the same collection may not have exactly the same fields. That flexibility can make early development easier.
Documents and collections
In MongoDB, a document is one stored record. A document uses key-value pairs, similar to a JavaScript object.
A collection is a group of related documents. You can think of a collection as being similar to a table in a relational database, but the documents inside it do not need to match perfectly.
For example, if your API stores hiking trails and campgrounds, you might have one trails collection and one campgrounds collection. The following is an example of a document in the trails collection:
{
  "_id": {
    "$oid": "69d80cf8e27c83a1a75818a0"
  },
  "name": "Pine Ridge Trail",
  "lengthKm": 10.3,
  "difficulty": "moderate",
  "openSeason": "summer"
}
The example above shows one MongoDB document. Each field has a name, such as lengthKm or difficulty, and each field stores a value.
The _id field
Each MongoDB document has an _id field. This is the unique identifier for that document. MongoDB creates it automatically if you do not provide one.
In many projects, this value is an ObjectId. It helps MongoDB find one specific document quickly. In your API routes, you will often use that id when a client requests one record, such as GET /trails/:id.
An ObjectId is a special data type that MongoDB uses for the _id field by default. It is a 12-byte value that is usually represented as a 24-character hexadecimal string.
How MongoDB data compares to relational database data
| Relational Database | MongoDB |
|---|---|
| Data is stored in tables with rows. | Data is stored in collections with documents. |
| Rows in one table follow the same column structure. | Documents in one collection can have slightly different fields. |
| Related data is usually stored in separate tables and joined. | Related data may be stored in separate collections or sometimes nested in one document. |
How querying works in MongoDB
A query is a request for data. When your Express server talks to MongoDB, it sends a query to a collection. MongoDB then returns matching documents.
If you want all documents in a collection, the query does not need a filter. If you want only matching documents, you include a filter object.
The following query asks MongoDB to return every document in the trails collection. Notice how it uses the find() method with no filter:
const allTrails = await db.collection('trails').find().toArray();
The following query asks MongoDB to return one document from the trails collection where the name field matches the given value. Notice how it uses the findOne() method with a filter object:
const oneTrail = await db.collection('trails').findOne({ name: 'Pine Ridge Trail' });
In APIs, it is common to request one document by id. Because MongoDB usually stores ids as ObjectId values, your route code often needs to validate the id string from the URL and then convert it into an ObjectId before querying.
import { ObjectId } from 'mongodb';

if (!ObjectId.isValid(req.params.id)) {
  return res.status(400).json({ message: 'Invalid id format' });
}

const trailId = new ObjectId(req.params.id);
const trail = await db.collection('trails').findOne({ _id: trailId });
An invalid id format is a client input problem, so it should usually return 400. A valid id that does not match any document should usually return 404.
Simple request-response flow with MongoDB
- A client sends an HTTP request, such as
GET /trails. - The Express route queries the MongoDB
trailscollection. - MongoDB returns matching documents.
- The route sends those documents back as JSON.
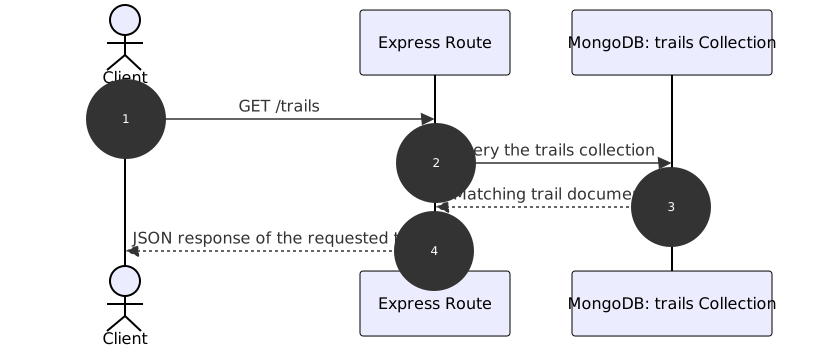
Do not confuse a collection with one document. If a route should return one item, make sure your query looks for one specific document instead of returning the whole collection.
Check Your Understanding
Question 1
What is a NoSQL database?
Answer (click to expand)
A NoSQL database stores data in a format that is different from the traditional table model used by relational databases. In MongoDB, that format is documents grouped into collections.
Question 2
What is the difference between a document and a collection in MongoDB?
Answer (click to expand)
A document is one stored record. A collection is a group of related documents.
Question 3
Why is MongoDB a good fit for many JavaScript web services?
Answer (click to expand)
MongoDB stores data in documents that look very similar to JSON. Since JavaScript web services often send JSON responses, the data model fits naturally.
Question 4
What does the _id field do in a MongoDB document?
Answer (click to expand)
The _id field uniquely identifies one document. It helps MongoDB find a specific record quickly.
Question 5
How do you query MongoDB for all documents in a collection?
Answer (click to expand)
You can call find() on the collection and convert the results to an array with toArray().
Question 6
Why might an API route need to convert a value into an ObjectId before querying MongoDB?
Answer (click to expand)
Many MongoDB document ids are stored as ObjectId values, not plain text strings. Converting the route value helps the query match the document correctly.
Question 7
In a simple Express and MongoDB request-response flow, what happens after the route queries the collection?
Answer (click to expand)
After the route queries the collection, MongoDB returns matching documents. Then the Express route sends those documents back to the client as a JSON response.
Activity Instructions
In this activity you will create a test collection at MongoDB and connect to it from your Express application. This will prepare you to do a similar thing in your weekly assignment that will use a different collection.
Complete the following:
Create a MongoDB Atlas free instance
You will use a free MongoDB Atlas M0 cluster. Atlas gives you a cloud-hosted MongoDB database that your local Express app can connect to with a connection string.
- Navigate to MongoDB Atlas.
- Select "Get Started" and follow the prompts to create a new account.
- Verify your email address if prompted and then sign in.
- Create a free cluster (M0) and give it a name such as
books-cluster. - Select AWS as the cloud provider and make sure to choose the same region that you are using in your render.com hosting.
- Under the Quick Setup section, you can leave the Automate security setup box selected, but uncheck the box to Preload sample dataset.
- Click the button to create or deploy the cluster.
- If you receive an error message about your current IP address not being added, make sure to add it.
- Create a database user with a username and password. Make sure to save the username and password in a secure location.
- On the cluster page, click Connect, choose Drivers, and select Node.js to view the connection string for your application.
- Copy the Node.js connection string from Atlas and save it in a
.envfile in a variable namedMONGODB_URI. Your file should look similar to the following:MONGODB_URI=mongodb+srv://<username>:<password>@<cluster-url>Make sure to replace
<username>,<password>, and<cluster-url>with the correct values from your Atlas cluster.
Troubleshooting IP address problems
If you cannot connect to your cluster, either now or later when you are working from a different location, make sure your current IP address is in the Atlas IP access list. MongoDB Atlas only allows connections from addresses you have allowed.
If you have difficulty getting your specific IP address or IP address range to work, you can add 0.0.0.0/0 to allow access from any IP address. Be aware that this is considered a security risk. It is generally better to include your correct IP address or IP address range whenever possible.
To find your current public IP address, you can search the web for "what is my IP address" or use the Add Current IP Address option in Atlas when it is available. If you are on a school, work, VPN, or shared network and your IP address changes often, search for guidance from your network provider about your public IP range or CIDR range.
Security reminder
Never commit the .env file with credentials. Make sure .env is listed in .gitignore.
Create the database and add sample data
Now you will create a practice database and add a few sample trail documents so you can explore how MongoDB collections work before using your books data in the prove assignment.
- Sign in to MongoDB Atlas in your browser and open the project that contains your cluster.
- In the Atlas sidebar, under Database, open Data Explorer.
- In the Connections sidebar, select or hover over your cluster and open the control to create a database.
- Enter
practiceas the database name andtrailsas the collection name. - Click Create Database.
- Select the
practicedatabase and then thetrailscollection. - Click Insert Document and switch to JSON mode if the field-by-field editor is displayed.
- Add at least 3 documents with fields such as
name,lengthKm, anddifficulty. - Use simple values so you can recognize the records easily when you browse or query them later.
- For example, paste the following JSON for the first document:
{
  "name": "Pine Ridge Trail",
  "lengthKm": 10.3,
  "difficulty": "moderate"
}
Notice that the
_idfield is automatically generated by MongoDB. - Click Insert, then repeat the process for at least two more trail documents using different values.
Explore Atlas Data Explorer and MongoDB
Before you move on, take some time to explore Atlas Data Explorer in your browser and try changing your data. Try creating, reading, updating, and deleting documents in the trails collection. This will help you understand MongoDB before you write code that uses it.
Create a database connection helper in your app
Now that your trails collection exists, connect your Node.js app to MongoDB so you can retrieve that data in code.
- Open your Week 01 project in VS Code.
- In the terminal, install the official MongoDB Node.js driver if it is not already installed:
npm install mongodb - Create a new folder named
srcin your project if it does not already exist. - Inside
src, create a subfolder nameddb. - Create a file in the
src/db/folder namedconnect.js. - Copy and paste the following code into the
connect.jsfile. It defines functions to connect to MongoDB and retrieve the database object.
import { MongoClient } from 'mongodb';

let database;

const connectToDb = async () => {
  const connectionString = process.env.MONGODB_URI;
  if (!connectionString) {
    throw new Error('MONGODB_URI is required.');
  }

  const client = new MongoClient(connectionString);
  await client.connect();
  database = client.db(process.env.MONGODB_DB_NAME || 'practice');
  return database;
};

const getDb = () => {
  if (!database) {
    throw new Error('Database not initialized. Call connectToDb first.');
  }
  return database;
};

export { connectToDb, getDb };
Update the server startup
You already created server.js in the Web Services and Express activity. Now update that file so the server connects to MongoDB before it starts listening for requests.
- Open
server.js. - Import the new
connectToDbyou just created in./src/db/connect.js. - Move the
app.listen(...)code inside an asyncstartServerfunction. - Inside
startServer, callawait connectToDb()beforeapp.listen(...). - If the connection fails, log a short message and stop the process.
- Call
startServer()at the bottom of the file.
Sample Code (Click to expand)
When you are finished, your complete server.js file should look like this:
server.js
import app from './app.js';
import { connectToDb } from './src/db/connect.js';

const PORT = process.env.PORT;

if (!PORT) {
  throw new Error('PORT is not defined. Make sure your local npm scripts reference the .env file with --env-file=.env, or define PORT in your hosted environment settings.');
}

const startServer = async () => {
  try {
    await connectToDb();

    app.listen(PORT, () => {
      console.log(`Server listening on port ${PORT}`);
    });
  } catch (error) {
    console.error('Database connection failed:', error.message);
    process.exit(1);}
};

await startServer();
Run your application and verify that it connects to the database and starts listening on the specified port. If you discover any issues, stop and address them before proceeding.
Create a temporary GET /trails practice route
In your assignment this week, you will create an API that retrieves book information from MongoDB. In this step, you will create a GET /trails route. This route shows how to connect to MongoDB and get data. You will use this route to verify that your database connection is working correctly. Then, once you feel comfortable with it you can remove this GET /trails route and replace it with your actual API routes.
- Open
app.js. - Import
getDbfromsrc/db/connect.js. - Add a temporary
GET /trailsroute before the final export. - Inside the route, query the
trailscollection withfind().toArray(). - Return the trail documents as a JSON response.
- Start the app with
npm run dev. - Open http://127.0.0.1:3000/trails in your browser and verify that the response contains the trail documents from your database.
Sample Code (Click to expand)
app.js
import express from 'express';
import { getDb } from './src/db/connect.js';

const app = express();

app.use(express.json());

app.get('/', (req, res) => {
  return res.status(200).json({ message: 'Server is running' });
});

app.get('/trails', async (req, res) => {
  try {
    const trails = await getDb()
      .collection('trails')
      .find({})
      .toArray();

    return res.status(200).json(trails);
  } catch (error) {
    console.error('Failed to retrieve trails:', error.message);
    return res.status(500).json({ message: 'Failed to retrieve trails' });
  }
});

export default app;
Clean up the practice route
The GET /trails route is only for practicing the database connection. After you verify that it works, you may delete this route and the getDb import from app.js. Keep src/db/connect.js because you will reuse that database connection helper in the assignment.
Submission
After you have completed all the learning activities for this week, return to Canvas to take the W01 Learning Activities quiz.
Other Links:
- Return to: Week Overview | Course Home