
Remote Connection to Render.com Database
Video Overview
The video provides a general overview of the activity, but does not contain the detail needed to complete each process. Watch the video to obtain a general idea, but follow the written steps to complete the activity. This is the Transcript of the video.
Introduction
With the database created on render.com and pgAdmin4 installed, we can now establish a connection between the two in order to build the structure and populate the database with content.
Check the Access Control Source
Render.com requires that any external access to a database service be allowed from only one location. That location is determined by an IP address. This is a security process, so just go with it.
- Navigate to Render.com.
- Login using the GitHub option, as done previously.
- Click the name of your database service in the dashboard.
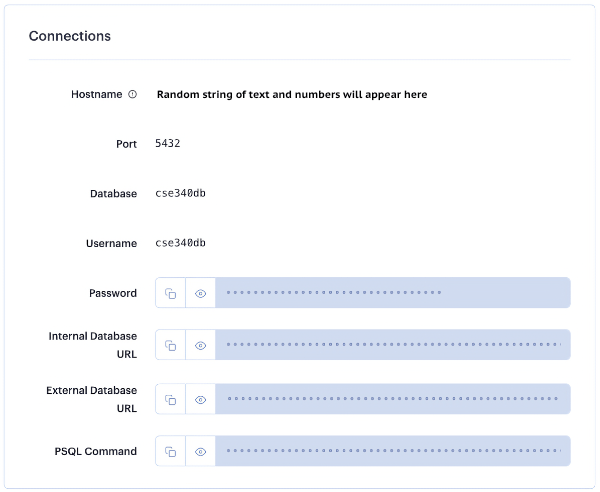
- Scroll to the bottom of the information page until you see the "Access Control" area.
- The address
0.0.0.0/0should already be present in the Source text box. This address opens access to any external IP address as long as the connection has the correct credentials. - Stay on the page, but scroll up to the "Connections" box. You will need this information in a moment.
pgAdmin Remote Connection
- Open the pgAdmin application.
- On the left side, should be a "Servers" panel. This is where we will build the connection.
- Right-click on the
Serversname. - Select
Register > Server. A dialog box should open: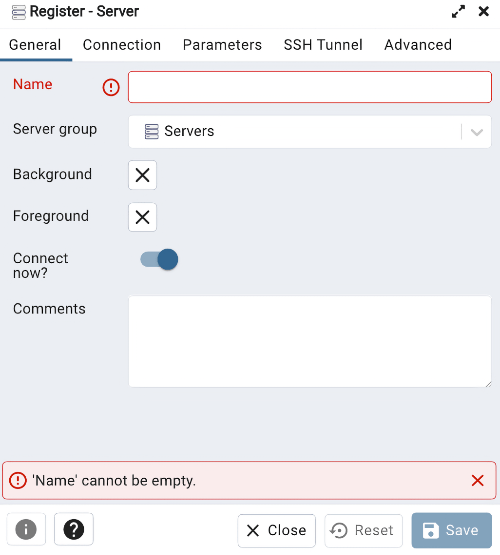
- Provide a descriptive name (e.g. Render.com). Toggle the Connect now? switch to off. Leave all other settings on this screen alone.
- Click "Connection" in the top bar of the dialog box.
- Return to the "Connections" box for the Render.com database.
- Locate the "External Database URL" item and click the "Copy to clipboard" button.
- Return to pgAdmin and paste the URL into the "Host name / address" dialog box.
- Highlight all characters in the string from the first character all the way to and including the "@"
symbol. Delete these characters. The highlighted characters in the example string below illustrate what
should be removed:
postgres://cse340db:odSoeaIrmf1bAz0hvCl4kH@dpg-cd4sj7hqpbpffhu0-a.oregon-postgres.render.com/cse340db
- Move to the end of the remaining string.
- Highlight the forward slash "/" and all characters to the right. Delete these characters. The
highlighted characters in the example string below illustrate what should be removed:
dpg-cd4sj7hqpbpffhu0-a.oregon-postgres.render.com/cse340db
- Why? The connection string contains many pieces of information needed to establish a connection. Unfortunately, pgAdmin cannot accept the string as a whole, so we have to alter it.
- The value of the Port should be "5432". That is correct, so don't change it.
- Return to the "Connections" box for the Render.com database.
- Visually confirm the Database name and Username. If they are identical, it makes it easy. Highlight and copy the database name.
- In the pgAdmin dialog box, paste the database name into the "Maintenance database" text box.
- In the pgAdmin dialog box, paste the Username into the "Username" text box.
- Leave the other settings on this screen alone.
- Click "Parameters" in the top bar of the dialog box.
- Change, if needed, the "SSL Mode" to "Require".
- Click the "Save" button.
- Right-click on the
- pgAdmin may attempt to connect immediately. In order to successfully connection, you'll need your database password. I'll describe this process in the next section.
Establish the Connection
When beginning a session between pgAdmin and the remote database on Render.com, you will need the password from the "Connections" information in the database dashboard.
- If not already logged in to Render.com, do so using the GitHub option.
- Click the name of your database service in the Dashboard.
- Scroll down to the "Connections" information.
- Click the "Copy to clipboard" button in the Password line.
- Go to pgAdmin.
- Expand the "Servers" list, if needed.
- Right-click on the Render server and select "Connect Server".
- Provide the password if asked. Just paste the copied password.
- If everything works, then the connection will be made, and you will be able to see the various options associated with the database on Render.com.
Close the Connection
On the Free tier that Render.com offers, it is important to not overuse time or resources. It is recommended that when you are done with your interaction between pgAdmin and the database server that the connection be closed. To do so:
- Right-click on the Render server object in the "Servers" panel of pgAdmin.
- Select "Disconnect from Server".
- You're done.
Conclusion
As you can see, establishing this connection requires a fair amount of work. You should only have to repeat this when your Render.com database expires and a new one is built.