
GitHub Desktop Client
Introduction
Before using Git or GitHub, you must first ensure that your computer has Git installed. What is Git? It is software typically used for version control. This means that this software keeps track of your code as you write it and allows you to save your code at particular points (called commits). The commits are known by Git and allow you to rewind or go back to a previous commit as needed. This is helpful when learning or experimenting.
Check for Git
You will need to check to see if Git is already installed, and what version is present. If it is missing or old, then you'll install or update to the newest version. Follow the directions below for your Operating System:
Mac
- Do the Command + Spacebar keystroke combination.
- Type Terminal, hit Enter.
- Type git -v, hit Enter.
- If version 2.x is present, you're good to go.
Windows
- Click the search tool in the dock.
- Type Command - Click the "Command Prompt" option.
- Type git -v, hit Enter.
- If version 2.x is present, you're good to go.
Installing Git
If Git is not found on your computer, then go to https://git-scm.com/download/. Then:
- Click the download link for your computer's operating system
- Mac users: Install homebrew and follow the directions found on the "Download for macOS" page.
- Windows users: Click the download link for the latest version at the top of the page and follow the installation directions.
When done with the installation, repeat the git version check shown above.
To interact with GitHub, we will use the Source Control built-in extension in VS Code. We will use it to clone the remote repository (repo) to the local machine.
Repository Cloning
Follow the process described in the video below (pause and rewind as needed) to clone the remote repository to your local machine. Note: The video will mention "web" repository and have a repository name that includes "github.io". Both of these should be ignored. The process works with any repo. Use the repo you created on GitHub for our class as you follow along.
Commit and Sync Content
In this video you will use VS Code to create and commit content to the Git version controller and sync the content between the local and remote repositories. When done you will confirm that the content has been backed up to GitHub. Remember to pause and rewind as needed until done. Check the outcomes list at the bottom of the page when finished.
Note
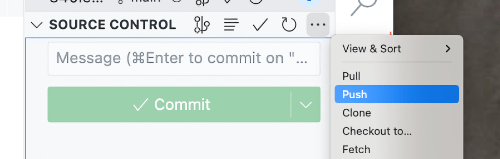
If, at the ~3:20 mark, after clicking the Commit button, the green button does NOT change to "Sync" or "Publish", then you will force the push of the new file to the GitHub repo. To do this:
- Hover you mouse over the "SOURCE CONTROL" line.
- Click the ellipse (...) icon, on the right.
- Click the "Push" item (3rd from the top).
- When done, go to the remote repo on GitHub and reload the page in the browser. You should see your new file.
Outcomes
- The remote repository was successfully created, then cloned, to the local computer.
- A simple web page was created, then committed and synced with the remote repository using the source control tool of VS Code.
If either of these outcomes was not successful, go back and review the process and/or get help until both have been completed.