
Deliver Registration View
Introduction
In the previous activity you used the MVC process to enable the "My Account" link, and successfully deliver the Login view to the client. That view contained a login form and a link to request the registration view, in order to create an account. This activity is all about making the link to request the registration view work.
Video Overview
The video provides a general overview of the activity, but does not contain the detail needed to complete each process. Watch the video to obtain a general idea, but follow the written steps to complete the activity. This is the Transcript of the video.
The Login View
You'll start this activity where the last one ended - in the login view. Why? Because there needs to be a path assigned to the link, and it needs to match the general format of the "My Account" path.
You'll recall that the path in the "My Account" link looked like this:
href="/account/login".
account element was placed in the server.js file as the first element of the app.use() function, while "login" was part of the router file, to indicate the actual process to be executed, if detected in the GET object. Understanding the path and how it fits into the MVC process is critical to the next step. The two parts of the path, as mentioned, are shown here:
// Account routes
app.use("/account", require("./routes/accountRoute"))// Route to build login view
router.get("/login", utilities.handleErrors(accountController.buildLogin))- Closely examine the register link href path (if any) below the login form.
- Add or modify the href path (if needed) to resemble the "My Account" path, but indicate that the "registration" view is being requested.
- Save the file.
The Registration Route
It's time to add a new route to the accountRoute file, to start the delivery of the registration view.
- Open the accountRoute file in the routes folder.
-
Using the login route as an example (refer to the example above), build a new
registrationroute. - As before, the route should trigger a function, found in the account controller, which you will need to build.
- Ensure no warnings or errors are displayed by VSC.
- Save the file.
Account Controller
With the registration route in place, the account controller function, to process the request for the registration view, needs to be built.
- Find and open the accountController file in the controllers folder.
- Add a few empty lines below the existing function to deliver the login view. Then, add a comment and a function that will deliver the registration view (you'll build it later in this activity).
-
The registration function is shown below (your names may be different that what is shown):
/* **************************************** * Deliver registration view * *************************************** */ async function buildRegister(req, res, next) { let nav = await utilities.getNav() res.render("account/register", { title: "Register", nav, errors: null }) } module.exports = { buildLogin, buildRegister } -
An Explanation
- Lines 1 - 3 - a multi-line comment introducing the function.
- Line 4 - begins the function, declaring it as asynchronous, and passing in request, response and next as parameters.
- Line 5 - retrieves and stores the navigation bar string for use in the view.
- Line 6 - calls the render function and indicates the view to be returned to the client and opens the object that will carry data to the view. Note: the path indicates that the view is inside the "account" folder, which should be within the "views" folder.
- Lines 7-8 - the data items to be sent to the view.
- Line 9 - closes the data object and the render function (opened on line 6).
- Line 10 - closes the function.
- Line 11 - left intentionally blank.
- Line 12 - exports the function for use elsewhere [Note: this function is added to the exports object, the other function name should already exist.].
- Ensure no warnings or errors are displayed by VSC.
- Save the file.
Registration View
With everything else done, it is time to build the registration view. As with the other views built, it should meet the following specifications:
- Be created inside the account folder, within the views folder.
- Be named according to the name in the render function of the controller.
- Use the title data value for both the title and h1 elements.
- Have the ability to display a flash message, if one is sent.
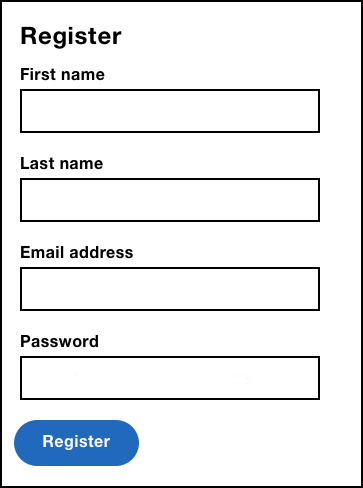
- Display a registration HTML form that accepts four inputs: first name, last name, email address and password. Each input should be of the correct input type. Remember to apply the data trail technique from the last activity to these form inputs too.
-
The form should include a button to submit the registration data. Refer to this example:
- The form should indicate that all the inputs are required and that the password must be:
- 12 characters in length, minimum
- contain at least 1 capital letter
- contain at least 1 number
- contain at least 1 special character
- Optionally, you can add a button to toggle the password from bullets to plain text and back. Follow the process shown in this video to add this functionality to the form:
- Add appropriate CSS to render the view and form professionally.
- Ensure no warnings or errors are displayed by VSC.
- Save the file.
Test Time
Okay, it is important to test the functionality that has just been added.
- Ensure that all the file names are correct, particularly those that are being required by other files.
-
Open a VSC terminal and
start the development server -
pnpm run dev. -
Open a browser to
localhost:5500. - Click the "My Account" link in the header.
- The login view should be delivered. Find and click the link to request the registration view.
- The registration view should be delivered.
- Test the view against the Frontend checklist.
- If everything worked, pump your fist in the air and shout "Hooray". If not, review the terminal logs to see if an error is reported, get help from your learning team, the TA, or the professor.
- Stop the local server when done testing!
Conclusion
Practice makes perfect. You have now repeated the entire process that you started in the previous activity. Keep up the great work!