Introduction to pgAdmin and Basic Database Operations
In this assignment, you will learn how to connect to a PostgreSQL database using pgAdmin, configure your connection to focus on your own database, and perform basic SQL operations. You will create tables, insert data, and explore different methods of deleting records and database objects.
pgAdmin is a web-based administration tool for PostgreSQL databases. It provides a graphical interface that makes database management more intuitive than working solely with command-line tools. Understanding how to use pgAdmin effectively will make your database development workflow much more efficient.
The Challenge of Multiple Databases
When you connect to a PostgreSQL server using pgAdmin, you will typically see all databases on that server—including system databases and those belonging to other users. This is a deliberate design choice in PostgreSQL. While you cannot access databases you do not own, seeing them in the interface can be distracting and confusing, especially when you only need to work with your own database. In shared environments, such as classrooms or development servers, this can make navigation more challenging and increase the risk of accidentally selecting the wrong database.
Additionally, working directly with SQL commands through a graphical interface helps bridge the gap between pure command-line database work and visual database management. This assignment will teach you how to configure pgAdmin to show only what you need and how to perform essential database operations both through SQL and through the interface.
Assignment Instructions
1. Connecting to Your PostgreSQL Database
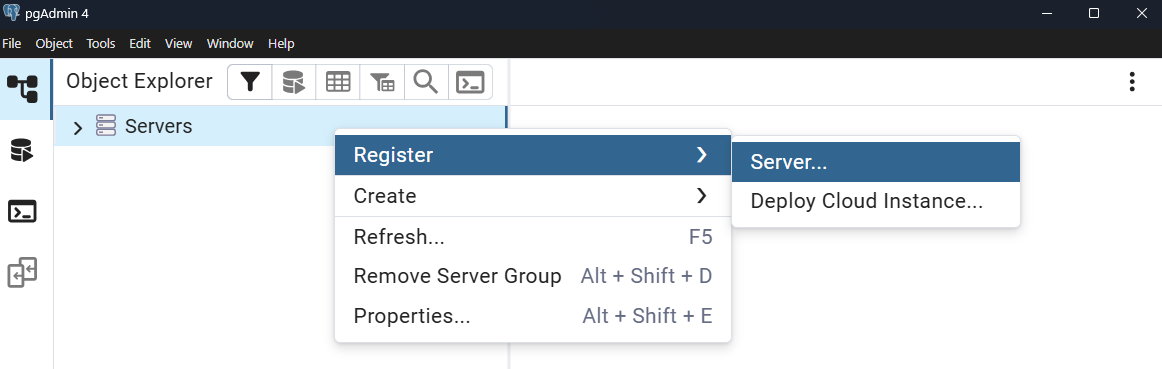
Start by opening pgAdmin and creating a new server connection. Right-click on "Servers" in the browser panel and select "Register" → "Server" to open the connection dialog.
In the "General" tab, give your connection a meaningful name like "CSE 340". This name is just for your reference and helps you identify the connection later:
Switch to the "Connection" tab and enter the database connection details your instructor provided to you. You will need to complete the following fields:
- Host name/address → Provided by BYUI CSE IO app
- Port → Provided by BYUI CSE IO app (Usually 5432)
- Maintenance database → Provided by BYUI CSE IO app
- Username → Provided by BYUI CSE IO app
- Password → Provided by BYUI CSE IO app
- Save Password ? → Toggle on
Do not save or connect yet, there is more that we need to configure.
2. Configuring the Advanced Settings
Next you will customize your connection to show only your database. Click on the "Advanced" tab in the already open server registration dialog. This tab contains settings that control what pgAdmin displays and how it behaves with this connection.
Look for the "DB restriction" field. This is a powerful feature that allows you to limit which databases are visible in the pgAdmin browser. Enter the exact name of your assigned database in this field. For example, if your database is called student_db_john, enter exactly that name, then press Enter to apply it.
This restriction means that when you expand your server connection in pgAdmin, you will only see your specific database instead of all databases on the server. This keeps your interface clean and prevents you from accidentally working with the wrong database.
Click "Save" to create the connection. pgAdmin will test the connection and, if successful, your server will appear in the browser panel on the left.
The DB restriction setting is particularly useful in shared database environments like classrooms or development teams. It prevents confusion, reduces clutter in the interface, and helps maintain focus on your specific work without the distraction of seeing other databases you cannot or should not access.
3. Exploring Your Database
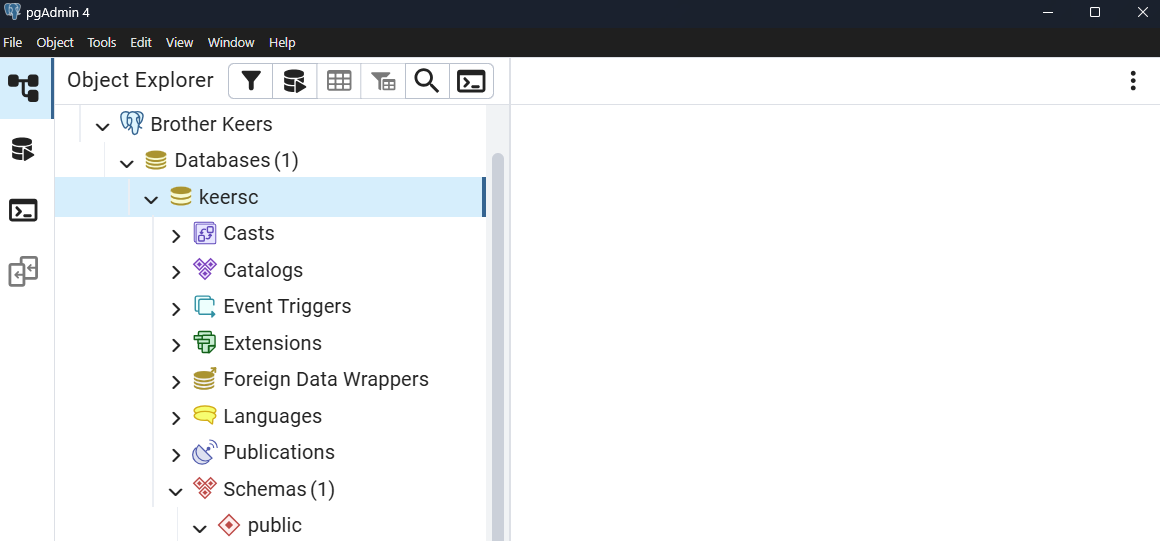
Once connected, expand your server in the browser panel by clicking the arrow next to it. You should see only your database listed under "Databases". Expand your database to see its structure, including "Schemas", "Tables", "Views", and other database objects.
Most PostgreSQL databases use the "public" schema by default. Expand the "public" schema under your database to see its contents. Initially, it may be empty or contain only a few system tables.
4. Creating a Table with SQL
Now you will create a simple table using SQL commands. Right-click on your database name in the browser panel and select "Query Tool" to open the SQL editor. This is where you can write and execute SQL commands directly.
Copy and paste the following SQL command into the query editor to create a table for storing student information:
        CREATE TABLE students (
            id SERIAL PRIMARY KEY,
            first_name VARCHAR(50) NOT NULL,
            last_name VARCHAR(50) NOT NULL,
            email VARCHAR(100) UNIQUE NOT NULL,
            enrollment_date DATE DEFAULT CURRENT_DATE
        );
Click the "Execute" button (play icon) or press F5 to run the command. You should see a success message indicating that the table was created. If you encounter an error, check that you copied the SQL exactly as shown.
You can also verify that the table was created by refreshing the "Tables" node under the "public" schema in the browser panel. Right-click on "Tables" and select "Refresh". You should see your new students table listed.
5. Adding Data to Your Table
With your table created, add some sample data using INSERT statements. Copy and paste these commands one at a time, or all together:
        INSERT INTO students (first_name, last_name, email)
        VALUES ('John', 'Doe', 'john.doe@email.com');

        INSERT INTO students (first_name, last_name, email)
        VALUES ('Jane', 'Smith', 'jane.smith@email.com');

        INSERT INTO students (first_name, last_name, email)
        VALUES ('Mike', 'Johnson', 'mike.johnson@email.com');

        INSERT INTO students (first_name, last_name, email)
        VALUES ('Sarah', 'Davis', 'sarah.davis@email.com');
Execute these commands to add four student records to your table. Each command should show a confirmation that one row was inserted.
Verify that your data was inserted by running a SELECT query:
SELECT * FROM students;
This should display all the records you just inserted, showing the auto-generated ID numbers and the current date as the enrollment date.
You could also view the data through pgAdmin's graphical interface by right-clicking on the students table in the browser panel and selecting "View/Edit Data" → "All Rows". This opens a grid view of your table data. Additionally, there are quick action buttons in the "Object Explorer" toolbar that allow you to view or edit table data directly.
6. Creating a Related Table
To demonstrate the difference between DELETE and DELETE CASCADE, create a second table that references the students table:
        CREATE TABLE enrollments (
            id SERIAL PRIMARY KEY,
            student_id INTEGER REFERENCES students(id),
            course_name VARCHAR(100) NOT NULL,
            enrollment_date DATE DEFAULT CURRENT_DATE
        );
Add some enrollment records that reference your students:
        INSERT INTO enrollments (student_id, course_name)
        VALUES (1, 'Database Design');

        INSERT INTO enrollments (student_id, course_name)
        VALUES (1, 'Web Development');

        INSERT INTO enrollments (student_id, course_name)
        VALUES (2, 'Database Design');

        INSERT INTO enrollments (student_id, course_name)
        VALUES (3, 'Programming Fundamentals');
7. Understanding DELETE vs DELETE CASCADE
Now you will explore the difference between standard deletion and cascading deletion. First, try to delete a student record that has related enrollment records:
DELETE FROM students WHERE id = 1;
This command should fail with a foreign key constraint error. PostgreSQL prevents you from deleting a parent record when child records still reference it. This protects data integrity by preventing orphaned records.
To successfully delete the student and all related enrollments, you have two options. First, you can manually delete the related records first:
        DELETE FROM enrollments WHERE student_id = 1;
        DELETE FROM students WHERE id = 1;
Alternatively, you can create a table with CASCADE deletion built in. Drop your current tables and recreate them with CASCADE delete:
        DROP TABLE enrollments;
        DROP TABLE students;

        CREATE TABLE students (
            id SERIAL PRIMARY KEY,
            first_name VARCHAR(50) NOT NULL,
            last_name VARCHAR(50) NOT NULL,
            email VARCHAR(100) UNIQUE NOT NULL,
            enrollment_date DATE DEFAULT CURRENT_DATE
        );

        CREATE TABLE enrollments (
            id SERIAL PRIMARY KEY,
            student_id INTEGER REFERENCES students(id) ON DELETE CASCADE,
            course_name VARCHAR(100) NOT NULL,
            enrollment_date DATE DEFAULT CURRENT_DATE
        );
Re-insert your test data using the same INSERT statements from earlier steps. Now when you delete a student record, any related enrollment records will be automatically deleted as well.
CASCADE deletions were created to simplify data management, but they can lead to unintended data loss if not used judiciously. CASCADE deletions are powerful but potentially dangerous. When you delete a parent record, ALL related child records are automatically deleted without additional confirmation. Always be certain you want this behavior before implementing CASCADE constraints.
8. Deleting Tables Through the Interface
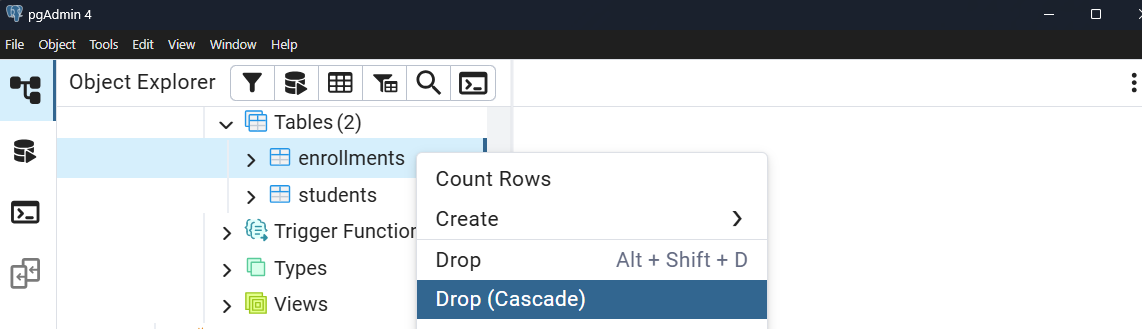
Finally, practice deleting database objects through pgAdmin's graphical interface. In the browser panel, navigate to your database → Schemas → public → Tables. You should see your students and enrollments tables listed.
Right-click on the enrollments table and examine the deletion options available. You will see "Drop" which attempts to drop only the table itself and "Drop (Cascade)" which removes the table and all connected objects (connected data in any related tables).
Select the deletion option and confirm when prompted. Notice that pgAdmin may show you the SQL command it will execute before you confirm the deletion. This transparency helps you understand what actions the interface performs.
Repeat this process to delete the students table. Since you already deleted the enrollments table, there are no foreign key constraints preventing this deletion.
Remember that pgAdmin's graphical interface ultimately generates and executes SQL commands behind the scenes. You can use pgAdmin to experiment with table designs visually, then examine the generated SQL to understand the exact commands you will need when creating database models in your applications.
Key Concepts Summary
Through this assignment, you have learned several important database management concepts. You configured pgAdmin to focus on your specific database using the DB restriction setting, which improves your working environment by reducing clutter and preventing confusion.
You practiced executing SQL commands directly through pgAdmin's query tool, creating tables with different types of constraints including foreign key relationships. Most importantly, you explored the critical difference between standard deletion and CASCADE deletion, understanding when each approach is appropriate and the safety implications of each.
You also learned to use pgAdmin's graphical interface for deleting database objects, seeing how the interface translates your actions into SQL commands. This dual approach of using both SQL commands and graphical tools gives you flexibility in how you manage databases and helps reinforce the connection between visual database administration and the underlying SQL operations.
Experiment and Extend
Practice creating additional tables with different types of relationships. Try creating tables for courses, instructors, and classrooms, establishing foreign key connections between them. Experiment with different constraint options like ON DELETE RESTRICT, ON DELETE SET NULL, and ON DELETE CASCADE to understand how each affects data deletion behavior.
Explore other pgAdmin features like viewing table properties, examining constraint details, and using the built-in SQL help. Try creating the same tables using pgAdmin's table creation wizard instead of SQL commands to see how the interface can generate SQL for you.