W06 Activity: Setting up a CI/CD Pipeline with GitHub Actions
Overview
This lab will use GitHub Actions to set up a CI/CD pipeline for the Teton Idaho Chamber of Commerce web site.
A CI/CD pipeline typically has a build stage, one or more test stages and a deploy stage. The pipeline you will set up will look much like this.
Complete the activity below, then answer the quiz questions once the setup is complete.
Instructions
In order to do today's lab, each student must have a free account with GitHub. If you already have an account, skip Step 2: Creating a Repository.
Step 1: Setting up a GitHub Account (if you don't have one already)
- Navigate to www.github.com and click the Sign Up button.
- You will be prompted to enter your e-mail. Please use your BYU-Idaho e-mail address if possible.
- You will then be asked to create a password. Use a password that meets the strength requirements for GitHub.
- Enter a username - this is your choice, but use something that will uniquely identify you. GitHub will tell you if your chosen name is already taken.
- Answer any additional prompts you get.
- After signing up, you will be sent a link over e-mail that you must click to activate your GitHub account. You will then be ready to complete this assignment.
Step 2: Creating a Repository
- Log in to GitHub. This will take you to your Dashboard screen.
- On the left is a green button labeled New. Click this button to create a new repository.
-
Choose the Owner (if necessary) then enter the repository name:
- Suggested repository name is cse270-teton.
- Set the visibility to Public.
- Leave all other fields as default, the click the green Create repository button.
-
This will take you to the new repository page. In the light blue box, copy the git URL. It will look something
like this:
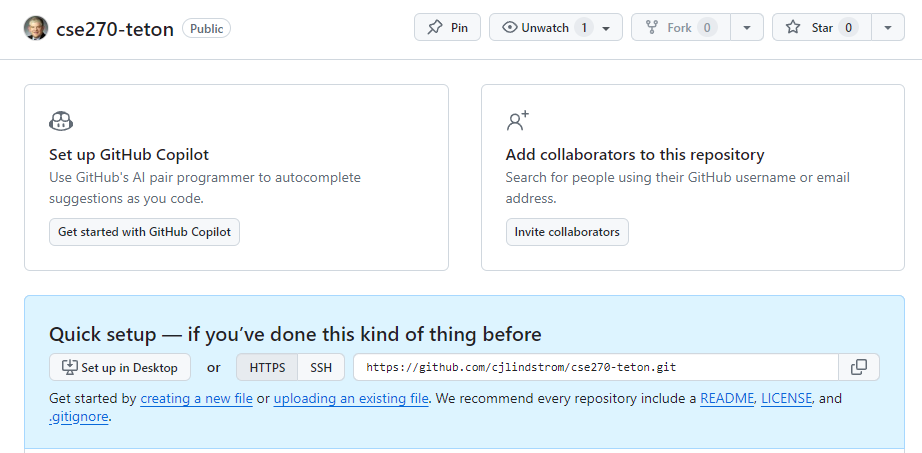
New Repository - Open VS Code.
- Using the menu, choose View -> Command Palette...
-
Search for Git:Clone and choose the command found.
- If you did not find Git:Clone in the command pallet, you will need to install the Git extension for VS Code.
- In the box that appears, paste (or select from the list) the URL you copied from Git, then press Return or Enter.
- VS Code will prompt you for a location to put your repository (git will make a directory by the name of your repository under the folder you choose). Choose the location and click the Select button.
- When prompted, choose Open in a New Window to open the new repository in VS Code.
- You now have an empty repository that's ready to be used.
Step 2.1: Setup Github Pages
-
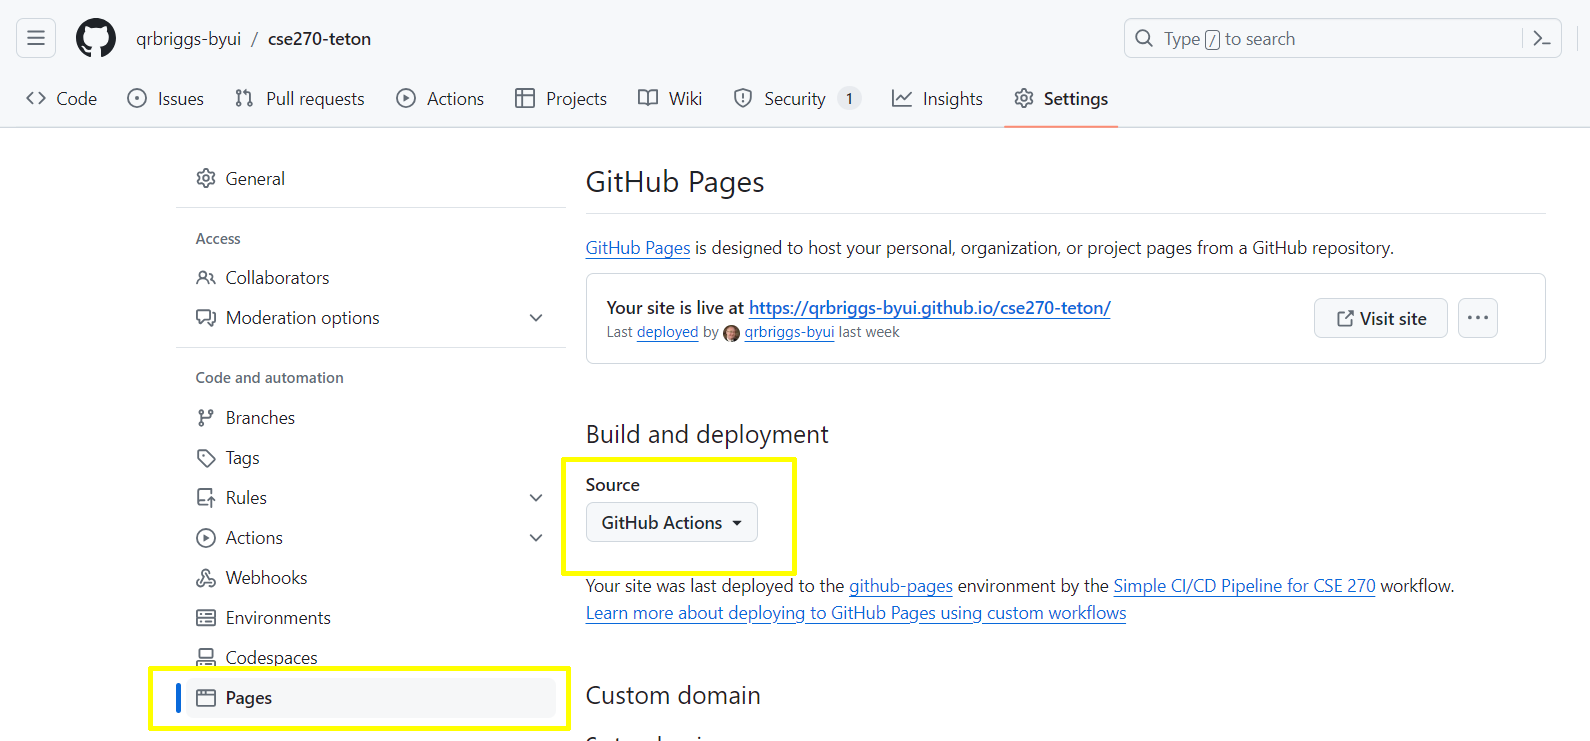
Return to GitHub and click the Settings icon from the menu.

Github Settings - On the left hand side of the screen you will see a menu option called Pages
-
In the section called Build and Deployment change the Source drowpdown to GitHub
Actions.
This tells GitHub that we are going to use CI/CD to deploy our website.
Step 3: Install the v1.6 website and CI/CD instructions
-
This week we will use a latest 1.6 version of the Teton Idaho Chamber of Commerce website. Download the file and
expand the files in a
well-known location on your computer.
- Download cse270-v16.zip
-
Copy the contents of the cse270 folder in the v1.6 website to your repository location. When you do this, you
should have four folders in
your repository:

VS Code Folder -
Click the Source Control icon in the left hand navigation in VS Code.
- Enter a commit message in the box above the blue commit button.
- Click the down arrow next to the commit button and choose Commit & Push
- If prompted to stage all your changes and commit them directly, Select Yes.
- Return to the GitHub web site, click on < > Code to see your project files. In a few moments the code you pushed will appear on your site.
Step 4: Reviewing the main.yml file
- The folder .github/workflows contains a special file called main.yml. This file contains instructions for GitHub to use when building and deploying your website. By checking in this file in this special location, GitHub is now configured to run this CI/CD Pipeline.
- Teaching you how to build YAML files is beyond the scope of this assignment, but notice a few things in the file.
-
There is a section in the file called jobs:
- This section identifies each job in the pipeline. There are three jobs defined, build, analyze and deploy.
-
Each job has a section called steps:
- These steps are the list of instructions needed to accomplish the job. Each step has a name.
-
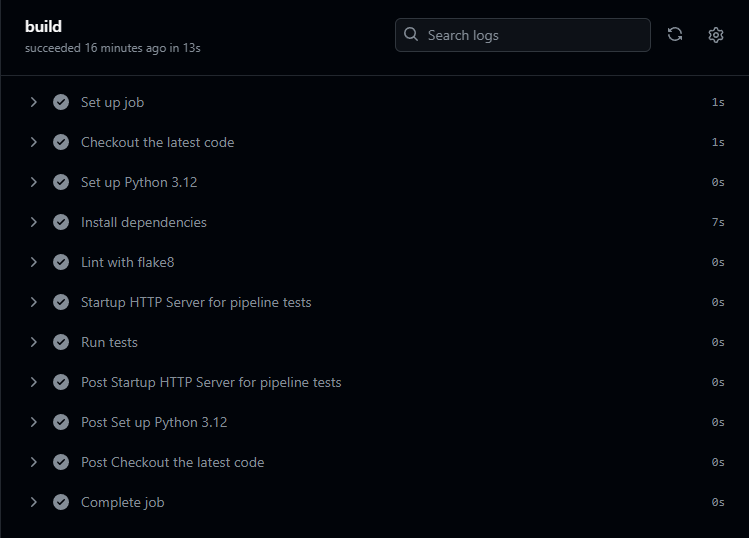
The names of the steps included in the build job are
-
Checkout the latest code
-
Set up Python 3.12
-
Install dependencies
-
Lint with flake8
-
Startup HTTP Server for pipeline tests
-
Run tests
-
- When you observe the pipeline, you will see these steps in the detailed log files.
- GitHub will add cleanup steps to the list above as needed
Step 5: Observing the Pipeline
-
Click on the Actions menu item. This will show you a log of all of the workflow runs. (I have
several runs as you see
below, but you will only have one to begin with)
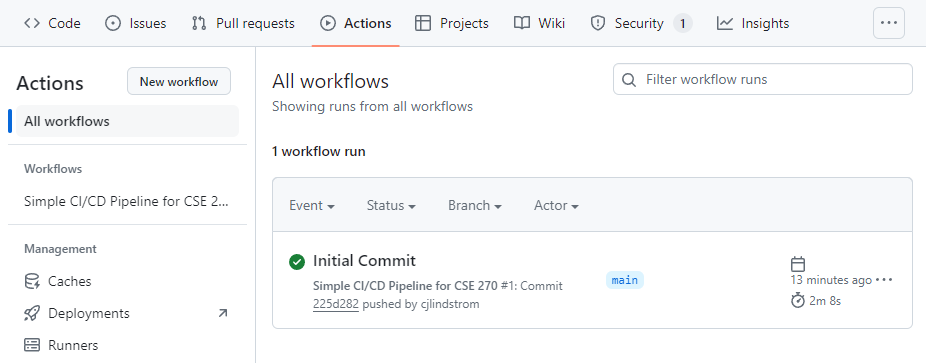
Github Actions - Click on the name of the workflow run (it will be your commit message) to observe the results of the workflow run. Your run might even still be in progress.
-
Once completed you will see something like this:
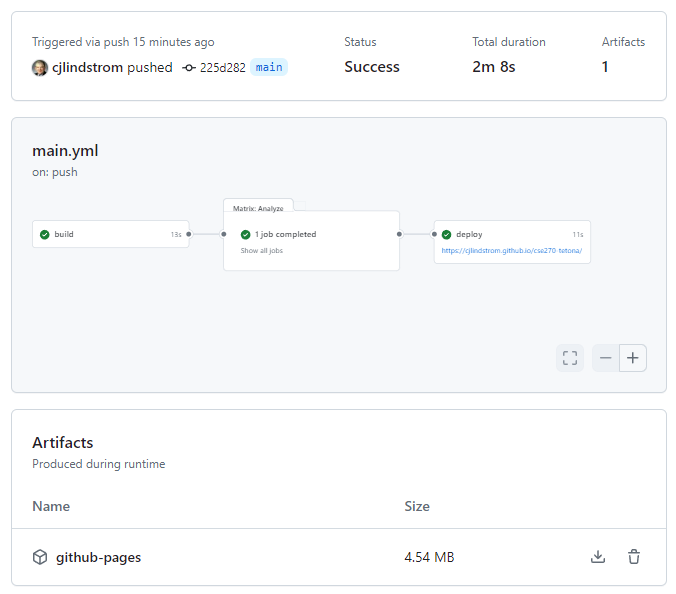
Actions results
-
- You can see the details of each stage of the pipeline by clicking on each item (build, Matrix: Analyze, deploy). In the quiz that follows you will need to look at the details of your workflow run to answer the questions correctly.
- For example, clicking on the "build" step shows these details.
Completing the assignment
-
A tester's job will be to understand the logs and messages found in a CI/CD pipeline to report trouble to
developers.
- After correctly installing the repository code observe the pipeline to ensure a correct build.
- If your build is failing, it is likely because the files and folders are not in the correct place. Ask the teacher or the TA for help getting things in the right place.
Submission
Return to Canvas and complete the W06 Activity: Setting up a CI/CD Pipeline with GitHub Actions quiz.
Useful Links:
- Return to: Week Overview | Course Home | Canvas
