W01 Activity: Setup Test Management Tools
Overview
For the next several weeks you will use the Squash test management tool to manage your project requirements, tests, and test results. This tool will be run on your local computer using Docker Desktop. Each student will run their own copy of Squash and configure their project. Squash is one of several test management software solutions. The various tools each have their own strengths and weaknesses, squash meets our class needs without adding to much complexity.
Complete this activity to install/configure the test management software.
Install Docker Desktop
Install Docker Desktop
If you do not have Docker Desktop installed on your computer you will need to do that before proceeding. The official docker installation instructions can be found in the official Docker documentation https://docs.docker.com/desktop/.
-
Follow the setup instructions for your operating system to install Docker Desktop.
- You will not need a docker account or cloud access for this class. You may skip account registration.
- You can skip the survey if you wish.
Test Your Docker Install
Before we get to far, test your Docker install.
-
Start Docker Desktop: Click the the Docker Desktop icon in your start menu/finder to run Docker Desktop.
Windows Tip: If Docker Desktop will not start after Installation, try rebooting your computer. -
Run the hello-world test image: Open a terminal and enter the command:
docker run hello-world
You should see output similar to the following:
Unable to find image 'hello-world:latest' locally
latest: Pulling from library/hello-world
c1ec31eb5944: Pull complete
Digest: sha256:1b7a37f2a0e26e55ba2916e0c53bfbe60d9bd43e390e31aacd25cb3581ed74e6
Status: Downloaded newer image for hello-world:latest

Hello from Docker!
This message shows that your installation appears to be working correctly.

To generate this message, Docker took the following steps:
1. The Docker client contacted the Docker daemon.
2. The Docker daemon pulled the "hello-world" image from the Docker Hub.
(amd64)
3. The Docker daemon created a new container from that image which runs the
executable that produces the output you are currently reading.
4. The Docker daemon streamed that output to the Docker client, which sent it
to your terminal.

To try something more ambitious, you can run an Ubuntu container with:
$ docker run -it ubuntu bash

Share images, automate workflows, and more with a free Docker ID:
https://hub.docker.com/

For more examples and ideas, visit:
https://docs.docker.com/get-started/
If this is not successful you will need to troubleshoot before continuing
Get the Class Image and Run Squash
For the next several weeks you will use Squash to document your project, define tests, and record test results. To use the software you will need to run the docker container that hosts the software before doing your homework, when done you may stop the container so it does not continue to use your computer's resources. Before you run the cse270 container you will need to download the cse270 docker image. Once downloaded you will run the image which will create a container that hosts your program. Each time you want to use Squash you will need to start the container, when you are done you will want to stop the container.
Get the Squash Image
Download the cse270 image:
- Open Docker Desktop, this will start the docker engine, the Docker engine must be running to execute docker commands at the terminal.
- Open a terminal
-
Enter the command:
docker pull pathwayswdev/cse270
You should see something similar to this if the pull was successful. (ignore the hash values shown in the output as they will change as we update the image.)
Using default tag: latest
latest: Pulling from pathwayswdev/cse270
63b69af3dc55: Pull complete
7e3be6309784: Pull complete
227bffdbb3c5: Pull complete
5ecb2a742830: Pull complete
f88ad8ee870f: Pull complete
1779895f7d22: Pull complete
9dc60f0a6143: Pull complete
52fd3c756599: Pull complete
423096ad7e8d: Pull complete
054e2fbc6ad8: Pull complete
Digest: sha256:d3be8dba5677421ec811d00d7520efd64922b8a95f2490c1b024eeca4923d155
Status: Downloaded newer image for pathwayswdev/cse270:latest
docker.io/pathwayswdev/cse270:latest
Create a Docker Container
A docker container is created from an image, the container must be configured correctly to run on your system. When a container is first run you must provide configuration information. After the container is created you can start and stop the container without providing all the configuration information. Since Squash has a web based interface the container must be configured with the port you would like the web interface to be available on, this example will use port 8090. If port 8090 is in use on your computer you will need to use a different port.
-
Use the docker run command to create a docker container named squash from the
pathwayswdev/cse270 image you just downloaded. Enter the following command in your terminal.
docker run -d --name='squash' -it -p 8090:8080 pathwayswdev/cse270
- If the container was created successfully you should see the docker container number returned. It is a long
number that will look similar to this:
481c24dfcce07bd34e0271b799fc0d9f8b6da5d34977ce329316286ebef93beb
If you do not see a container number, view the error message returned and troubleshoot using your favorite search engine, AI, or ask for help in your class's Microsoft Teams Team.
What containers are on your system?
You can see a list of containers with the docker command docker container ls. The output will contain information about the containers on your system and their configuration and status.
Access Squash
After your container starts you will be able to access Squash through your web browser using the port you configured when you created the container. In our example port 8090.
-
Open the Squash website running on your computer with the following URL http://localhost:8090/squash. If you started your container mapped to a different port that 8090 you will have to adjust the URL's port accordingly
You should see the Squash login screen.
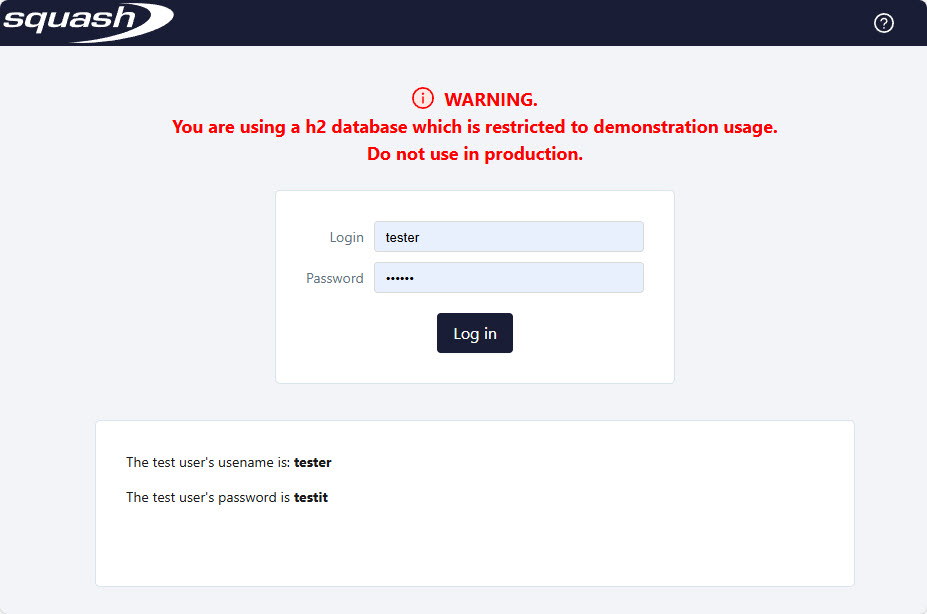
Squash Login Screen Page not found?
If you get a page not found error, here are some things that might help.
- Make sure the URL is correct.
- Check that your container is running (either with the Desktop app or terminal): From the terminal use the command docker container ls -a (The -a option shows all containers; by default the command only shows running containers.). If the container is not running you can start it using the command docker container start name where name is the name or id of your docker container.
- Make sure the docker engine is started.
- Login to Squash. The username is tester and the default password is testit.
You should see the Squash home page.

Squash home page
Stop the Squash Container
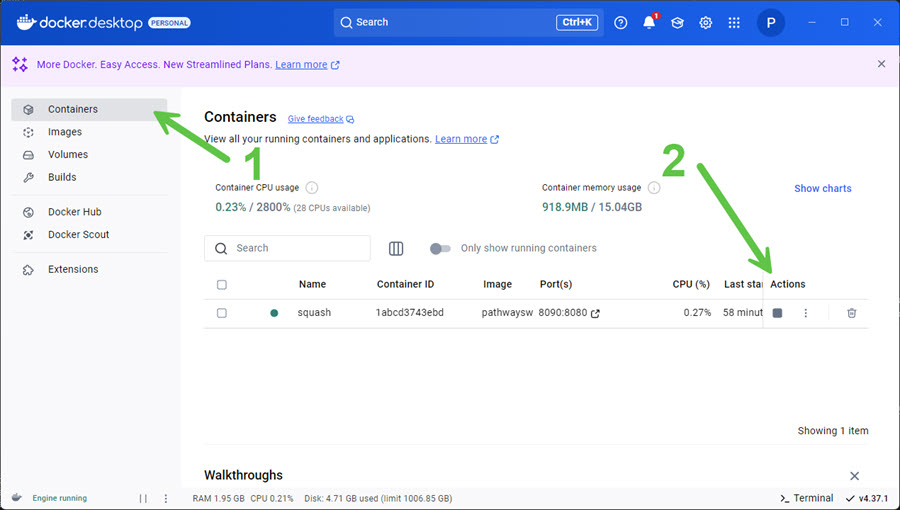
While the squash container is running it will use resources. Depending on how powerful your computer is, this could significantly impact the performance, or maybe you won't even notice at all. In either case you should stop the squash container when you are done using it. You will need to remember to start the container next time you would like to use squash. You can start and stop your container with the Desktop app or the terminal.
To use the Desktop application navigate to the Containers screen then use the icons in the Actions area to start or stop your container
To use the terminal user the docker container command.
- To start a container you just need to know the containers name or id. If my container is named squash the
command would be:
docker container start squash
- To stop a container you just need to know the containers name or id. If my container is named squash the
command would be:
docker container stop squash
- Stop your container using whichever method you prefer.
Submission
When complete report your status in the Canvas Quiz
Useful Links:
- Return to: Week Overview | Course Home | Canvas