W04 Learning Activity: Linked Lists
Linked List Structure
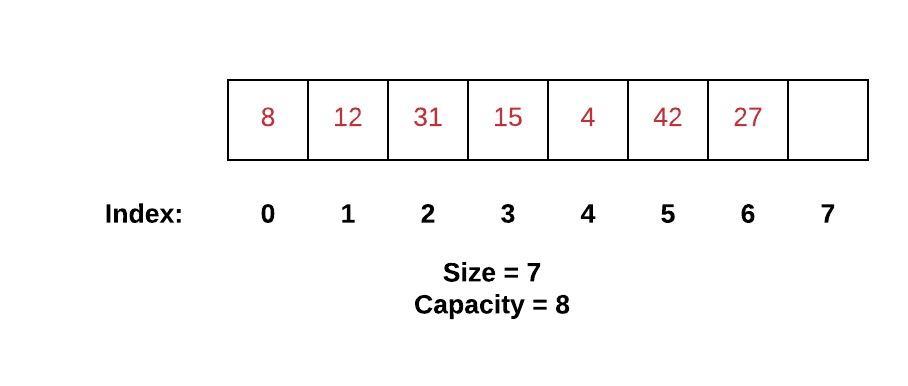
When we learned about the dynamic array, we saw that it was characterized by contiguous memory. Each item in a
dynamic array is right next to the next item in memory. This allowed for very quick access to items in the dynamic
array because memory addresses of each item could be calculated from a formula
(address = startingAddress + (index * itemSize)). The queue, stack, set, and map were all based on
memory organized in this way.

A collection of data can also be stored in random places scattered throughout memory. A linked list is organized in this way. With a linked list, each element in the list is at some location in memory. There is no guarantee that one element will be next to another element. In order to keep our list together, each element (which we will call a node) will contain both the value and a link to the next node in the list. Specifically, the link will be a pointer to the location in memory that contains our next element.

In the linked list shown above, the first node is called the head. If you know where the head is, then you can traverse the entire linked list by following the pointers. Most linked lists maintain a bi-directional linking between nodes. Bi-directional means that each node will maintain a pointer to both the next node and previous node. The doubly-linked list shown below has both a head and a tail.

Inserting into a Linked List
Unlike inserting into a dynamic array where we had to worry about moving items over towards the end to maintain contiguous memory, the act of inserting into a linked list only has an effect on its neighboring elements. Additionally, since we are going to use pointers to connect the nodes together, there is no need to worry about concerns such as capacity or growing the list like we did with a dynamic array. There are three scenarios to consider: insert at the head, insert at the tail, and insert at the middle.
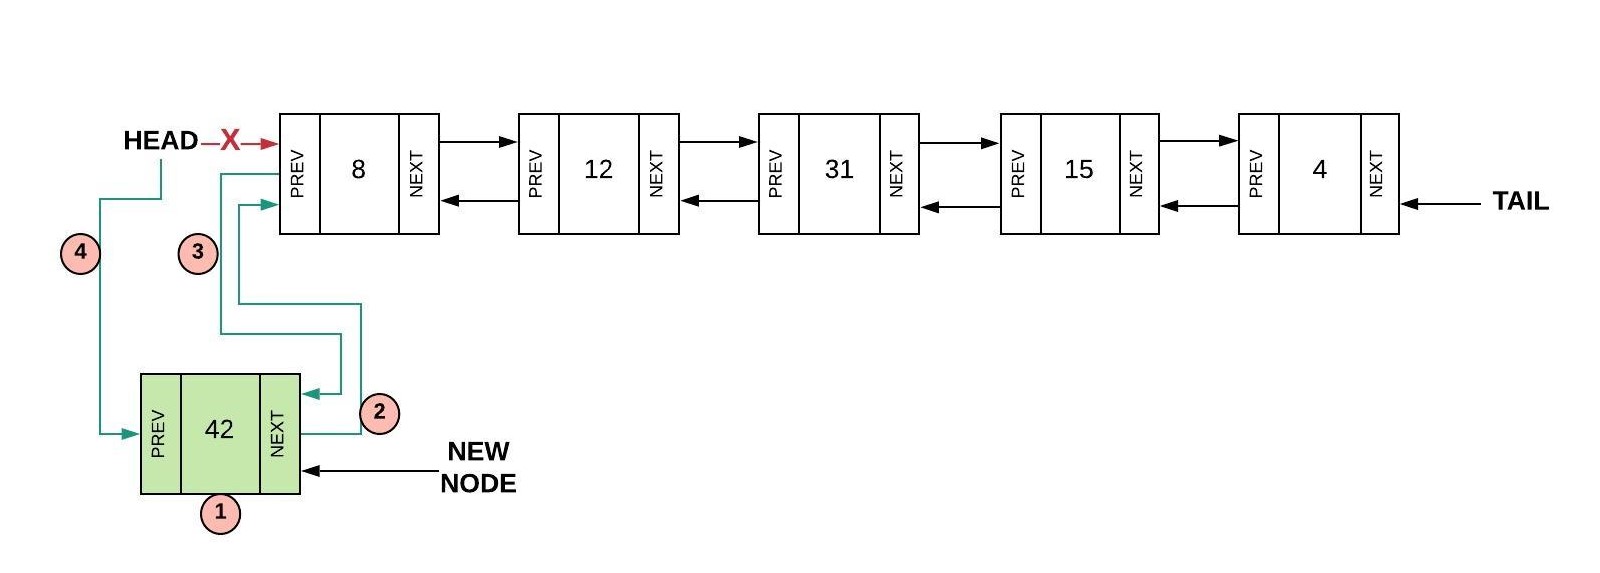
Inserting at the head usually requires a four step process:
- Create a new node (we will call it
newNode) - Set the "next" of the new node to the current head (
newNode.Next = head) - Set the "prev" of the current head to the new node (
head.Prev = newNode) - Set the head equal to the new node (
head = newNode)

There is a special case that exists for inserting at the head (and also inserting at the tail). If the linked
list is empty (head == null)) then all we have to do is set both the head and the tail to the new
node we created.
Inserting at the tail is similar to inserting at the head. The same four steps are followed but with respect to the tail the following should happen:
- Create a new node (we will call it
newNode) - Set the "prev" of the new node to the current tail (
newNode.Prev = tail) - Set the "next" of the current tail to the new node (
tail.Next = newNode) - Set the tail equal to the new node (
tail = newNode)

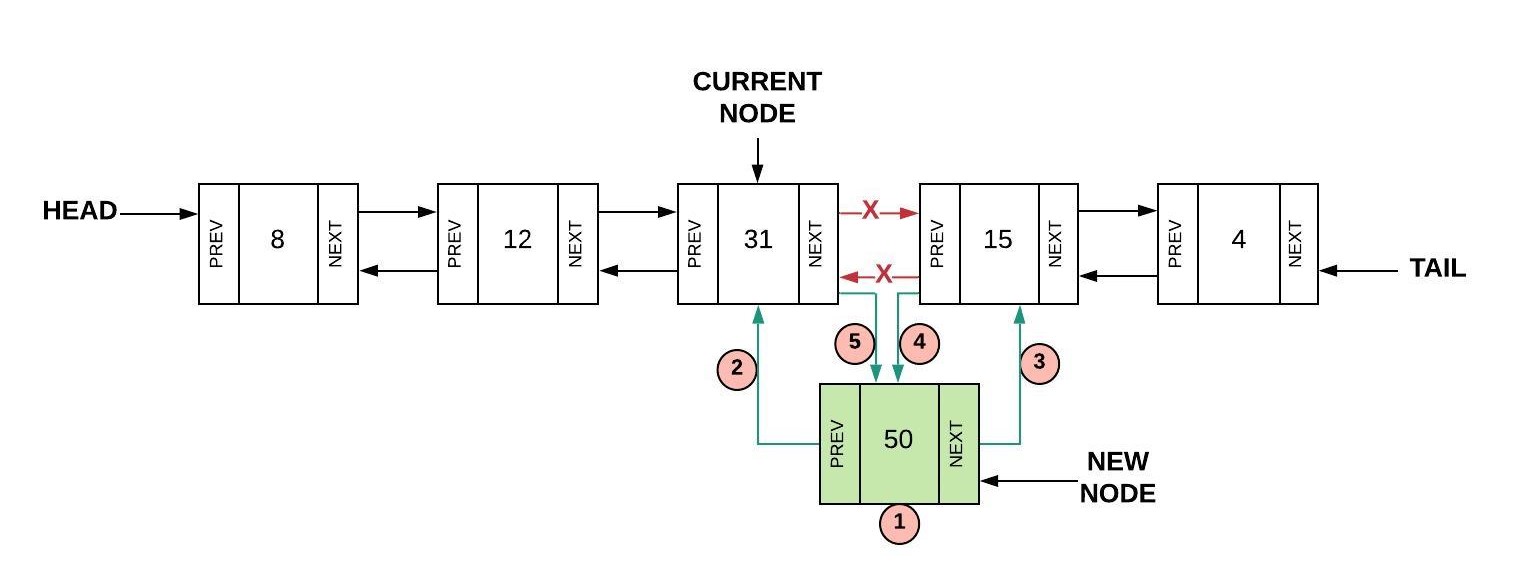
The process for inserting into the middle is a little more complicated. In the picture below, we are trying to
insert after node current. The process involves five steps as follows:
- Create a new node (we will call it
newNode) - Set the "prev" of the new node to the current node (
newNode.Prev = current) - Set the "next" of the new node to the next node after current (
newNode.Next = current.Next) - Set the "prev" of the "next" node after current to the new node (
current.Next.Prev = newNode) - Set the next of the current node to the new node (
current.Next = newNode)

Removing from a Linked List
Removing the first (the head) or the last (this tail) node from a linked list is similar and involves updating the second node (or the second to last node in the case of removing from the tail). The process for removing the first node is as follows:
- Set the "prev" of the second node (
head.Next) to nothing (head.Next.Prev = null) - Set the head to be the second node (
head = head.Next)
As a special case, if there was only one node in the linked list, the head and tail would need to be set to
null thus creating an empty linked list.

The process for removing the last node is as follows:
- Set the "next" of the second to last node (
tail.Prev) to nothing (tail.Prev.Next = null) - Set the tail to be the second to last node (
tail = tail.Prev)

The process to remove from the middle is not as complicated as inserting from the middle. In the picture below,
we are trying to remove the node current. The process involves two steps:
- Set the prev of the node after current to the node before current
(
current.Next.Prev = current.Prev) - Set the next of the node before current to the node after current
(
current.Prev.Next = current.Next)

Accessing from a Linked List
If we want to find a value in the linked list or if we want to find a specific node (for example, the 3rd node or the 10th node), we are required to loop through the linked list. We can start at either the head (if we want to go forward through the list) or we can start at the tail (if we want to go backward through the list). To loop through the list, we will follow the "next" (or the "prev" if going backwards from tail) links until we get to the end. The following code shows a basic traversal through a linked list.
private void GoForward()
{
    // Start at the beginning (the head)
    var current = _head;

    // Loop until we have reached the end (null)
    while (current != null)
    {
        // Do something with the current node
        Console.WriteLine(current.Data);

        // Follow the pointer to the next node
        current = current.Next;
    }
}
Linked Lists in C#
In your assignment this week you will be writing your own linked list class. However, C# does include a linked
list class LinkedList<T>. The table below shows the common functions in the
LinkedList.
| Common Linked List Operation | Description | C# Code | Performance |
|---|---|---|---|
| insert_head(value) | Adds "value" before the head | linkedList.AddFirst(value) |
O(1) - Just need to adjust the pointers near the head. |
| insert_tail(value) | Adds "value" after the tail | linkedList.AddLast(value) |
O(1) - Just need to adjust the pointers near the tail. |
| insert(node, value) | Adds "value" after node "node". | linkedList.AddAfter(node, value) |
O(n) - It's not complicated to adjust the pointers to insert, but it takes a loop to find the node to insert after. |
| remove_head() | Removes the first item (the head) | linkedList.RemoveFirst() |
O(1) - Adjusts the pointers near the head. |
| remove_tail(index) | Removes the last item (the tail) | linkedList.RemoveLast() |
O(1) - Just need to adjust the pointers near the head. |
| remove(node) | Removes node "node". | linkedList.Remove(node) |
O(n) - It's not complicated to adjust the pointers to remove, but it takes a loop to find the node to remove. |
| size() | Return the size of the linked list | linkedList.Count |
O(1) - The size is maintained within the linked list class. |
| empty() | Returns true if the length of the linked list is zero. | if (linkedList.Count == 0) |
O(1) - The comparison of the length with 0 is all that is needed. |
Comparing Dynamic Array and Linked List
The dynamic array and linked list look the same to the user but because the memory is managed differently, the performance numbers are different. The table below compares these two data structures:
| Operation | Dynamic Array | Linked List |
|---|---|---|
| Insert Front | O(n) | O(1) |
| Insert Middle | O(n) | O(n) |
| Insert End | O(1) | O(1) |
| Remove Front | O(n) | O(1) |
| Remove Middle | O(n) | O(n) |
| Remove End | O(1) | O(1) |
We can conclude the following:
- The dynamic array has good performance at the end.
- The linked list has good performance at the beginning and the end.
Thinking back about stacks and queues, the stack did the push and pop operations from the end. Therefore, a stack can use either a dynamic array or linked list equally well. However, since a queue did the enqueue and dequeue operations from the end and the front, a queue should always be implemented with a linked list. This strong statement only applies when the size of the data is "large" (recall discussions earlier about big O). If we only have a small number of items in the queue, then both a dynamic array and linked list will run fast enough.
Video Discussion (Optional)
The following video is optional. It presents a brief discussion of the topic.
Activity Instructions
Complete the following activity:
On a sheet of paper, draw a doubly-linked list and follow along with the following operations shown below. You should draw new boxes and arrows, and erase boxes and arrows exactly as shown in the reading material above.
Try the process first on your own, but if you need help, feel free to reference the steps shown above to walk you through the process.
Begin with a list containing A B C D, then perform the following operations:
- Insert
Xat the head. - Insert
Yin betweenBandC. - Remove
D(the tail). - Remove
B.
Key Terms
- doubly-linked list
- A linked list that is bi-directional. The linked list will maintain both a head and a tail. To traverse in either direction, the node will have both a pointer to the next node and the previous node. Access to both the head and tail is O(1).
- head
- A pointer to the first node in the linked list.
- linked list
- A data structure that keeps data in order but is not in contiguous memory. To get to the next (or previous) item in the list, pointers are maintained and followed. Access to the head is O(1).
- next
- A pointer in each node of the linked list that points to the next node.
- node
- The combination of the value and the pointers representing one item in the linked list.
- pointer
- Refers to an address in the computer memory. Also called a reference.
- tail
- A pointer to the last node in the linked list. If the list has only one item, then the head and tail are the same.
- value
- The actual data stored in the linked list as part of the node.
- previous
- A pointer in each of the linked list nodes that points to the previous node.
Submission
When you have finished this learning activity, return to Canvas and submit the associated quiz there.
Other Links:
- Return to: Week Overview | Course Home
