Polymorphism Learning Activity
Overview
In this activity you will learn and practice the principle of Polymorphism.
Prepare
What is Polymorphism?
Polymorphism is the ability to take on many forms. In programming, this principle is shown when one line of code can have different behavior depending on the context.
Method Overriding
To see polymorphism in action with objects and inheritance, you first need to learn about method overriding. Method overriding is the ability of a child class to override, or change the behavior of, a method that it inherited from a parent class. The method name stays the same but the behavior, or the code to run is different.
An Example
When using inheritance, a derived class can inherit both member variables and methods from a super-class. For example, a payroll system might define an employee that had a name, tax id number, address, and many other attributes. It may also have a method to calculate the pay for that employee.
For a salary employee, perhaps the salary is just returned as shown in this example:
// a parent class
public class Employee
{
  private float salary = 100f;

  public float CalculatePay()
  {
    return salary;
  }
}
But if the payroll system also has to account for hourly employees that get paid a certain amount of money based on the number of hours they worked. These employees are very similar to the standard employee class, but they need different logic for the CalculatePay method. This could be defined in a child class that overrides the method from the Employee class. To do this, we first mark the method in the base class with the keyword virtual which tells C# that this method is eligible for another class to override it. Then, in the child class, we use the keyword override as shown in this example:
// the parent class showing the "virtual" keyword included
public class Employee
{
  private float salary = 100f;

  public virtual float CalculatePay()
  {
    return salary;
  }
}

// a child class
public class HourlyEmployee : Employee
{
  private float rate = 9f;
  private float hours = 100f;

  public override float CalculatePay()
  {
    return rate * hours; // pay is calculated differently
  }
}
Changing a behavior this way is called method overriding. Different languages have slightly different syntax for overriding methods. In C# you override the method using the keywords virtual and override in the parent and child class methods as shown.
Notice that both Employees and HourlyEmployees have a method for CalculatePay, so in that way they are the same. But the actual behavior or code for the method is different.
A Powerful Combination
Inheritance and Method Overriding are a powerful combination. Used together they provide a way to vary runtime behavior according to the context.
Recall from the lesson on Inheritance that you should be able to use a derived object anywhere you can use the base class (the Liskov Substitution Principle). With this in mind, if you create a list of Employee objects, you should be able to insert HourlyEmployee objects into the list as well.
Review the following code carefully.
// Create a list of Employees
List<Employee> employees = new List<Employee>();

// Create different kinds of employees and add them to the same list
employees.add(new Employee());
employees.add(new HourlyEmployee());

// Get a custom calculation for each one
foreach(Employee employee in employees)
{
  float pay = employee.CalculatePay();
  Console.WriteLine(pay);
}
Output:
100
900
In this example, a new instance of Employee and HourlyEmployee are added to the employees list. In the loop that follows, the CalculatePay method is invoked for each one. The actual method that is called and the resulting value depends on the context, or the type of employee, during each iteration. If the object happens to be an Employee the base method will be called. However, if the object is an HourlyEmployee the version defined for hourly employees will be used instead.
The significance of the last statement cannot be overstated. All it takes to vary the behavior of the loop is to create new derivations of Employee, override the CalculatePay method, and add an instance to the list. None of the previously written code needs to be modified in any way. Changing the program is easy!
Polymorphism in Action
The previous code example shows polymorphism in action. Recall the following line of code from that example:
float pay = employee.CalculatePay();
As stated, this exact same line of code can take on "many forms", or more specifically, it will call different methods depending on the type of the employee object encountered at run time.
Another Example: Parameter Passing
In addition to seeing polymorphism used in the context of iterating through a list of base class objects. You can see it in action by passing an object to a method. Consider the following code:
public class Program
{
    // ...

    static void DisplayPayCheck(Employee e)
    {
        float pay = e.CalculatePay();
        // ...
    }
}
Notice that in this example, the DisplayPayCheck function has a parameter of Employee. Again, we should be able to substitute any derived class and have it work, so you could call the function with an HourlyEmployee object, and it will work just fine. The code e.CalculatePay() will call the correct method based on the actual object at run time.
Another Example: Return Values
Another common use of Polymorphism is that when the return type of a method is a base class, you can also return objects of derived classes. Consider the following code:
public class Program
{
    // ...

    static Employee GetManager()
    {
        // ... code here to find the manager ...
        return theManager;
    }

    static void DisplayManagerPay()
    {
        Employee manager = GetManager();
        float pay = manager.CalculatePay();
        // ...
    }
}
The code that determines the manager may return may end up returning either a base class Employee object or it may return an HourlyEmployee object. Regardless of the type of employee returned, the manager.CalculatePay() code will call the appropriate method.
Abstract Methods
In the example above, the base class contained a default implementation for the CalculatePay method that worked for base employees. But sometimes, it is not possible to create a good default method. For example, instead of having the base class represent a Salary Employee and then the derived class is for the Hourly Employee, you might define the base class for a generic Employee with two derived classes. In this case, you couldn't provide a good default implementation of the method in the base class, so you would want to leave it blank.
A blank virtual method has a special name, it is called an Abstract method. Any class that has at least one abstract method is an Abstract class. This means that the base abstract class cannot be directly instantiated, you can only create objects from the derived types.
You specify abstract methods with the abstract keyword instead of virtual. Then, the class definition must also contain the abstract keyword. For example:
// the parent class showing the "virtual" keyword included
public abstract class Employee
{
  private string _employeeName;

  // Notice the abstract method doesn't have a body at all (not even an empty one)
  // and it is followed by a semicolon.
  public abstract float CalculatePay();
}

// a child class
public class SalaryEmployee : Employee
{
  private float salary = 100f;

  public override float CalculatePay()
  {
    return salary;
  }
}

// a child class
public class HourlyEmployee : Employee
{
  private float rate = 9f;
  private float hours = 100f;

  public override float CalculatePay()
  {
    return rate * hours; // pay is calculated differently
  }
}
Its All About the Interface
The most important aspect of the previous example is the shared method called CalculatePay. It is a formal contract that all Employee derivations, no matter what their specific type, will provide the same capability, namely a method with the name CalculatePay and in this case, no parameters, and a return value of a float. That guarantee is relied on by any other parts of the program that use Employees of any kind.
Take a moment and cast your mind back to the second principle of programming with classes. One of the more important aspects of applying encapsulation was to focus on what a class must do rather than how it will do it. The same advice applies here.
Interfaces (optional)
Abstract methods give us a way to specify that a method must be present in derived classes without providing a default implementation. This idea is so powerful many times all we want to do is define the public methods that a derived class must have--we do not even want to provide any member variables or method bodies in the base class.
A base class that only contains these abstract methods and nothing else has a special name, it is called an Interface because it defines the interface or public methods that any classes that implement it must have. In this case, you define the "class" as an interface, and then, you don't have to specify that the methods are abstract or virtual or even public, because all of these things are implied. Consider the following code:
// the Employee interface
// The C# convention is that interface names begin with an I
public interface IEmployee
{
  float CalculatePay(); // interface method does not have a body
}

// a specific implementation of the Employee interface
public class SalariedEmployee : IEmployee
{
  private float salary = 100f;

  public float CalculatePay()
  {
    return salary;
  }
}

// another implementation of tbe Employee interface
public class HourlyEmployee : IEmployee
{
  private float rate = 9f;
  private float hours = 100f;

  public float CalculatePay()
  {
    return rate * hours;
  }
}
So which should you use, an Abstract class or an Interface? The answer depends on whether your base class will have any member variables or method bodies. If you want to provide those, then you should create an abstract class. If your base class is only there to define the methods that should be overridden, then you should use an Interface.
Video Example
Please watch the following example of how to use Polymorphism in C#.
Direct Link: Polymorphism in C# (17 minutes)
In Summary
Polymorphism is the fourth and crowning principle of programming with classes. Skillful use of abstraction, encapsulation and inheritance are all required to apply polymorphism effectively. The result is a simple but powerful mechanism for ensuring that programs are flexible and ready for change.
One of the recurring themes through all of this has been the importance of focusing on class contracts or the interface. Identifying, defining and developing them are of prime concern for those who practice programming with classes on a regular basis.
Activity Instructions
Practice the principle of polymorphism by writing a program that computes the areas of different shapes cut out of pieces of paper.
For all shapes, you need to keep track of the color of the paper and then have a method to compute the area. The area should not be stored as a member variable, but instead, you should store the length of the shapes sides and then compute the area as needed.
Your program should include squares (which store a color and a single side), rectangles (which store a color and two sides), and a circle (which store a color and a radius). You should create several kinds of shapes and put them into a single list. Then, iterate through the list and display their areas.
Design the Classes
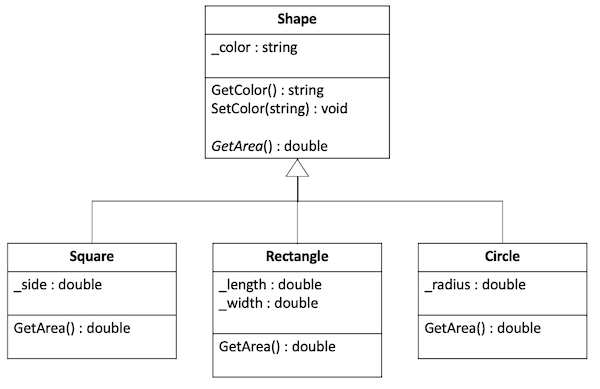
Based on what you learned in inheritance, it seems reasonable to create a base shape class where you can include any responsibilities that all shapes have in common. Then you can create derived classes for the individual square, rectangle and circle shapes.
In this example all shapes have a color and a method to get the area, but the implementation of that method will be different for each kind of shape. Thus, the GetArea method should be declared in the base class, but you should override it in the derived classes.
These relationships can be seen with the following class diagram:
Start the Project
- Open the class project in VS Code.
- Navigate to the
Learning05project in thepreparefolder. Find theProgram.csfile, which will be your entry point for the program. - Verify that you can run the project.
Create the base Shape class
- In a new file, create the
Shapeclass. - Add the color member variable and a getter and setter for it.
- Create a constructor that accepts the color and set its.
- Create a virtual method for
GetArea().
Create the Square class
- In a new file, create the
Squareclass. - Make sure this class inherits from the base class.
- Create a constructor that accepts the color and the side, and then call the base constructor with the color.
- Create the
_sideattribute as a private member variable. - Override the
GetArea()method from the base class and fill in the body of this function to return the area.
Test the Square class
- Return to the
Mainmethod inProgram.csto test your code. - Create a
Squareinstance, call theGetColor()andGetArea()methods and make sure they return the values you expect.
Create the Rectangle and Circle classes
- Repeat the steps above for the
RectangleandCircleclasses, putting them each in their own files, storing the necessary variables, and overriding theGetArea()for each. - Test these classes back in
Mainand make sure they work as expected.
Build a List
- In your
Mainmethod, create a list to hold shapes (Hint: The data type should beList<Shape>). - Add a square, rectangle, and circle to this list.
- Iterate through the list of shapes. For each one, call and display the
GetColor()andGetArea()methods.
Sample Solution
When you have finished please compare your approach to the following sample solution (you may also use this sample solution as a guide if you need help finishing).
Submission
- Verify that each of your classes works as described above.
- Commit and push your code to your GitHub repository.
- Verify that you can see your updated code at GitHub.
- Submit the Canvas quiz to report on your work.