Abstraction Learning Activity
Overview
In this activity you will learn and practice the principle of Abstraction.
Prepare
What is Abstraction?
Abstraction is the process of turning complex ideas into simple ones. It is removing characteristics from something so that only the essential ones remain. As programmers, we create and use abstractions all the time. Consider the following line of Python code.
print("hello world")
Whether or not you're familiar with Python, you probably recognize this as the first program we all learn to write. You also probably understand this statement will show the words, "hello world", on a computer display. However, relatively few programmers know the details of how this is accomplished. As it turns out, it takes over 3000 lines of C to implement this function.
The print function in Python is an abstraction. It is the simplification of something that is actually quite complex. In order to use it, all we need to know is the function name itself, or "print", and the required arguments, some literal text or a variable that can be transformed into literal text.
The print function might be used within another function we write to create yet another abstraction. That is, a different function that simplifies a higher order idea or task. This layering of abstractions is exactly how all of the software used in the world today, from text editors like Notepad to social media platforms like Facebook, is written.
Objects and Classes
Programming with classes is another way of creating abstractions in software. We begin, however, by thinking about objects. An object is a conceptual model for a category of things, real or imagined, that has a specific responsibility within our program. For example, we might think of an object that holds and provides identifying information about a person.
Objects have state and behavior that allow them to fulfill their responsibility. The person object may have state like "given name" and "family name". It may also have related behaviors like "show western name" and "show eastern name". Following is a graphical depiction of our person object.
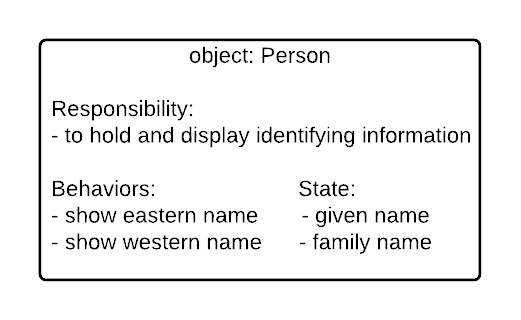
Thinking about a person this way is an abstraction. It is a simplification of something that is more complex. It might seem trivial at first but not having to worry about differences in lexical name form anywhere else in our software is significant. We can just rely on the person object to take care of it.
There aren't any unrelated behaviors either. There are certainly many other ones we could think of as belonging to a person. However, our conceptualization only contains those that help fulfill its specific responsibility.
With an object in mind we are ready to translate it to a code template called a class. The object's state is translated to variables called attributes. The object's behaviors are translated to functions called methods.
As a stepping stone to writing the actual code, we can create a Class Diagram which is a box that has the name of the class at the top, the member variables or attributes in the middle, and the methods at the bottom. Member variables are followed by a colon and their data type, and methods are followed by a colon and their return type. The following is an example of the Class Diagram for the Person class described above:
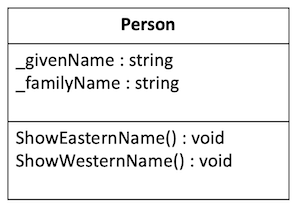
You can observe from the class diagram that the standard in C# is to use TitleCase, also called PascalCase, for class and method names, and to use _underscoreCamelCase for our member variable, or attribute, names. The underscore at the beginning helps you recognize that the variables are members variables, or attributes, of the class and are different from function local variables and parameters. For function local variable names and parameter names, use normal camelCase, like: usersAge and daysInAMonth.
Note: For constants, which are variables whose value will not change, the C# standard specifies all upper case with _ (underscores) separating the words. For example: NAME_INDEX or MATH_PI.
Once we have a class diagram, we have enough detail to begin to implement the class in code. The following is an example of the Person translated to a class in code. Be sure to read all of the comments and code carefully.
    // A code template for the category of things known as Person. The
    // responsibility of a Person is to hold and display personal information.
    public class Person
    {
        // The C# convention is to start member variables with an underscore _
        public string _givenName = "";
        public string _familyName = "";

        // A special method, called a constructor that is invoked using the
        // new keyword followed by the class name and parentheses.
        public Person()
        {
        }

        // A method that displays the person's full name as used in eastern
        // countries or <family name, given name>.
        public void ShowEasternName()
        {
            Console.WriteLine($"{_familyName}, {_givenName}");
        }

        // A method that displays the person's full name as used in western
        // countries or <given name family name>.
        public void ShowWesternName()
        {
            Console.WriteLine($"{_givenName} {_familyName}");
        }
    }
A Note on Creating Diagrams
There are many tools to help you create class diagrams, and as you learn about more details of programming with classes you will learn that there are lots of elements that can be added to a diagram.
For this course, the important part is to focus on the name, the attributes (member variables), and the behaviors (methods). If you would like to find an use a tool to create the diagrams, that is great, but you can also do this as simply as creating a bulleted list in any text editor:
Class: Person
Attributes:
* _givenName : string
* _familyName : string

Behaviors:
* ShowEasternName() : void
* ShowWesternName() : void
Classes and Instances
By itself, a class is just a template for something. It only becomes useful when an instance is created and assigned to a variable in your program. An instance is the realization of attributes and methods in the computer's memory.
Another way to think about creating an instance of a class is to imagine baking a cake. In this metaphor, a class is like the recipe. It is a template for a cake but not the actual baked good. In contrast, an instance is what comes out of the oven. It is a realization of the recipe details in a sweet tasting crumb! Consider the following code.
    Person person = new Person();
    person._givenName = "Joseph";
    person._familyName = "Smith";
    person.ShowWesternName();
    person.ShowEasternName();
Output:
    Joseph Smith
    Smith, Joseph
In this example, an instance of the Person class is created and assigned to the variable called "person". It is created by invoking a special method, called the constructor, which is the name of the class followed by parentheses. Some programming languages, like Java, C# and others, require the "new" keyword when calling a constructor. (You will learn more about constructors in the next unit.)
One of the most important aspects of programming with classes is that multiple instances can be created and used in the same program. The following example shows the creation of two Person instances. Notice how the "given name" attributes are assigned different values, varying the behavior of the "show western name" method from one instance to the other.
    person1 = new Person();
    person1._givenName = "Emma";
    person1._familyName = "Smith";
    person1.ShowWesternName();

    person2 = new Person();
    person2._givenName = "Joseph";
    person2._familyName = "Smith";
    person2.ShowWesternName();
Output:
    Emma Smith
    Joseph Smith
Custom Data Types
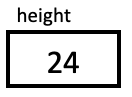
When you create classes, you are really creating a new custom data type. For example, in C# there are built-in data types for integers and strings. When you declare a variable of these types, it is like making a box that can hold that type of data, and putting a label on the outside of the box with the variable name. For example, consider the following code:
int height;
string color;
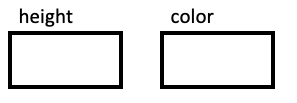
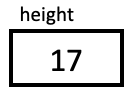
This code creates boxes that you can later fill with values. Then, when you assign the value, it puts it in the box. For example, the following code puts the number 17 in the box:
height = 17;
And this code, changes it to 24:
height = 24;
Now suppose you were working for a window covering company that manufactured blinds, and you wanted a program to work with these blinds. Your code would need to store the width, height, and color of each blind in the program.
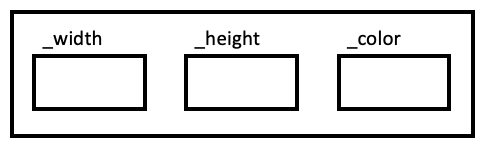
Imagine how great it would be if C# came with a data type like string or int but that was designed specifically with blinds in mind that could store all three of these components together. With classes, we can create this new datatype as follows:
public class Blind
{
  public double _width;
  public double _height;
  public string _color;
}
With this new custom data type, you can now create a new variable whose type is Blind. We can think about this as creating a new box for it. The difference is that this box has a little separator inside it making three smaller compartments, one for each of the three member variables.
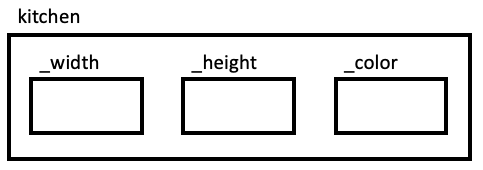
Every time you create a new Blind variable, it creates another large box that has these three components. The class is what defines the structure of the large box, and each of these large boxes that you create is an object or instance of that class.
For example:
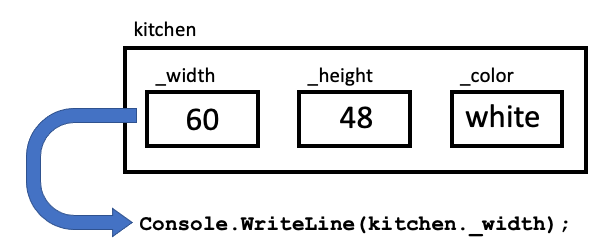
Blind kitchen = new Blind();
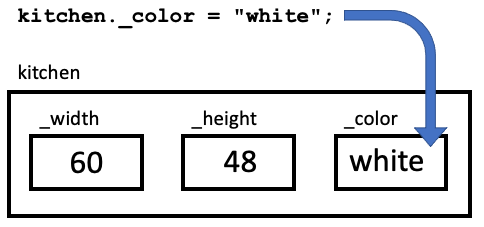
In your code, whenever you use the variable kitchen it refers to a large box, and if you want to refer to anything inside the box, you use the "dot" operator. You can set the values as follows:
kitchen._width = 60;
kitchen._height = 48;
kitchen._color = "white";
And you can access the values in the same way:
Console.WriteLine(kitchen._width);
Storing all of these values together in one larger box can greatly simplify your code, because, for example, you can now pass that whole large box to a function as a parameter, or return it.
Adding Behaviors
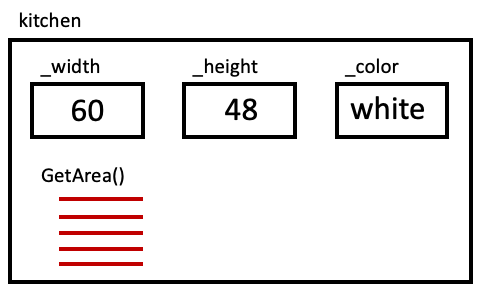
In addition to storing values together that belong together, you can also put the member functions, or methods, that use that data right in the box with them.
For example, continuing with the same window covering example, suppose that you wanted a method to compute the area of the blind, so the program could display the amount of material you needed. This could be added as a function inside the box, called, GetArea().
public class Blind
{
    public double _width;
    public double _height;
    public string _color;

    public double GetArea()
    {
        return _width * _height;
    }
}
The GetArea() function now belongs inside the box as well. And because it is inside the box, you use the "dot" notation to call it:
double materialAmount = kitchen.GetArea();
The following shows all of these lines together:
Blind kitchen = new Blind();

kitchen._width = 60;
kitchen._height = 48;
kitchen._color = "White";

double materialAmount = kitchen.GetArea();
Notice that to call the GetArea() method, you must supply the name of the object first, followed by a dot. Then, also notice that you do not need to pass it variables for the width and the height. This is because this method is a member of the class, so it is already "in the box," so it can access any of the member variables it needs.
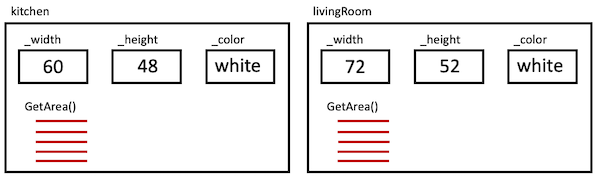
The fact that the method accesses the member variables in its box, is also why GetArea() will return different values for different Blind objects, such as kitchen.GetArea() and livingRoom.GetArea(), because these two objects will have different values for their widths and heights.
Objects within Objects
In the previous example, all of the member variables had simple types (double or string). But member variables can also have custom types. This is similar to putting another box inside the larger one.
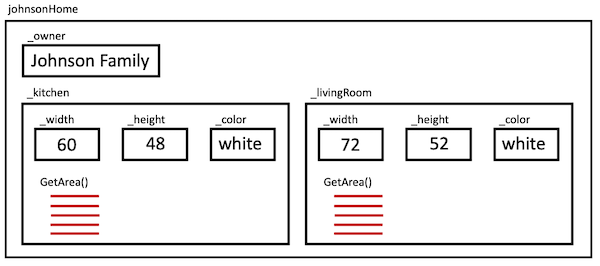
For example, in the window covering example, you might consider creating another class for the whole house. Internally, it might contain other member variables, some of which could be simple types, and others could be complex types. For example:
public class House
{
    public string _owner;
    public Blind _kitchen;
    public Blind _livingRoom;
}
Remember, that you must initialize these blinds to new values. You can do this after you create a new House object:
House johnsonHome = new House();

johnsonHome._kitchen = new Blind();
johnsonHome._livingRoom = new Bind();
Or, you can initialize these variables right in the class definition:
public class House
{
    public string _owner = "";
    public Blind _kitchen = new Blind();
    public Blind _livingRoom = new Blind();
}
Once you have created a new House object, you can access its member variables using the "dot" operator just as before:
House johnsonHome = new House();
johnsonHome._owner = "Johnson Family";
When you want to access the internal values of one of these complex-type, member variables, you can just chain together multiple "dot" operations, such as:
johnsonHome._kitchen._width = 60;
Lists of Custom Types
In the same way that you can create a list of strings or a list of doubles, you can also create a list of a new custom type. For example, instead of the House class containing variables for the kitchen and the living room blinds, it might have a list of blinds:
public class House
{
    public string _owner;
    public List<Blind> _blinds = new List<Blind>();
}
With this new version of the House class, you could write code like:
johnsonHome._blinds.Add(kitchen);
or:
double amount = johnsonHome._blinds[0].GetArea();
or:
foreach (Blind b in johnsonHome._blinds)
{
    double amount = b.GetArea();
}
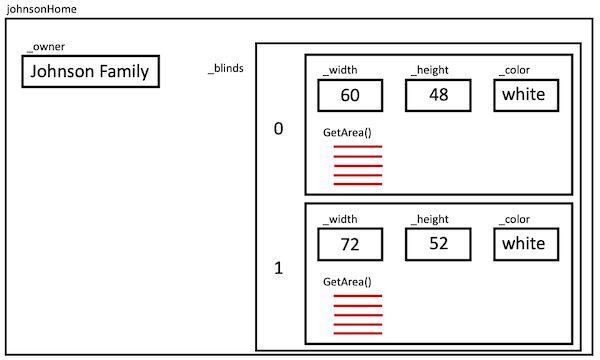
The following figure shows the way you might think about the storage of the johnsonHome object. Notice that the _blinds member variable now refers to a list of Blind objects. Each Blind object can be referenced by its index, and each has its own values for the _width, _height, and _color variables.
Summary
Think back to the beginning paragraphs in this article. One of the more interesting aspects of abstraction is that we can layer them, as you have just seen, putting objects within objects. Each of these objects can have their own responsibility, behaviors and state.
Abstraction is the first principle of programming with classes. As you get better at applying it, you'll find you're able to think and talk about your software, with programmers and non-programmers alike, in a very natural way. Please don't underestimate the value of this ability. Being able to communicate clearly about what is needed and what you're doing is at the very heart of creating software that is ready for change.
Terms and Definitions
Class - A new custom data type that defines attributes (member variables) and methods. This is like a blueprint to create instances or objects of that class. Example: A Person has given name and family name.
Instance - A variable whose data type is the class. We often use the term Object interchangeably. Example: We can have two instances of the Person class: one for John, and one for Mary.
Instantiate - A verb that means "to create an instance of." Example: We can instantiate the Person class to create a new object.
Method - A member function. Methods are called using "dot notation" with an instance of the class before the dot. Example: person1.GetEasternName()
Activity Instructions
Practice the principle of abstraction by creating classes to represent a resume or an job history for a person like you might see on LinkedIn.
Design the Classes
You program should contain two classes one for a Job and one for the Resume itself, as follows:
Class: Job
- Responsibilities:
- Keeps track of the company, job title, start year, and end year.
- Behaviors:
- Displays the job information in the format "
Job Title (Company) StartYear-EndYear", for example: "Software Engineer (Microsoft) 2019-2022".
Class: Resume
- Responsibilities:
- Keeps track of the person's name and a list of their jobs.
- Behaviors:
- Displays the resume, which shows the name first, followed by displaying each one of the jobs.
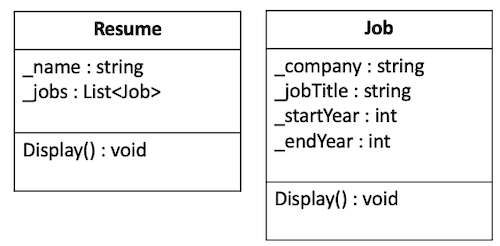
Based on these descriptions, you could create class diagrams like the following:
Start the Project
- Open the class project in VS Code.
- Navigate to the
Learning02project in thepreparefolder. Find theProgram.csfile, which will be your entry point for the program. - Verify that you can run the project and see the beginning "Hello World" output.
Create the Job class
- Create a new file for your job class. By convention this should be named
Job.cs. - Create the class (Hint this is the
public class Jobsyntax). - Create member variables in the class for each element that this class should contain. By convention these member variables should begin with an underscore and a lowercase letter such as
_jobTitle.
Test your Job class
- Back in your Program.cs file, add code to your
Mainfunction. - Create a new job instance named
job1. - Set the member variables using the dot notation (for example,
job1._jobTitle = "Software Engineer"; - Verify that you can display the company of this job on the screen, again using the dot notation to access the member variable.
- Create a second job, set its variables, display this company on the screen as well.
Sample Output
Microsoft
Apple
Add a Display method to the Job class
- Return to your
Job.csfile and add a method (member function) to display the job details. This method should not have any parameters and does not need to return anything. By convention, this method should begin with a capital letter, such asDisplay, and if you have multiple words each word should be capitalized, such asDisplayJobDetails. - This method should display the job details on the screen in the correct format. Remember that the method can access the member variables directly, without needing them to be passed into it.
- Return to your
Program.csfile. Remove the lines of code where you displayed the company earlier, and replace them with calls to your new method. Remember that you call the method using the same dot notation such asjob1.Display();.
Sample Output
Software Engineer (Microsoft) 2019-2022
Manager (Apple) 2022-2023
Create the Resume class
- Create a new file for your
Resumeclass. Each class should be in its own file and the file name should match the name of the class. - Create the
Resumeclass. - Create the member variable for the person's name.
- Create the member variable for the list of Jobs. (Hint: the data type for this should be
List<Job>, and it is probably easiest to initialize this to a new list right when you declare it..)
Test your Resume class
- Return to your
Program.cs. Add the end of theMainfunction, create a new instance of theResumeclass. - Add the two jobs you created earlier, to the list of jobs in the resume object.
- Verify that you can access and display the first job title using dot notation similar to
myResume._jobs[0]._jobTitle.
Add a Display method to the Resume class
- Return to your
Resumeclass and add a method to display its details. - This method should not have any parameters and should not return anything.
- In the method body, you should display the person's name and then iterate through each
Jobinstance in the list of jobs and display them. - Hint: remember that you can call each job's
Displaymethod that you created earlier. - Return to your main function, remove any code that is displaying information, and instead, add a call at the end to the
Displaymethod from yourResumeclass to display the name and all the jobs in one line.
Sample Output
Name: Allison Rose
Jobs:
Software Engineer (Microsoft) 2019-2022
Manager (Apple) 2022-2023
Sample Solution
When you have finished please compare your approach to the following sample solution (you may also use this sample solution as a guide if you need help finishing).
Submission
- Verify that your program works as described.
- Commit and push your code to your GitHub repository.
- Verify that you can see your updated code at GitHub.
- Submit the I-Learn quiz to report on your work.