W02: Programming Task
Overview
You will build your cse121b site home page named index.html. The structure,
style, and some of the responsive menu programming will be provided. The task is to complete a
series of programming enhancements to supply content to this new page using JavaScript
document manipulation.
💡 In order for the script to affect the HTML document, the HTML must
reference the source of the JavaScript so that the HTML DOM can be manipulated (edited).
This
JavaScript file(s) will be external to the HTML document. The <script>
element will be used to reference the external JS file.
Instructions
Setup

- Download the starter files, unzip the files, and
place those unzipped files and folders as given into the cse121b folder.
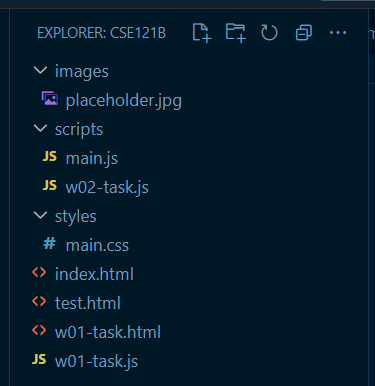
The starter files contain an
index.htmlfile and three folders namedscripts,styles, andimages. There are two .js files inscripts, one image file inimages, and one css file instyles. The only file you will be modifying to complete this assignment is namedw02-task.jsin thescriptsfolder. You will be adding one (1) image file to theimagesfolder. - Test the page in your local browser by using Open with Live Server on the
index.htmlfile. - Place an image of yourself into the
imagesfolder by dragging and dropping the image file into the images folder in VS Code or by using your operating system's file manager. The image should be at least 300 pixels in width and at least 300 pixels in height but does not need to be a square.
placeholder.png file in the images folder or
delete it.
Variables
- Declare and instantiate a variable to hold your name. Identify the variable as
"
fullName".Check Your Understanding
let fullName = 'Patricia Juarez';constdeclaration is OK to use to declare this variable because the value will not change in this application.
💡You can use single quotes ('), double quotes ("), or backticks (`) to surround the string (sequence of characters) data type value. - Declare and instantiate a variable to hold the current year. Identify the variable as
"
currentYear". - Declare and instantiate a variable to hold the file path (location) and file name of the
image that you placed in the images folder as a string. Identify the variable as
"
profilePicture".Example path:'images/yourprofileimagename.png'
The file path will be relative to the location of the HTML document and the name and type of image matches your own image.
Set the HTML Element Variables
- Use the
document.getElementById()method to get the HTML element with theidofnameand store it in a const variable named "nameElement".Check Your Understanding
const nameElement = document.getElementById('name');🚑 getElementById - MDN Web Docs - Use the
document.getElementById()method to get the HTML element with theidoffoodand store it in a const variable named "foodElement". - Use the
document.querySelector()method to get the element with the id of "year" and store it in a variable named "yearElement".Check Your Understanding
const yearElement = document.querySelector('#year');🚑 querySelector - MDN Web Docs
Note the#in the selector string to indicate the id attribute value. 🪲This syntax detail is often missed. - Use any viable method to get the profile image element stored into a variable named
"
imageElement".🚫Do NOT edit the HTML markup in the HTML page.
Adding Content to the Document
- Assign the
nameElement'sinnerHTMLproperty thefullNamevariable value. - Surround the
fullNamevalue with<strong>tags.💡Use a template literal to create the string with HTML tags.Check Your Understanding
💡Note that using thenameElement.innerHTML = `<strong>${fullName}</strong>`;textContentproperty instead ofinnerHTMLin this example would not work because the expression contains HTML markup that needs to be rendered. UsingtextContentwill render the HTML markup as text, which is not what is wanted. - Use the
textContentproperty to set the value of the element to the value of the variablecurrentYear. - Use the setAttribute method to set the
srcproperty of the image element and set its value to the file path variable set in Step 2.Check Your Understanding
imageElement.setAttribute('src', profilePicture);Alternatively, you can use thesrcproperty directly to set the value of the image element'ssrcproperty. - Use the
setAttributemethod to set thealtproperty of the image element and set its value to equal'Profile image of [Insert Name Variable]'where the name variable comes from Step 2. Always use a template literal to create the string.

Arrays
- Declare an array variable to hold your favorite foods.
Hint
Use[]and fill it with your favorite foods as strings. What you name the array variable is up to you. - Modify the HTML element with the id of
foodto display your favorite foods array. 💡Remember that you set a variable namedfoodElementin Step 3 to reference the element with theidoffood. - Declare and instantiate a variable to hold another single favorite food item.
- Add the value stored in this new variable to your favorite food array.
Hint
Use the arraypush()method to add the new item to the array. - Append the new array values onto the displayed content of the HTML element with the id of
foodusing a+=operator and a<br>(line break character) to provide a line break as shown in Figure 2.Check Your Understanding
foodElement.innerHTML += `<br>${favFoods}`; - Remove the first element in the favorite food array.
- Again, append the array output showing the modified array, using a line break as shown in step 5.5.
- Remove the last element in the favorite food array.
- Append the array output with this final modified favorite foods array. Hint: Step 5.5.
Testing
- Test your work locally by using Live Server and debug and fix your code as needed.
Submission
- Commit and push your work to GitHub.
- Submit the your GitHub Pages enabled cse121b URL in Canvas.
💡Here is an example of what the URL should look like:
https://yourgithubusername.github.io/cse121bThis points to the home page of your cse121b site (the index.html file which does not need to be in the URL reference because it is the default file)
