Prepare 03: Database Design and Creation
This week you will...
- design and create a simple database using the first three normal forms.
- continue to refine your skills designing proper relationships between entities.
- learn how to enter data into a database.
- learn commands to create different parts of the database.
- learn commands to edit data
Instructions
This material will help you build a foundation for this week's topic. Test your understanding by taking this week's prepare quiz in Canvas. The quiz is open book and open note. You may retake the quiz up to 3 times to improve your score.
Terms to Know
- Database design:
- Organizing data to minimize redundancy and ensure data integrity and consistency.
- Normal Forms:
- A set of rules that if applied to data reduces data redundancy and attributes of each entity are organized in a way that increases data integrity and consistency.
- First Normal Form (1NF):
- Each cell of the table should only have one single (scalar) value and there should be no repeating columns. The table should also have a primary key.
- Second Normal Form (2NF):
- Every non-key column must depend on the entire primary key (both parts of a composite primary key).
- Third Normal Form (3NF):
- Every non-key column must depend only on the primary key (a single value primary key).
- De-normalizing:
- Ignoring some normal forms if it improves performance of a database.
- CRUD (Create, Read, Update and Delete):
- These are the four basic functions of relational databases.
- DDL (Data Definition Language):
- SQL commands that are used to define the database, to create and modify the actual structure of the database. Examples are CREATE, ALTER and DROP.
- DML (Data Manipulation Language):
- SQL commands that deal with manipulating data in the database. Examples are INSERT, UPDATE, and DELETE.
- CREATE:
- SQL command that will create new schemas, databases or tables.
- INSERT:
- SQL commands to add data into tables.
- UPDATE:
- SQL command to modify or edit data in tables. Always use a WHERE clause with UPDATE.
- DELETE:
- SQL command to delete data in tables. Always use a WHERE clause with DELETE.
- DROP:
- SQL command to delete not only data in the table but the table definition itself. So, the entire table is completely deleted.
- Referential Integrity:
- Implies that relationships among data should be enforced to guarantee the relationship between rows in two tables will remain synchronized during all updates and deletes.
- Foreign Key Constraints:
- Enforces referential integrity by guaranteeing that changes cannot be made to data in the primary table if those changes invalidate the link to data in the foreign key table.
Designing a Database
Watch the Normalization Video
Database Design
With database design we are trying to organize the data in such a way that redundancy is minimized without losing any data. Redundancy is when we repeat the same data more than once. For example, each time a student registers for a class their name and address might be repeated for each class in which they are registered. Another way you might have repeating data is if you have a list of those same students and their addresses in a separate file listing parking passes or ticket violations. Say the student's address changes, then changing the address would mean editing in different locations; not only in multiple places in registration, but also in a different file at the parking office. There is a greater chance of making a data entry mistake when you must edit in multiple places. It takes more time and resources as well. Having multiple copies of information also increases the chances for unauthorized access to data that should be secure.
Good design also means our data should be accurate and reliable. Setting up constraints on our data is a good way to ensure it has integrity and is consistent. We learned about what data integrity and data consistency were earlier and now we will see this in action as we design a database.
For relational database design, reducing redundancy means splitting the data up into separate entities or tables to minimize redundancy. But it is not always clear how to do this, especially with large 'real-life' databases. Database design can be complex. You may not be the person who will design a database, usually this is the database administrator, but knowing the proper way to design a database will help you understand the structure of the database you work with.
The Statement of Work
It is wise to start with determining what output is needed and work backwards from there to determine what data is even going to be used in the database. As you analyze the needs of the business you can determine what is needed for the database. This may require a lengthy time period to accomplish. Remember this process can begin with the Statement of Work (SOW) that was covered earlier. A SOW is a document that describes the work that needs to be done on a project. It can help clarify the project for both the users and the database designer.
Basic Steps for Proper Design
Relational databases model real-world environments. The designer must analyze the real-world system and design it into a relational database.
A data model organizes data and standardizes how the data relate to each other. The purpose of the model is to show the data needed and created by business processes. The data model determines the structure of data and the relationships and constraints of the data.
Let's look at an example of designing for a system that uses books and their associated information as output. Here's a flat file showing all the data that is needed for the system:
| ISBN | Title | Author | Author Address | Publisher | Publisher Address |
|---|---|---|---|---|---|
| 1-1111-1111-1 | Intro to Databases | Sue Smith | 123 Street | Acme Publishing | 60 Main Street |
| 2-2222-2222-2 | Database Design | John Jones | 44 Fourth Ave | Frontier Inc | 25th N 700 E |
| 3-3333-3333-3 | Data Retrieval | Sue Smith | 123 Street | Budd Publisher | 345 Allen Blvd |
| 4-4444-4444-4 | Data Types | Tim, Thomas, John Jones | 67 E Bird Blvd, 44 Fourth Ave | Acme Publishing | 60 Main Street |
| 5-5555-5555-5 | Queries for Fun | Mary Miller | 32 Launa Dr | Perfect Inc | 309 Wish Way |
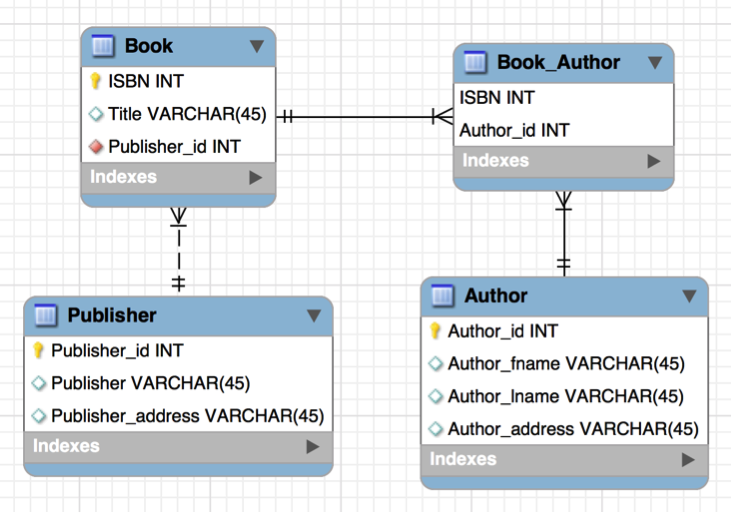
Each book is listed with the international standard book number (ISBN), title, author, and publisher. For relational databases, one table in the database will represent one entity in the real world with each row being one instance of that entity and one column storing an attribute associated with that entity.
Step 1 - Each table should be only one real-world entity.
In the table above, there are 3 different entities: books, authors and publishers. In the table, we see some of the authors and publishers are repeated. Remember we want to eliminate redundancy.
In the table above, the first two columns belong to the real world entity of books. The next two columns belong to the entity of author, and the last two columns belong to the entity of publisher. If we separate the data into 3 tables, we can eliminate the redundancy and have Sue Smith and Acme Publishing listed only once.
| ISBN | Title |
|---|---|
| 1-1111-1111-1 | Intro to Databases |
| 2-2222-2222-2 | Database Design |
| 3-3333-3333-3 | Data Retrieval |
| 4-4444-4444-4 | Data Types |
| 5-5555-5555-5 | Queries for Fun |
| Author | Author Address |
|---|---|
| Sue Smith | 123 Street |
| John Jones | 44 Fourth Ave |
| Tim Thomas | 67 E Bird Blvd |
| Mary Miller | 32 Launa Dr. |
| Publisher | Publisher Address |
|---|---|
| Acme Publishing | 60 Main Street |
| Frontier Inc | 25th N 700 E |
| Budd Publisher | 345 Allen Blvd |
| Perfect Inc | 309 Wish Way |
Differentiating between entities and attributes within those entities, can be tricky sometimes. For example, maybe we find that we want to store both of the author's home address and work address. Suddenly the address attributes of the author's table would become a separate table called Author Address with a foreign key that relates to the author's primary key. You will ultimately make these decisions based on what output is needed from the database. For now we will leave the entities as they are.
Step 2 - Identify primary and foreign keys.
The book entity already has a great natural key that uniquely identifies each book; the ISBN. But there is a possibility of two different authors having the same name or even publishing companies having the same name, so we need a unique primary key for each of those tables. Here they have been assigned surrogate keys for the primary keys. A surrogate key is a key that the system automatically assigns to each row to each row unique.
| Author ID | Author | Author Address |
|---|---|---|
| 22 | Sue Smith | 123 Street |
| 23 | John Jones | 44 Fourth Ave |
| 24 | Tim Thomas | 67 E Bird Blvd |
| 25 | Mary Miller | 32 Launa Dr. |
| Publisher ID | Publisher | Publisher Address |
|---|---|---|
| 001 | Acme Publishing | 60 Main Street |
| 002 | Frontier Inc | 25th N 700 E |
| 003 | Budd Publisher | 345 Allen Blvd |
| 004 | Perfect Inc | 309 Wish Way |
Let's look at the relationships of the entities now, which will help us establish the foreign keys. The relationship between Publishers and Books is one to many. A book belongs to one publisher and a publisher can publish many books. The foreign key will be located in the table with the many part of the relationship. So the primary key of Publisher becomes a foreign key of Books. Notice how Acme Publishing, 001 is listed multiple times as a foreign key in the Book table. They are the publisher for two different books, 'Intro to Databases' and 'Date Types'.
| ISBN | Publisher ID | Title |
|---|---|---|
| 1-1111-1111-1 | 001 | Intro to Databases |
| 2-2222-2222-2 | 002 | Database Design |
| 3-3333-3333-3 | 003 | Data Retrieval |
| 4-4444-4444-4 | 001 | Data Types |
| 5-5555-5555-5 | 004 | Queries for Fun |
| Publisher ID | Publisher | Publisher Address |
|---|---|---|
| 001 | Acme Publishing | 60 Main Street |
| 002 | Frontier Inc | 25th N 700 E |
| 003 | Budd Publisher | 345 Allen Blvd |
| 004 | Perfect Inc | 309 Wish Way |
The Books and Authors tables have a many-to-many relationship; each book can have many authors, and each author can write many books. Therefore, there will be a linking table between the two tables to resolve the many-to-many into 2 one-to-many relationships. The linking table will have the foreign keys made up of each primary key of the other tables. So in our linking table we have a composite primary key, meaning two attributes together ensure each row is unique. Together these two foreign keys make up the primary key of the linking table. We have author ID 22 repeated a few times and ISBN 4-4444-4444-4 repeated a few times but when we put each foreign key together with the other foreign key they uniquely identify each row. No two rows have both those attributes together exactly the same. We can see the many-to- many being resolved here. Sue is the author of multiple books and the book 'Data Types' has two authors. And it is all designed properly now for a relational database.
| ISBN | Publisher ID | Title |
|---|---|---|
| 1-1111-1111-1 | 001 | Intro to Databases |
| 2-2222-2222-2 | 002 | Database Design |
| 3-3333-3333-3 | 003 | Data Retrieval |
| 4-4444-4444-4 | 001 | Data Types |
| 5-5555-5555-5 | 004 | Queries for Fun |
| ISBN | Author ID |
|---|---|
| 1-1111-1111-1 | 22 |
| 2-2222-2222-2 | 23 |
| 3-3333-3333-3 | 22 |
| 4-4444-4444-4 | 23 |
| 4-4444-4444-4 | 24 |
| 5-5555-5555-5 | 25 |
| Author ID | Author | Author Address |
|---|---|---|
| 22 | Sue Smith | 123 Street |
| 23 | John Jones | 44 Fourth Ave |
| 24 | Tim Thomas | 67 E Bird Blvd |
| 25 | Mary Miller | 32 Launa Dr. |
Step 3 - Make sure the data is normalized.
Separating the data into real-world entities and establishing relationships and reducing redundancy are is part of normalizing the data. But there are a standard set of steps to follow to ensure your data is normalized.
There are 7 normal forms that must be applied in order. Our course covers the first 3 normal forms.
First Normal Form (1NF) - The value stored at the intersection of each row and column must be a scalar value, and the table must not contain any repeating columns. Scalar means ' being described as a single value that might belong to a number of fields, but itself is one value. The table should also have a primary key.
Second Normal Form (2NF) - Every non-key column must depend on the entire primary key. This normal form has to do with composite keys where each field in the row has to rely on both parts of the composite primary key.
Third Normal Form (3NF) - Every non-key column must depend only on the primary key. Like 2NF but now we are looking at only the one part primary key.
By following normalization rules (or normal forms) we reduce data redundancy. The attributes of each entity are organized in a way that increases data consistency.
Normalization is a great design to maintain data consistency, however, sometimes normalization can slow performance to a point where a database engineer may chose to denormalize the data to improve performance. Denormalizing can ignore some normal forms if the organization see this as a benefit to the system.
Entering and Editing Data
The Structured Query Language (SQL) is used to enter and change data. Here are a few basic SQL statements.
INSERT Statement
The Insert statement is used to add rows to a table.
INSERT Statement Syntax:
INSERT INTO table_name (column_list) VALUES (value_list)
Let's add some data to the course table. Here are the column definitions as shown in Workbench:
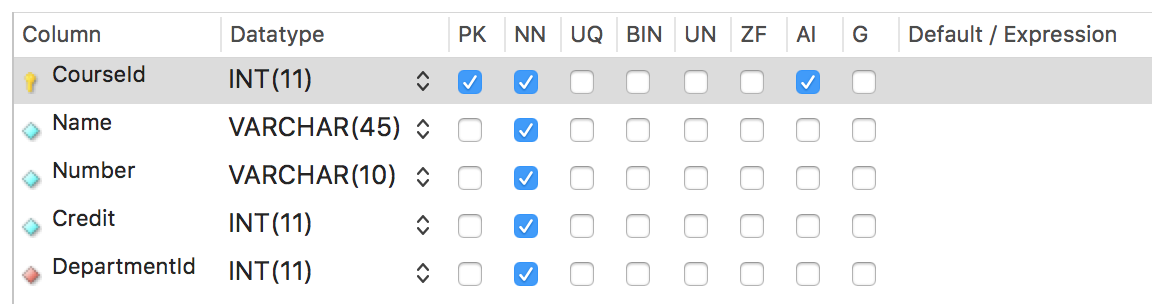
There are two different ways to add one or more rows of data to your tables with the INSERT statement.
The first way is without a column list. With this method, every column in the table must have a value and it must be entered in the proper column order as it was defined in the column definitions.
No Column List, One Row
INSERT INTO course VALUES
  (1, 'Intro to Databases', '111', 3, 1);
No Column List, Multiple Rows
INSERT INTO course VALUES
  (2, 'Economics', '388', 4, 2),
  (3, 'Micro Economics', '150', 3, 2),
  (4, 'Classical Heritage', '376', 2, 3);
The second way is with a column list. The columns in the list don't have to be in any particular order, but the values must be in the same order as the columns are listed in the INSERT statement. Here we have left the same order of columns that is shown in the column definition image but we don't have to keep that order.
Using a Column List, One Row
INSERT INTO course
  (courseid, name, number, credit, departmentid)
VALUES
  (1, 'Intro to Databases', '111', 3, 1);
Using a Column List, Multiple Rows
INSERT INTO course
  (courseid, name, number, credit, departmentid)
VALUES
  (2, 'Economics', '388', 4, 2),
  (3, 'Micro Economics', '150', 3, 2),
  (4, 'Classical Heritage', '376', 2, 3);
Let's look at the artist table column definitions in Workbench:
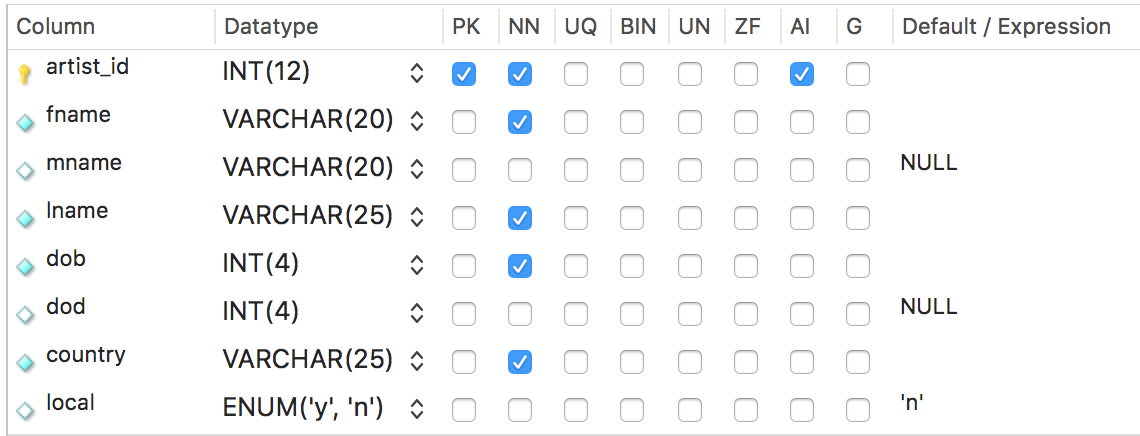
Two columns in the Artist table have NULL as the default value if nothing is entered for that column. The local column in the artist table has a default value of 'n'. That column tells us whether an artist is local or not. Most artists are not local, so the value of 'n' will be inserted into that column if no other value is placed there as data is entered for that row. Also notice that the artist_id is set up as auto-increment (AI).
We can insert data into this table in a few different ways.
We can use the keyword of DEFAULT instead of an actual integer for any auto-incremented field. And we can also use NULL to leave a data value null. Or DEFAULT to enter the default value.
INSERT INTO artist VALUES
(DEFAULT, 'Vincent', NULL, 'van Gogh', '1853', NULL, 'France', DEFAULT);
Since we already defined NULL in our column definitions for mname and dod, we could have also used DEFAULT for mname and dod instead of NULL.
Or this INSERT would do the same thing.
INSERT INTO artist
  (fname, lname, dob, country)
VALUES
  ('Vincent', 'van Gogh', '1853', 'France');
Because we have an auto-increment for artist_id, it will be filled in automatically and mname, dod, and local will all get the default values filled in automatically from the column definitions.
You can also enter data into your tables in the table view in Workbench without using the SQL INSERT command. When you apply the data you've entered, it will create an INSERT statement for you to run. When entering a string or string literal this way, you don't have to put quotes around the string value.
UPDATE Statement
The Update statement is used to modify an existing row in a table.
UPDATE Statement Syntax:
UPDATE table_name
SET column_name = expresson
WHERE search_condition
If we wanted to change Vincent Van Gogh's first name to Vinny we could use this UPDATE statement.
UPDATE artist
SET fname = 'Vinny'
WHERE artist_id = 2;
DELETE Statement
The delete statement is used to remove an existing row from a table.
The DELETE Statement Syntax:
DELETE FROM table_name
WHERE search_condition
If we wanted to delete the van Gogh row from our table, we could use this DELETE statement.
DELETE FROM artist
WHERE lname = 'van Gogh';
Don't forget to always use a WHERE clause with UPDATE and DELETE. Otherwise, every row in the table will be UPDATED or DELETED. You might need to turn off the Safe Mode in Workbench by going to 'Preferences' ' 'SQL Editor' and uncheck 'Safe Updates' near the bottom of the preferences there. Remember there is no undo button once you run a UPDATE or DELETE statement.
The way we create our database this week, we will not need to use the CREATE command because Workbench does that for us in the forward engineering from our ERD to the database. We also should not need to use DROP to delete any of our tables or any of our databases. If you need to delete a table or database from Workbench because you made a mistake or want to start over, you can run a DROP statement but be careful not to drop something you don't mean to. You can also right click the table or database name from your schema list in Workbench and drop them that way. Be very careful with the DROP command. There is no undo button.
Referential Integrity and Foreign Key Constraints
Referential Integrity implies that relationships among tables should be enforced. This guarantees that relationships between rows in two tables remain synchronized during all updates and deletes. When we create a database from our ERD diagram the foreign keys are by default mandatory. In other words, MySQL is enforcing the relationships between tables. This is referred to as Foreign Key Constraints. This constraint enforces the referential integrity by guaranteeing that changes cannot be made to data in the primary key table if those changes invalidate the link to data in the foreign key table.
This is important to know because, as we enter insert, update, and delete data in our tables, we cannot delete a row of data that has a foreign key associated with the primary key of that row in another table. We also cannot add a row to a table with a foreign key that does not already exist as a primary key of another table.
Also, if an attempt is made to insert a row into a table that uses a foreign key that doesn't exist as a primary key in another table, the action will fail. If an attempt is made to delete a row in a primary key table or to update a primary key value, the action will fail when the deleted or updated primary key value corresponds to a foreign key value of another table. All links to that primary key would have to be deleted first before you could delete or update that primary key.
Submission
Take the Week 3 Prepare quiz in Canvas
You may use this quizlet to help you study the terms.
Useful Links:
- Next Activity: Movie Database Design
- Go to: Week Index • Course Home • Canvas